Soft Foliage Shader Breakdown
Intro
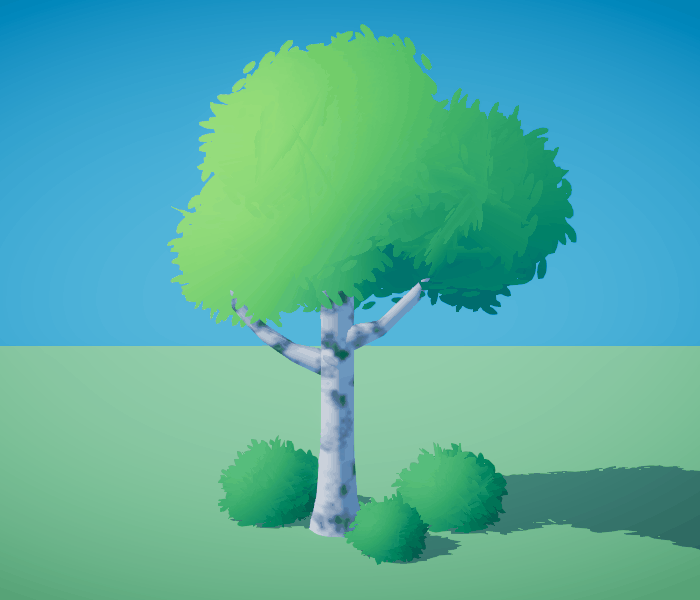
This is a foliage shader that is applied to mesh consisting of intersecting quads generated from a particle system. It uses adjusted normals to provide a soft shading, alpha clipping with foliage texture and a small amount of vertex displacement to simulate wind.
I posted the shader on my twitter as linked above back in Dec 2020. This post provides a slightly updated version and full breakdown of the setup.
Notes
- This is an Unlit shader using Opaque surface mode and Alpha Clipping to discard pixels to produce the foliage shape (based on a texture).
- Uses the Main Light subgraph from my custom lighting functions on github. You can add them to your project in the Package Manager using the HTTPS link with .git appended, or download and put the files in your assets manually.
- Doesn’t receive shadows, though that could be added with the use of the Main Light Shadows subgraph (e.g. using a Multiply before the colour gradient is applied). With receiving shadows, the quads in the foliage mesh can cast shadows onto itself making the quads much more obvious. I personally prefer not including it for a softer result.
Breakdown
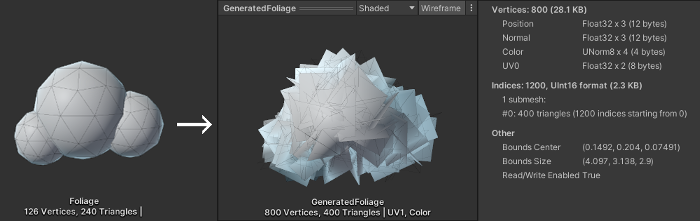
Foliage Mesh
Before going into the Shader Graph, it’s important that we have a mesh to use for the effect. As mentioned, we’re using intersecting quads which allows us to view the foliage from any direction. Alternatives might be billboarding but that might look obvious as quads move to face the camera which is something I wanted to avoid.
There is likely many ways to generate the mesh for this effect, but I’m using the Particle System component as it can spawn quads as particles, and it’s possible to spawn them based on a Mesh. We can then convert the particles to a new mesh using ParticleSystemRenderer.BakeMesh (which is a really handy function to be aware of, and I totally didn’t write a custom one before discovering it). The mesh is then saved as an asset using AssetDatabase.CreateAsset (or EditorUtility.CopySerialized to override an existing mesh without breaking references).
Create an empty GameObject and add the Particle System component. My Particle System has the following settings :
Main Module :
- Looping : false
- Start Lifetime : 999
- Start Speed : 0
- Start Size : 1
- 3D Start Rotation : true, set to Random Between Two Constants using the small arrow on the right, set each axis to between 0 and 360.
- Max Particles : 200
Emission Module :
- Rate over Time : 0
- Add a single Burst, with a count of 200 particles
Shape Module :
- Shape : Mesh, Type : Triangle, Mesh : A custom mesh (an example is shown in a later image). Each triangle in the mesh spawns a quad.
- Normal Offset : -0.25
- Depending on the mesh, may want to adjust Rotation/Scale. Can also rotate/scale the gameobject as the BakeMesh takes that into account as it’s second parameter is set to true.
Renderer Module :
- Render Alignment : Local (this is what stops the billboards always facing the camera)
Next, create a new C# script named “BakeParticleSystemToMesh” and copy the following into it :
|
|
We can add this component to our GameObject. In the Scene View we click the Play/Restart on the Particle Effect window to spawn the particles. Then right-click the BakeParticleSystemToMesh script (or use the “…” button) and select Bake To Mesh Asset, which appears in the dropdown thanks to the ContextMenu attribute used.
Alternatively, use a custom inspector to add a Bake button which calls the same function, by placing the following script (BakeParticleSystemToMeshEditor) in a folder named “Editor” :
|
|
The generated mesh is saved in the folder (under Assets) with the name specified on the BakeParticleSystemToMesh component. This particle system GameObject is no longer required and could be deleted - However it may be useful to keep it (e.g. saved as a prefab) for generating more foliage meshes later so you don’t have to change the settings again.
For the soft shading, we have a choice as we can either alter the normals of our mesh to point outwards, or we can use the Position later in the shader to create a vector used for the shading. If we require static/dynamic batching, we should calculate the normals and store them now as it’ll combine meshes which will alter the origin (and model matrix) used in those calculations (specifically clearing it to an identity matrix as the transform will be baked into the vertex shader input).
Calculating the required normals isn’t too difficult, we use the vertex positions and normalise them, the script above already has this included. Make sure to change the Handle Normals setting to Normalised Vertex Pos. If you’d rather handle it in the shader, you can still generate the normals or clear them to save on memory.
With the mesh generated, we can now create a new GameObject, add a Mesh Renderer and a Mesh Filter with the new foliage mesh assigned.
Shader Graph
For the shader, I’m using an Unlit Graph but applying some custom lighting (Main Light only, optional shadow receiving). The same concept may work for the PBR / Lit Graph too though. Create a new Material using the graph and assign it to the Mesh Renderer.
First up, we need to create a Texture2D property that is used for our foliage texture. I’m using the following texture that I threw together quite quickly in GIMP. (Feel free to use it if you want, or make your own)

We use a Sample Texture 2D node to sample it, and put one of the outputs into the Alpha port on the Master Stack (or Unlit Master node).
Every channel of the texture is basically the same so it isn’t too important which is used. If the texture is compressed the alpha channel likely uses more bits but we could also remove the alpha on the texture import to save memory. Usually the G channel is stored with more bits than the red/blue when compressed so I’m using that - there likely won’t be any visible difference between them all for this texture though.
To optimise the texture further, it could likely be made smaller and converting the shape to a distance field may help too (discussed briefly in my sprite glow/outline breakdown).
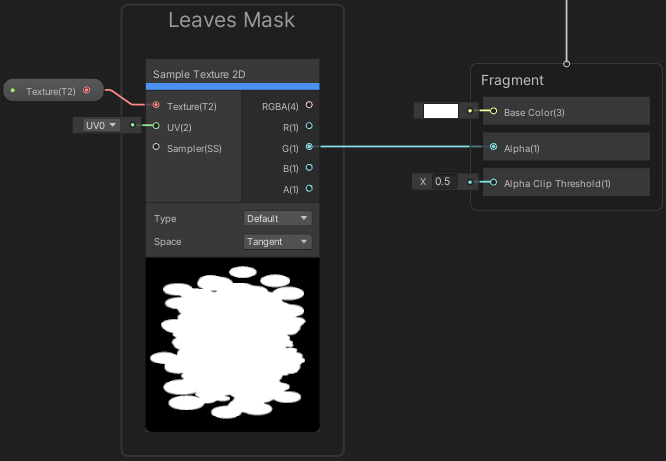
The shader is Opaque as that is best to prevent sorting issues, but in order to get the foliage shape we need to make sure Alpha Clipping is enabled via the Graph Inspector (if in v10+). We’ll set the Alpha Clip Threshold port to 0.5. The shader will now clip/remove any pixels where the Alpha port is below the threshold, which is mainly the black parts of the texture (since 0 < 0.5).
Shading
For the shading I’m using the Lambertian diffuse calculation, which is a dot product between the normal and light direction. If the normals were edited in the mesh, we can use the Normal Vector node to obtain them.
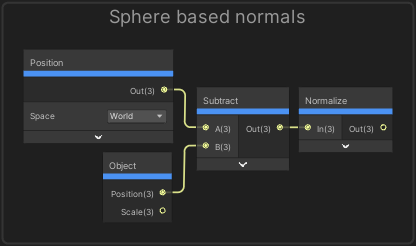
If you’d rather calculate the required normals in the shader, we can do so using the Position node in World space and Subtract the Position output from the Object node (which is the world space position of the origin of the GameObject/Transform). We then need to Normalize the result. (As mentioned previously, be aware that this calculation won’t produce the correct results for meshes batched using static/dynamic batching, or particle systems)
We can then use a Dot Product between the (stored or calculated) normal and Light Direction, obtained using a Sub Graph named Main Light, which contains a Custom Function node calling GetMainLight(). I have shared some custom lighting functions on github which includes this. (You can add them to your project in the Package Manager using the HTTPS link with .git appended, or download and put the files in your assets manually)
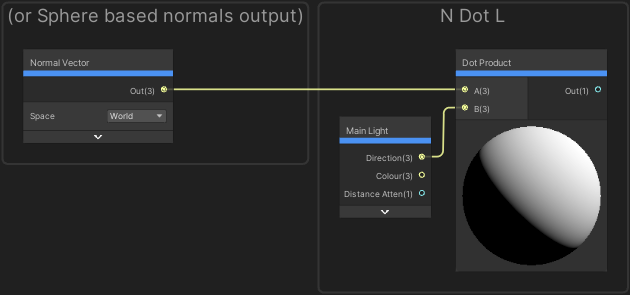
The output of the Dot Product is in a -1 to 1 range, so we can use an Inverse Lerp (or Remap) to remap it to a 0 to 1 range with -1 and 1 as the A and B inputs (or In Min Max). For most objects you usually don’t remap this and have half of the object darker but this shading looks strange for foliage as it should allow some light to pass through.
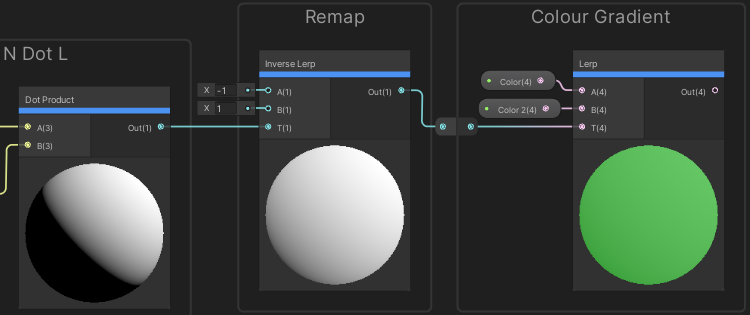
To apply some colour to the remapped gradient, we put the output into the T of a Lerp node and assign some Color properties to the A and B inputs. This allows us to interpolate between the two colours. With this put into the Base Color port of the Master Stack (or Color of Unlit Master node) we get the soft shading that we wanted :
If you wanted vertex colours to be taken into account too, you should Multiply the result with the Vertex Color node before putting it into the Base Color.
Wind
To handle the wind we’re displacing the vertices. There may be a few ways to go about doing this depending on the accuracy needed (e.g. could use noise / texture sample). I’m using a sine wave to give a slight swaying motion to give the impression that a light wind is affecting them. This will only affect the foliage, however it may be possible to extend the same method to the tree branches too - with an additional method of controlling the weight of the offset (e.g. painting vertex colours), so the bottom of the trunk doesn’t move as much as the ends of branches.
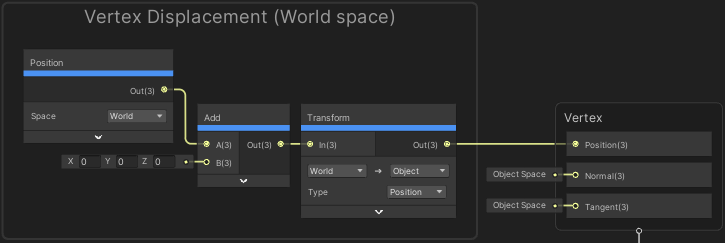
The Master Stack/Node expects the Vertex Position to be in Object space. The regular input would be the Position node set to Object space, which gives us the vertex positions. We could then use an Add or Subtract to offset it. However, if we imagine offsetting all the vertices by (1,0,0) it’ll shift the mesh on the local X axis. If we rotate the GameObject that direction will change which might look strange for wind. The scale would also affect the amount of displacement.
Ideally, we would want the wind direction to remain constant for all objects in the scene so should instead use a Position node in World space, Add, then Transform it back to Object at the end. We’ll come back to what goes in the second port on the Add later.
For the swaying motion we’re using the Sine node. The sine wave should be based on Time so we need the Time node, with a Multiply to control the speed (aka time-based frequency of the wave, set to 2), you can create a Vector1 property for this if you want control from the material inspector.
We don’t want every vertex to move the same amount so should take the position into account. We use a Position node (World space), Split to obtain each component and add them together. Since it’s a Vector3 we only need to worry about the X, Y and Z (aka R, G and B). We’ll include another Multiply for this which will increase the position-based frequency of the wave, which I have set to 8.
Now we can Add these two frequencies together and input it into the Sine node. The range (or amplitude) of the wave is -1 to 1 which is far too large of an offset, so we also Multiply the output by 0.04 to lower that. Again could use a Vector1 property.
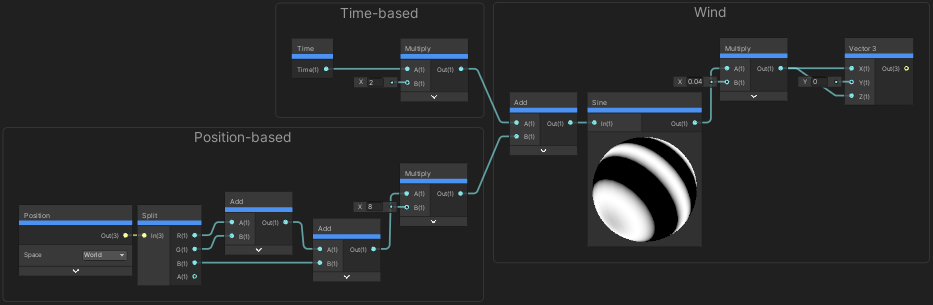
We put the result into a Vector3 node which is then put into the Add node in the Vertex Displacement group from earlier. I find the results to look best when the wind only affects the R/X and Z/B axis, especially for bushes/shrubs that are on the ground rather than trees.
Thanks for reading! 😊
If you find this post helpful, please consider sharing it with others / on socials
Donations are also greatly appreciated! 🙏✨
(Keeps this site free from ads and allows me to focus more on tutorials)