Sprite Glow/Outline Shader Breakdown
Intro
This shader uses a signed distance field (SDF), stored in the alpha channel of the sprite’s texture to create an outline or glow effect around the sprite. We can also produce “in-lines” or glow effects inside the sprite and have properties to control the colours and width of these outline/glow effects.
I wrote this mainly to show an alternative to the “using multiple texture samples offset in each direction” method which I’ve seen other tutorials use (e.g. this and this).
Notes
- The technique here could be used with any master node, but specifically I’m using the Sprite Unlit. If working with URP’s 2D Renderer, we can also use the Sprite Lit. Note however that it doesn’t have an “unlit” output (like the Emission on the PBR), so if you want the outline to glow you’ll need to overlay an Unlit Sprite ontop of the Lit one. This is what I did in the tweet above.
- Technically the distance field here isn’t actually “signed”, as it doesn’t contain negative values. It has been remapped and clamped to the 0-1 range. A value of 0.5 typically means a distance of 0 from the alpha edge of the original sprite depending on how it was generated.
- This should work for single sprites, sprite sheets, as well as sprites rigged using the 2D Animation package. (Be aware that each separated part of the rigged sprite will have the outline/glow however, regardless of how they are arranged after rigging/posing). You may need extra padding between the edges of the texture (and other sprites in the case of a sprite sheet) to account of the glow effect / SDF texture.
The technique works best with vector-based sprites, but it does require some setup and won’t work straight from a normal sprite texture. A SDF texture needs to be generated, which can be stored in the alpha channel of the original texture so only a single texture sample is required. I’ll be going through how I generated this texture in the breakdown below. Depending on how many sprites you want to apply the outline/glow effect to, this setup could take a while.
If you want to use it with pixel art sprites, but have the outlines/glow be smooth (as in not perfectly pixel based), the SDF texture would have to be stored in a separate file rather than combined into the alpha channel, possibly resized to be smaller, and sampled with Bilinear filtering, while the sprite texture would be sampled with Point filtering.
If you use it with pixel art sprites and want pixel-based outlines too, then you can still combine it into the alpha channel. It may be best to hand-draw the SDF to ensure the outline/glow is consistent, though this may take a while to setup. e.g.
Breakdown
SDF Texture Setup
Before we begin the shader graph, we need to have a sprite we want to outline and generate a distance field from it. Catlike Coding has a brilliant SDF Toolkit (Free version) on the Unity Asset store for this! (You’ll need to open the asset store window in your project, search for the tool and import it. There is also a paid version which provides some shaders, however they probably only work for the Built-in Pipeline).
For how to use the tool, see it’s documentation page here. You should generate the SDF using both inner and outer distances to account for the inner and outer glows. These distances should likely be set to the largest glow/outline you want to use. Be aware that you may need to resize the sprite/texture so the SDF doesn’t go outside the texture bounds.
I’ve also come across this article which mentions a method of generating a SDF from a texture through Photoshop if you prefer, (as well as a few other fairly advanced shader based techniques, but we don’t need those).
Once you have generated the SDF texture, you may want to open it in any image manipulation software along with the original sprite texture and use the SDF result as the alpha channel for the sprite. Personally I used GIMP for this – I’ll quickly go through the method I used :
- Open the result from the SDF Texture Generator. If the pixels are black, invert the colour (Right-click, Colors → Invert).
- Using the Rectangle Select tool, select the entire image and copy it (Ctrl+C).
- Open the sprite texture file, and on the Layers, right-click the layer and Remove Alpha Channel.
- Right-click it again, Add Layer Mask, select Layer’s alpha channel and add it.
- On the layer there should now be black box next to the texture, which shows the mask. With the layer mask selected, paste the SDF (Ctrl+V). A Floating Selection layer will be created, right-click this and Anchor Layer to apply it.
- It should now contain the SDF in the alpha channel of the texture, save the texture into your project (File → Export As). In Unity, you will then want to set the texture type to Sprite and use it in the place of your old sprite (assuming you didn’t override it). You can also delete the generated SDF texture.
With the sprite now containing the SDF in the alpha channel, we can move onto the actual shader graph!
Shader Graph
In order for this to work with sprites, we are using the Universal RP Sprite Unlit Master node. (We can also use Sprite Lit Master, but it won’t glow as it doesn’t have any emission-like output. The lit one will also only work when using the 2D Renderer and 2D Light sources. If you want the glow around a lit sprite you may need to use an unlit version of the sprite with the outline/glow, behind the lit one without the outline, which is what I did in the tweet example at the beginning of the post. Could also overlay the unlit one with only the outlines (without the regular sprite texture color) on top of the lit one).
First we need to set up a new Texture2D property, it can be named anything (e.g. Main Texture), but the Reference must be set to _MainTex so that it uses the sprite from the SpriteRenderer component. So our previews inside Shader Graph also show something, you should also assign the sprite to the property’s Default value.
We’ll also create some Vector1 properties to control the glow effects. For each of these, the Mode is set to Slider with Min/Max values of 0 and 1.
- Sprite Alpha Edge (Vector1), Default : 0.5 (may vary depending on the sprite’s alpha/SDF)
- Outer Edge (Vector1), Default : 1
- Outer Falloff (Vector1), Default : 1
- Inner Edge (Vector1), Default : 1
- Inner Falloff (Vector1), Default : 1
Next create a Sample Texture 2D node, put the Main Texture property as the Texture input and put the A (alpha) output into the In input on a Smoothstep node.
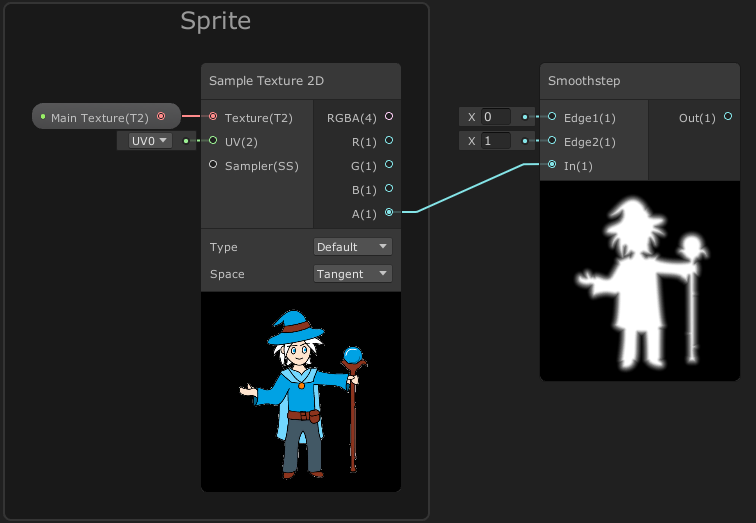
If you aren’t familiar with what a smoothstep does, it can remap values, similar to a Inverse Lerp, but it’s not linear – It uses a Hermite interpolation which means it’s gradient starts and ends at 0, gradually increasing at the start, and decreasing at the end. The output is also clamped between 0 and 1 (if you wanted to use the Inverse Lerp instead, you’d need to use a Saturate node too, to achieve this clamping).
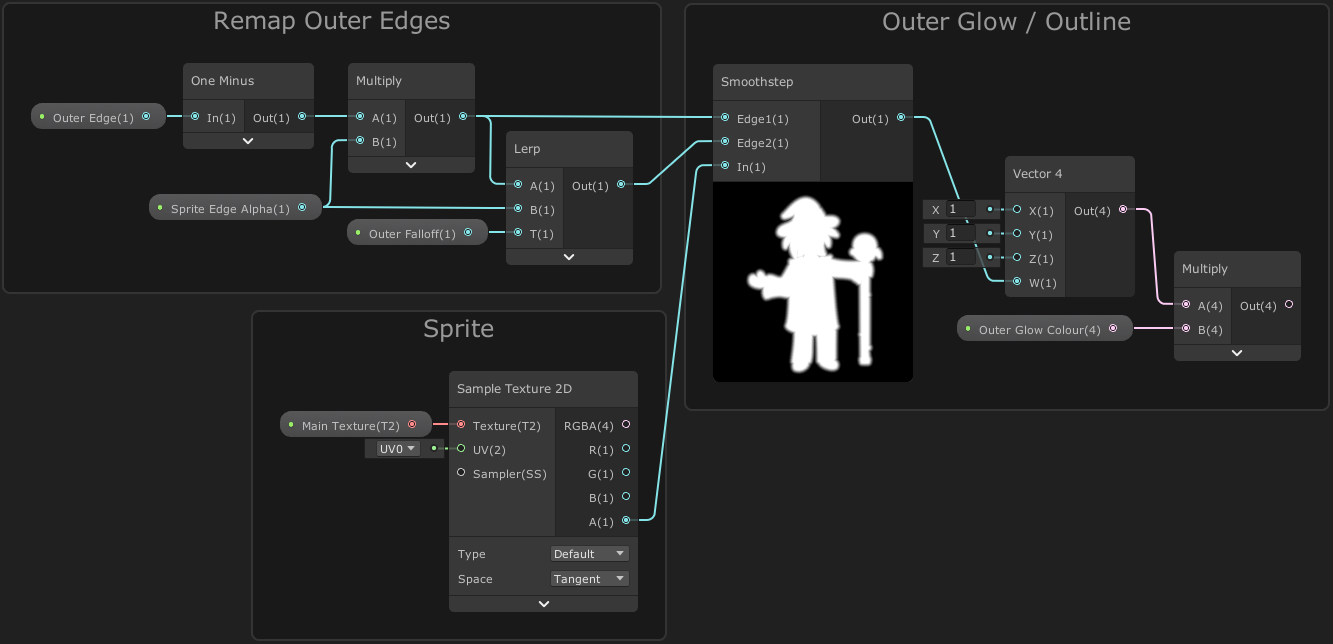
We’ll be using the Smoothstep to adjust the glow effect, such as change it’s width and falloff (so it has the option to be turned into a solid outline). While we could put properties straight into these Edge inputs, if the Edge2 input is smaller than the Edge1, the entire effect flips! To better control the values, I’m remapping the inputs slightly so that each property can be a 0-1 slider, based on the distance to the Sprite Edge Alpha.
We also don’t want the colour to be darkened by the Smoothstep output, so it’s first put into the A/W input on a Vector4 node, with the other inputs as 1, before multiplying it with an Outer Glow Colour property.
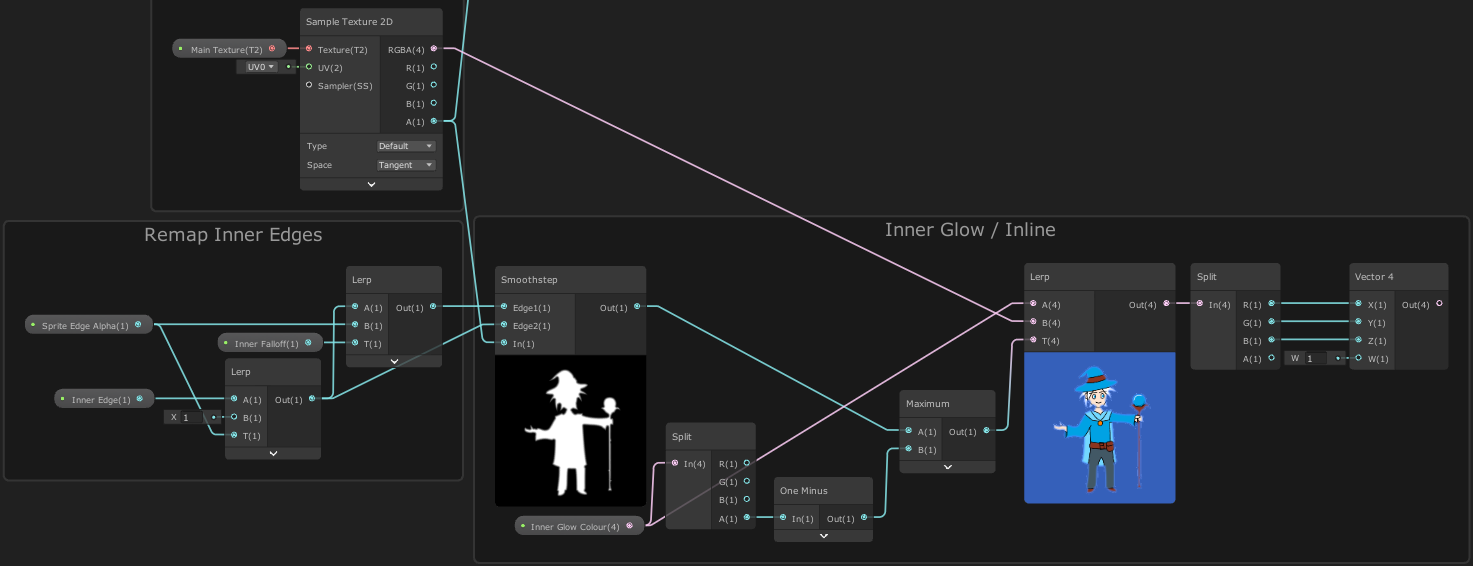
Next we’ll handle the inner glow effect, which is a similar setup. Again we use a Smoothstep, but this time we will also take the texture colour into account by using a Lerp node (with the A input as the Sample Texture 2D RGBA output, and B as an Inner Glow Colour property). I’m also making sure that the alpha of the colour is taken into account via the One Minus and Maximum nodes.
Note that the output from this Inner Glow Lerp, contains alpha values inside the edge of the sprite which we don’t want. To remove this, I use a Split and put the RGB outputs into a Vector4 node, setting the A/W input as 1.
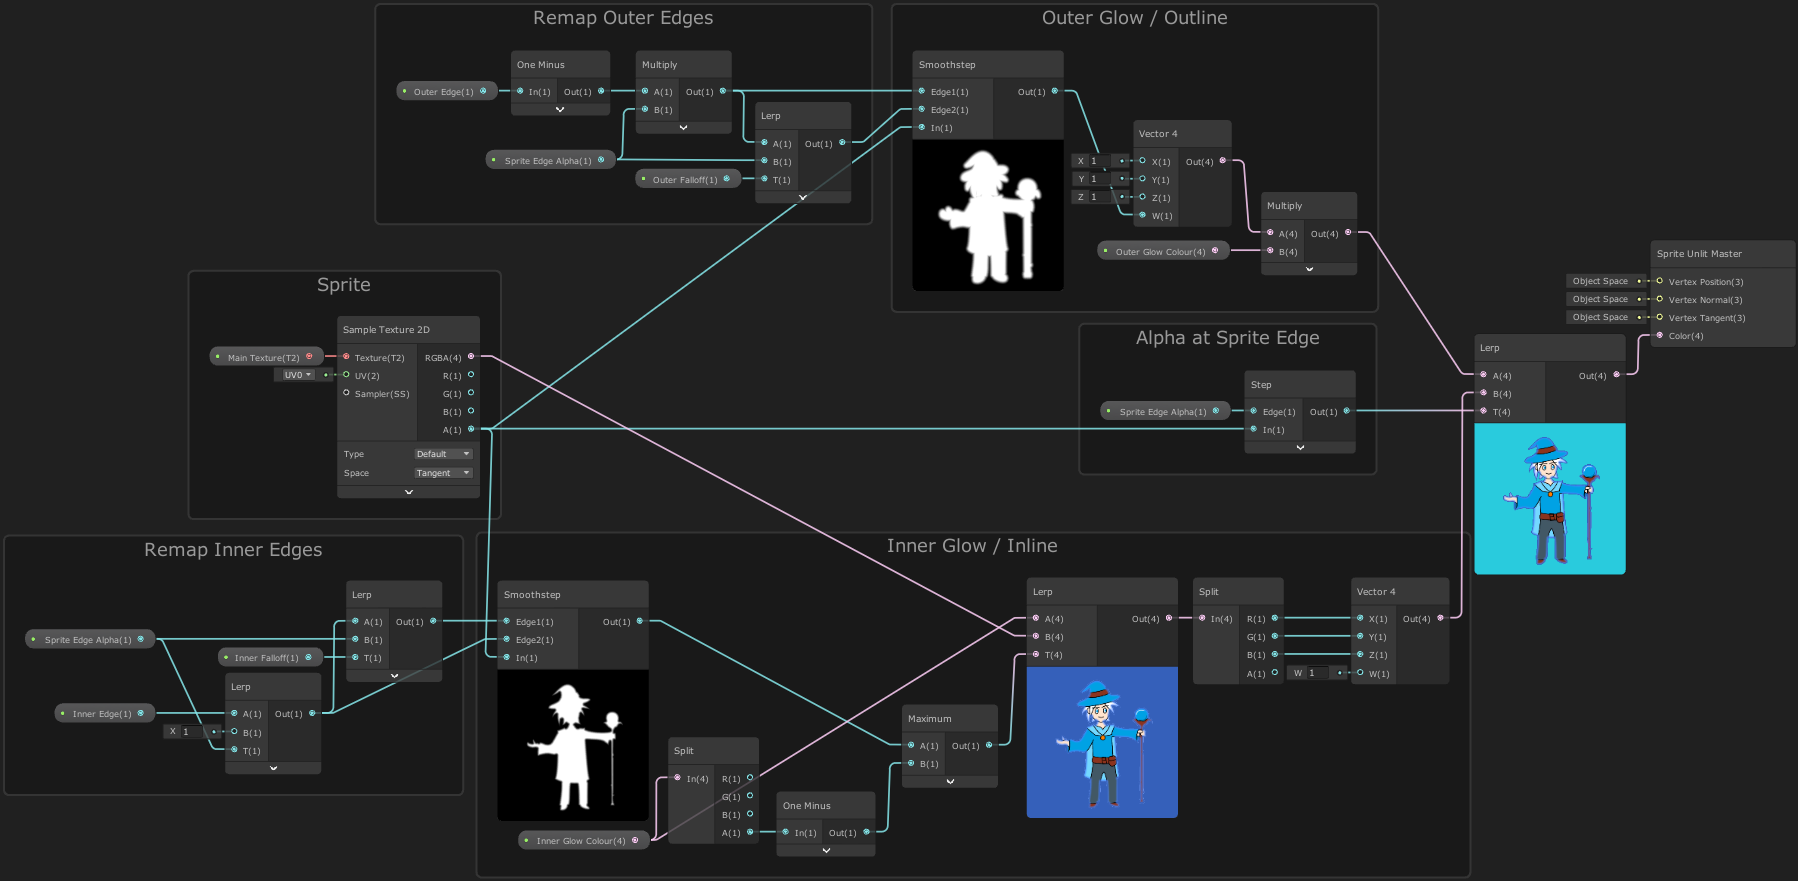
Finally we need to combine the outer and inner results. To do this we’ll use a Lerp node, with the T input based on the A output from the Sample Texture 2D node put into a Step with the Sprite Edge Alpha property. This can then be put into the Color input on the Master node.
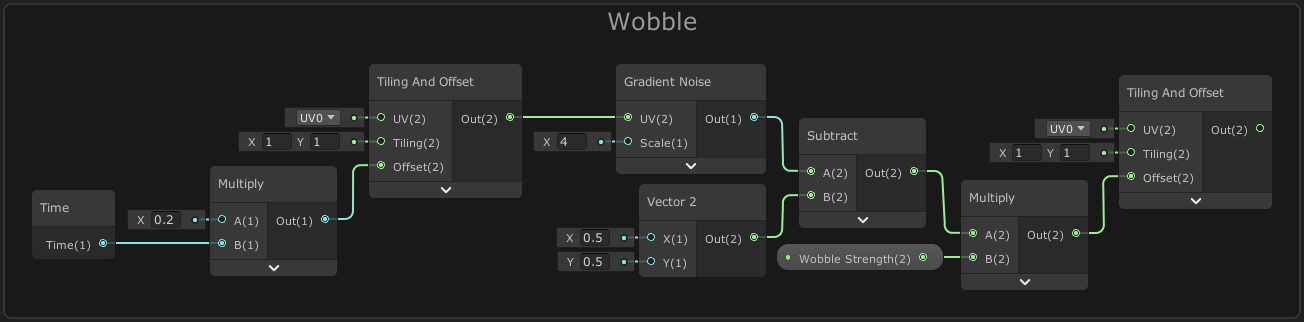
As an extra, I’m also using the Gradient Noise node to offset the UVs in order produce some wobbling distortions for the fireball. If you are interested in this effect, the output of the following graph would be put into the UV input on the Sample Texture 2D node, and there’s an additional Wobble Stength Vector2 property set up.
Thanks for reading! 😊
If you find this post helpful, please consider sharing it with others / on socials
Donations are also greatly appreciated! 🙏✨
(Keeps this site free from ads and allows me to focus more on tutorials)