Jellyfish Shader Breakdown
Intro
This shader displaces vertices based on Sine waves in order to animate a Jellyfish mesh. This is a useful alternative to animating using bones, especially for meshes which would require a large number of bones to achieve a similar looking animation. In the second section we will also add some simple movement and rotation to the Jellyfish GameObject. We will be sending an angle and rotation axis into the shader in order to rotate the vertices of the tentacles to better simulate the jellyfish’s motion, and so that the entire mesh isn’t just rotating on the spot.
Notes
- This is an Unlit shader. Transparent surface mode and Additive blending.
- You will need a mesh of a Jellyfish if you plan on recreating this shader, with the tentacles hanging straight down, and with enough vertices to make the displacement smooth. An important note is that the mesh I’m using has a scale of 2 units wide and about 5 units tall. The origin being at the base of the head of the jellyfish (or more technically, the umbrella/bell) which has a height of 1 unit, leaving 4 units of tentacles below the origin. If your mesh has a different scale or origin you may need to use different values in some of the nodes to achieve the same effect.
- If you are interested in a few simpler examples, look at the Vertex Displacement Post, which includes a brief description and graph to animate a Fish and Butterfly.
- This shader was inspired by the amazing work by @ZappForThat
Breakdown
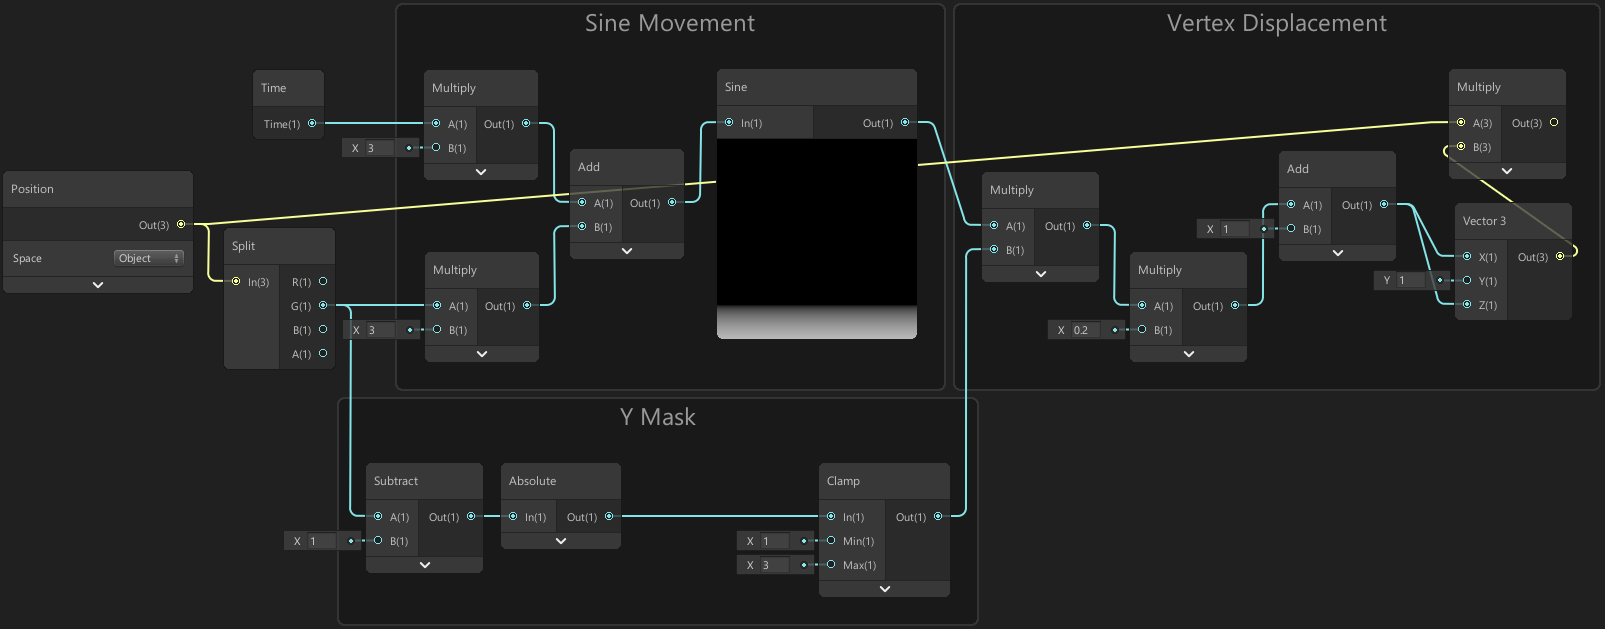
We will be offsetting vertices using a Sine wave based on the jellyfish’s Y (up/down) axis to scale the X and Z parts of each vertex, pushing vertices in and out without affecting their Y position. We’ll also mask this based on the Y axis, clamped between 1 and 3, allowing the tentacles to move slightly more than the top of the jellyfish.
To begin, create a Position node set to Object space and Split it. Create a Time node, take the Time output and Multiply it by a time-scaling value/property of 3. Then take the Y/G output of the Split (which should corrospond to the vertical position along the jellyfish) and Multiply this by a value to control the frequency of our wave, we’ll also set this to 3. We can then Add the output of these two nodes together and put it into a Sine node.
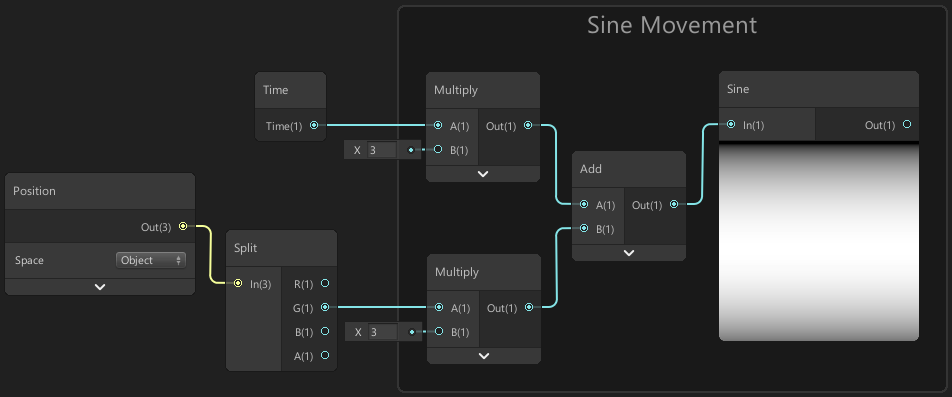
To mask this so the tentacles can move more than the top of the jellyfish, we’ll take the Y/G output again, Subtract 1 and then put this into an Absolute node. We can then put this into a Clamp node with a Min of 1 and Max of 3. This will give us an output of 1 at and above the origin, while 1 unit below outputs a value of 2, and at and more than 2 units downwards will output values of 3. We can Multiply this by our Sine node output in order to increase the amplitude, or strength of the offset, on the tentacles.
In order to use this to offset the vertices, Multiply this by a value such as 0.2 to control the strength of the offset, then Add 1. Put this into the X and Z components of a Vector3 node, and set the Y component to 1. We can then Multiply this with the output from the Position node.
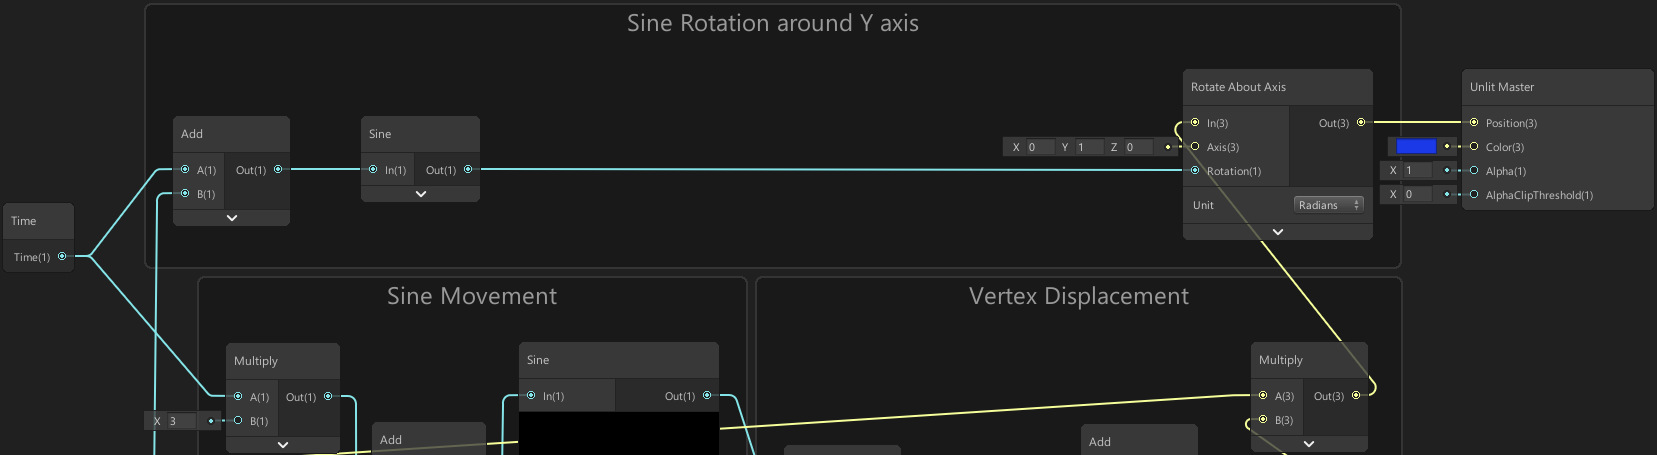
To make the vertex displacement a little more interesting, I also added some Sine rotation around the Y axis, making the jellyfish sway back and forth a bit. To do this put the output of our vertex displacement into the In input of a Rotate About Axis node, setting the Axis to (0, 1, 0). Add the Time output from the Time node we created earlier with the Y/G output of the Split, then put this into a Sine node, and use this as the Rotation input, with the Unit set to Radians. Take the output of this and put it into the Position input on the Master node.
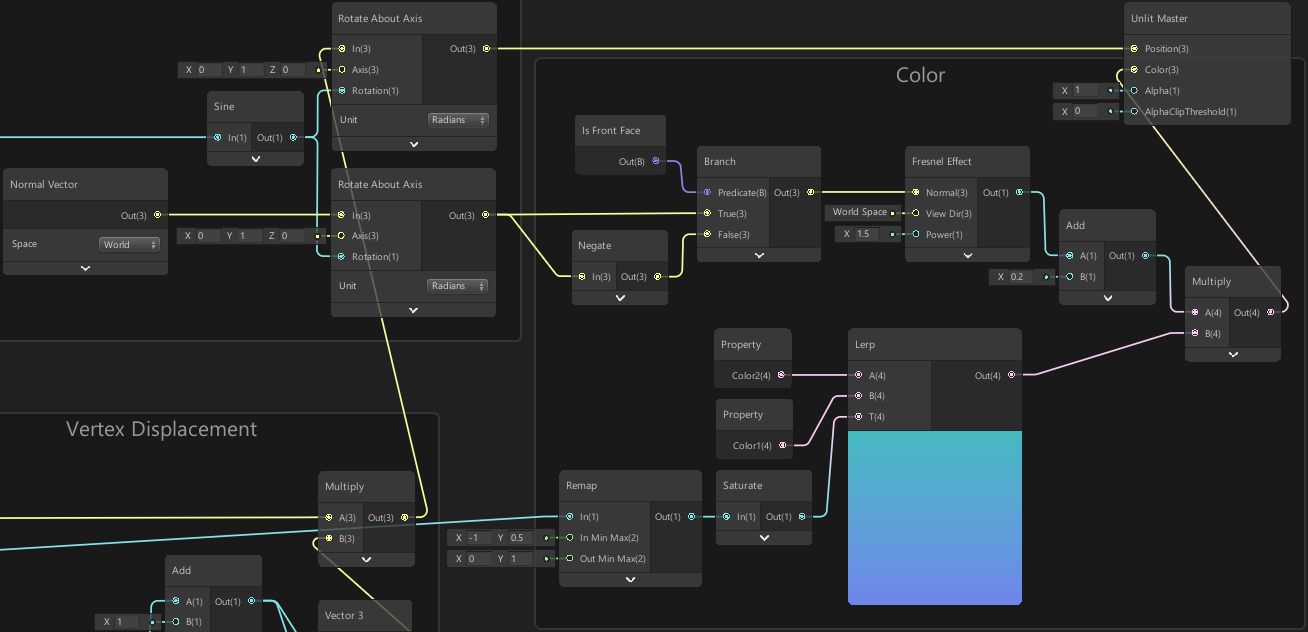
Finally we can also add some colour to the Jellyfish. To do this I’m using a simple gradient between two colours created via a Lerp node. We’ll take the Y/G output again and put it into a Remap node with an In Min Max of -1 and 0.5 and an Out Min Max of 0 and 1, then put this into a Saturate node to clamp the values between 0 and 1. Put this into the T input on a Lerp node, and create two Color nodes (or properties) and put them into the A and B inputs.

We can also Multiply the colour output with a Fresnel Effect node to create a more jelly-like look before putting it into the Color input on the Master node. Also set it to use the Transparent rendering mode and Additive blending by clicking the cog icon. I’m also setting it to be double-sided, as the tentacles are only single-sided on the mesh I’m using and we won’t be able to see them from behind otherwise.
You may notice however there are some slight issues. Firstly, as we are rotating vertices, we also need to rotate the Normals put into the Fresnel Effect node to make it output the intended values. You can do this by putting a Normal Vector node into the In input of another Rotate About Axis node, having the other inputs the same as the one from before. Secondly, the back faces have normals facing away from us, so for all back faces the Fresnel Effect is outputting 1. We can fix this by flipping the normals for back faces. Create a Branch node with the Predicate set to use the Is Front Face node, and put the rotated normal into the True input, as well as into a Negate node for the False input.
Now we have a nice looking Jellyfish. In the next section, we’ll look at extending this further so that the jellyfish can move, with tentacles that can bend when the jellyfish turns in order to make the motion feel more realistic.
Movement & Reacting to Rotation
In order to make the Jellyfish move and rotate, I’m using the following C# Script :
|
|
In short, I’m moving and rotating the the jellyfish transform towards another Transform (via the followTransform field). This is set up as an empty GameObject which is then dragged into the field in the inspector. I’m multiplying the movement vector by the Absolute of a Sine wave that is moving over time in order to simulate jellyfish-like movement. Note that changing the transform directly means it will ignore collisions. You may want to look into using Rigidbody movement instead if you require collisions.
Currently however if we use this script, when the jellyfish rotates, the entire mesh rotates – which looks very unnatural. Jellyfish only really move their main body, the umbrella/bell part, with the tentacles following behind. Since the entire mesh is already rotating we need to instead rotate the tentacles back to their original position to fix this.
As a quick disclaimer, I don’t know if this is an efficient way of achieving this or whether there is a better way, but this is how I am handling it :
|
|
We simulate a Vector3 position, named tentaclesPosition, that follows the jellyfish transform. If it gets more than 1 unit away, it moves towards the jellyfish. This keeps track of where the tentacles are meant to be.
We obtain the vector from our tentaclesPosition to the jellyfish’s position, named tentaclesVector. We can then compare this with the jellyfish’s transform.up vector, which is the direction the jellyfish is facing. We can get the angle between the two vectors by using Vector3.Angle, and obtain the cross product by using Vector3.Cross. The cross product returns another vector, which is perpendicular to both of the other vectors.
In other words, we’ve obtained the angle and axis of rotation which allows us to rotate the tentaclesVector to make it equal to the transform.up vector. Of course this is useless to do as we already have the transform.up vector, but we can instead send the angle and axis into the shader, where we can use them to rotate vertices based on how far along the tentacles they are. We’ll also need to negate the rotation angle to make sure it is in the correct direction.
This method won’t be perfect, but it will allow us to add some bending to the tentacles which should look fine for small rotations. And it will look a lot better than the entire mesh just rotating on the spot. We might be able to improve it further by adding another tentaclesPosition point or two, following each other in a chain, however I haven’t tested it. It would also require more properties to allow it to be sent into the shader, and every rotation will affect the whole mesh, so it needs to be masked to the correct areas in the shader. For now, we’ll stick to the single point.
Back to Shader Graph
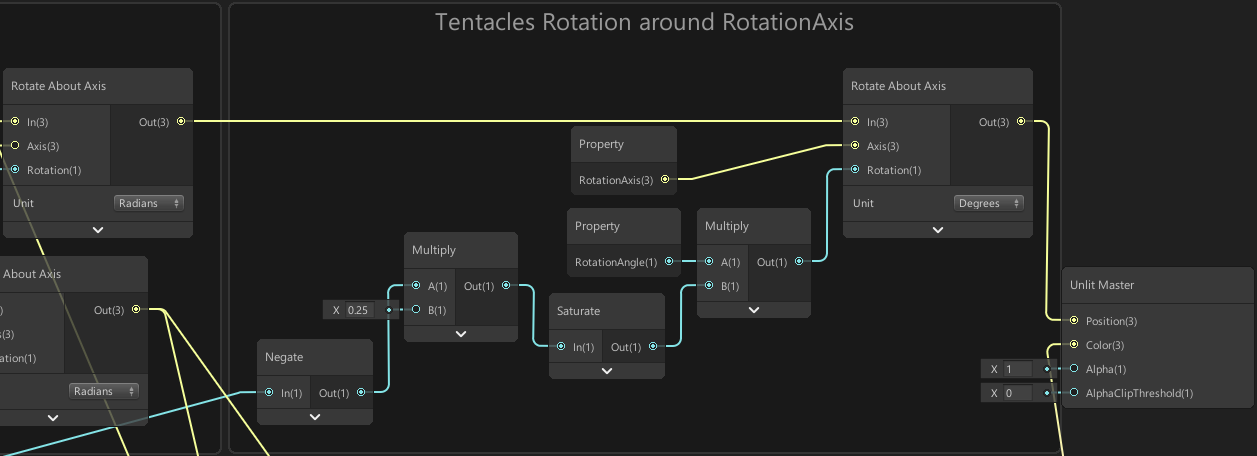
Going back to the shadergraph to implement this, we need to set up two Properties in the blackboard. We’ll set up a Vector3 propery for the Rotation Axis, with the reference set to “_RotAxis”, and a Float/Vector1 property for the Rotation Angle, with the reference set to “_RotAngle”. (You could also combine these into a Vector4, and then Split it to obtain the last value on it’s own, so you are only setting a single property, but for this example I’ll be using two).
We’ll take the output from the Rotate About Axis node we used to rotate the vertex position before, and put it into the In input of another Rotate About Axis node, with the axis set to the Rotation Axis. If we set the rotation to use the Rotation Angle however, we’ll be rotating every vertex with the same amount. We first need to mask it so we are only rotating the tentacles.
To do this, take the Y/G output, put it into a Negate node then Multiply it by 0.25. This flips our values to keep the tentacles in a range of positive values and means that a value of 1 is obtained about 4 units downwards, at the very end of the tentacles in the mesh I’m using. We put this into a Saturate node, Multiply it with our Rotation Angle property and put it into the Rotation input with the Unit set to Degrees (as the Vector3.Angle gave us the angle in degrees rather than radians). This means that the rotation will be 0 at the jellyfish’s position, while 4 units along the tentacles is the full rotation angle. Finally, put the output of this into the Position input on the Master node.
As mentioned before this won’t be perfect, but should provide a bit of bending to the mesh when the jellyfish rotates to make the motion a little more realistic. The fact we are using quite a few Rotate About Axis nodes might make the shader a bit expensive though.
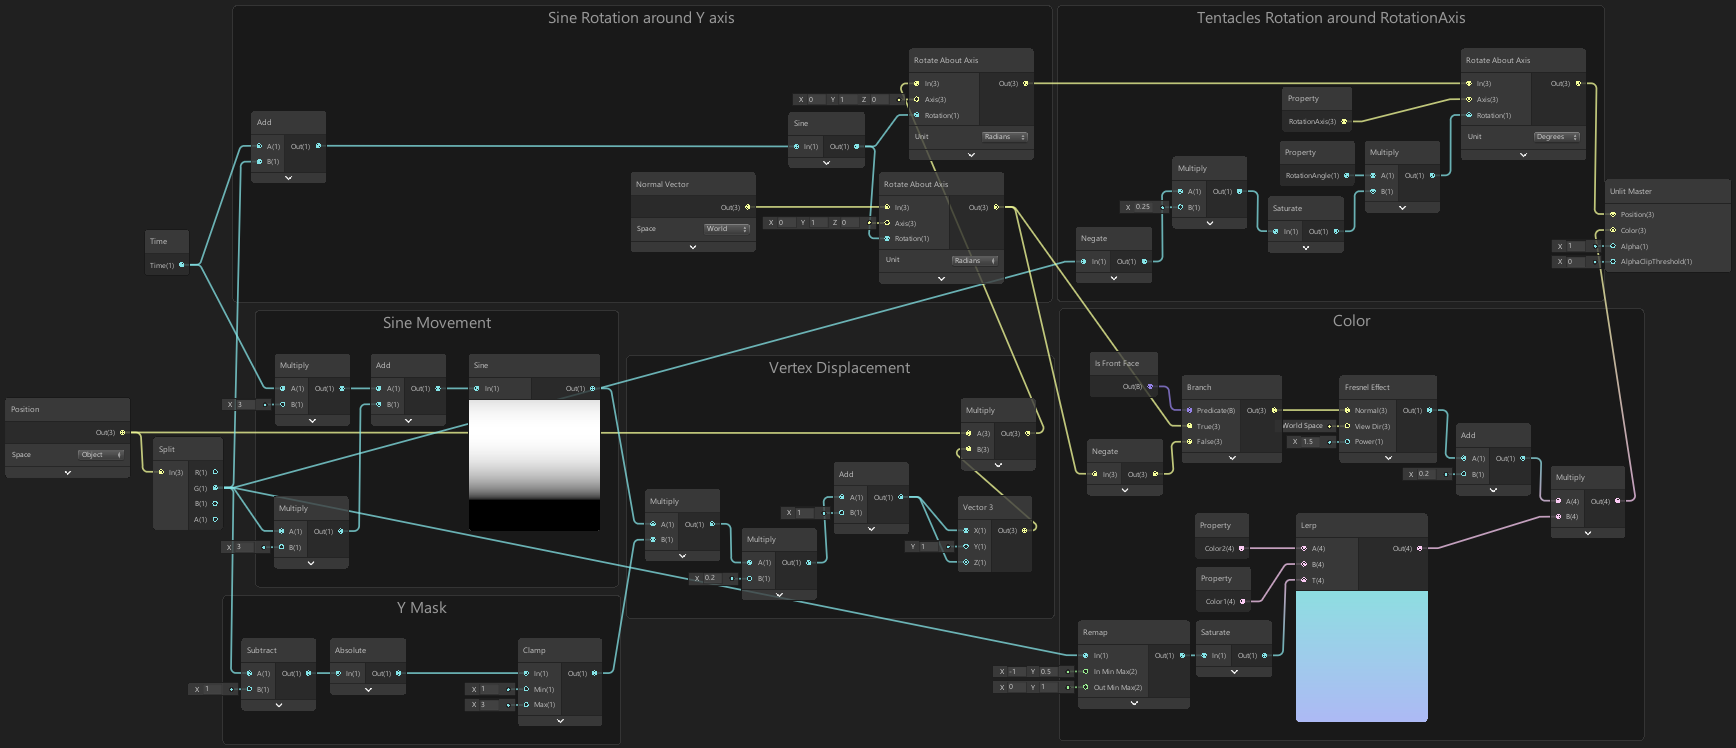
Finally, here’s an image showing the entire graph.
Thanks for reading! 😊
If you find this post helpful, please consider sharing it with others / on socials
Donations are also greatly appreciated! 🙏✨
(Keeps this site free from ads and allows me to focus more on tutorials)