Whirlpool Shader Breakdown
Intro
This whirlpool shader is based on using polar coordinates to offset vertices as well as sample a seamless noise texture to create a swirling effect.
Notes
- This is an Unlit shader, applied to a flat plane. I’m using the default Unity plane mesh, which has a scale of 10 units (X and Z axis) at an object scale of 1.
- The shader is Opaque. Can’t really use Transparent surface mode as the vertex offsetting will cause geometry to overlap. Transparent doesn’t write to the depth buffer so it won’t have any information on how to sort the faces correctly. While something like this can help fix issues like this, it’s not really possible to do something like that in Shader Graph.
- You’ll need a seamless/tileable noise texture in order to create the swirling water effect.
Breakdown
In order to create a whirlpool effect we’ll be using Polar Coordinates. If you aren’t familiar with them I wrote a blog post explaining the node which you should read first : Polar Coordinates Post.
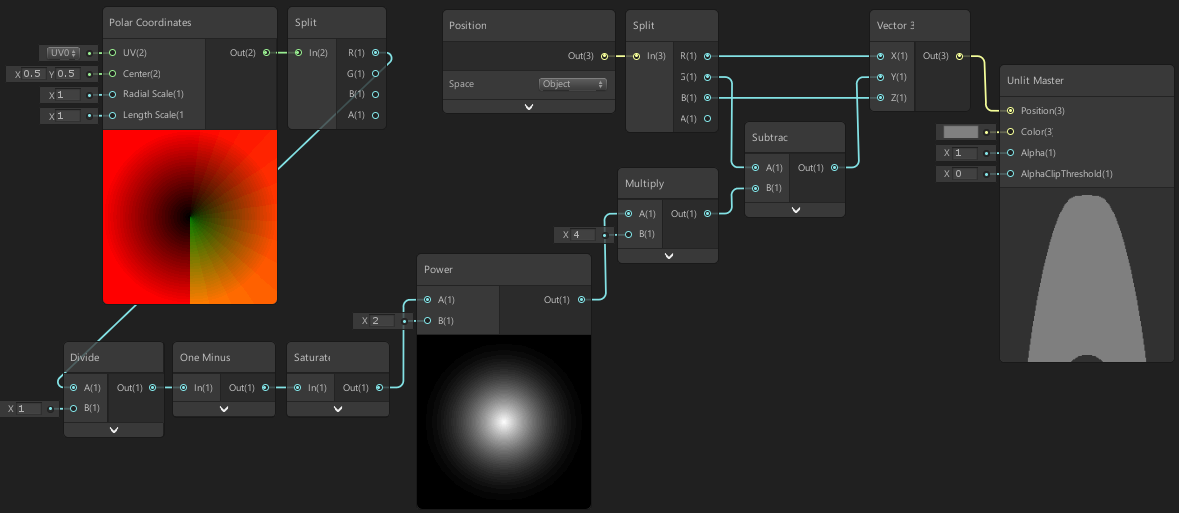
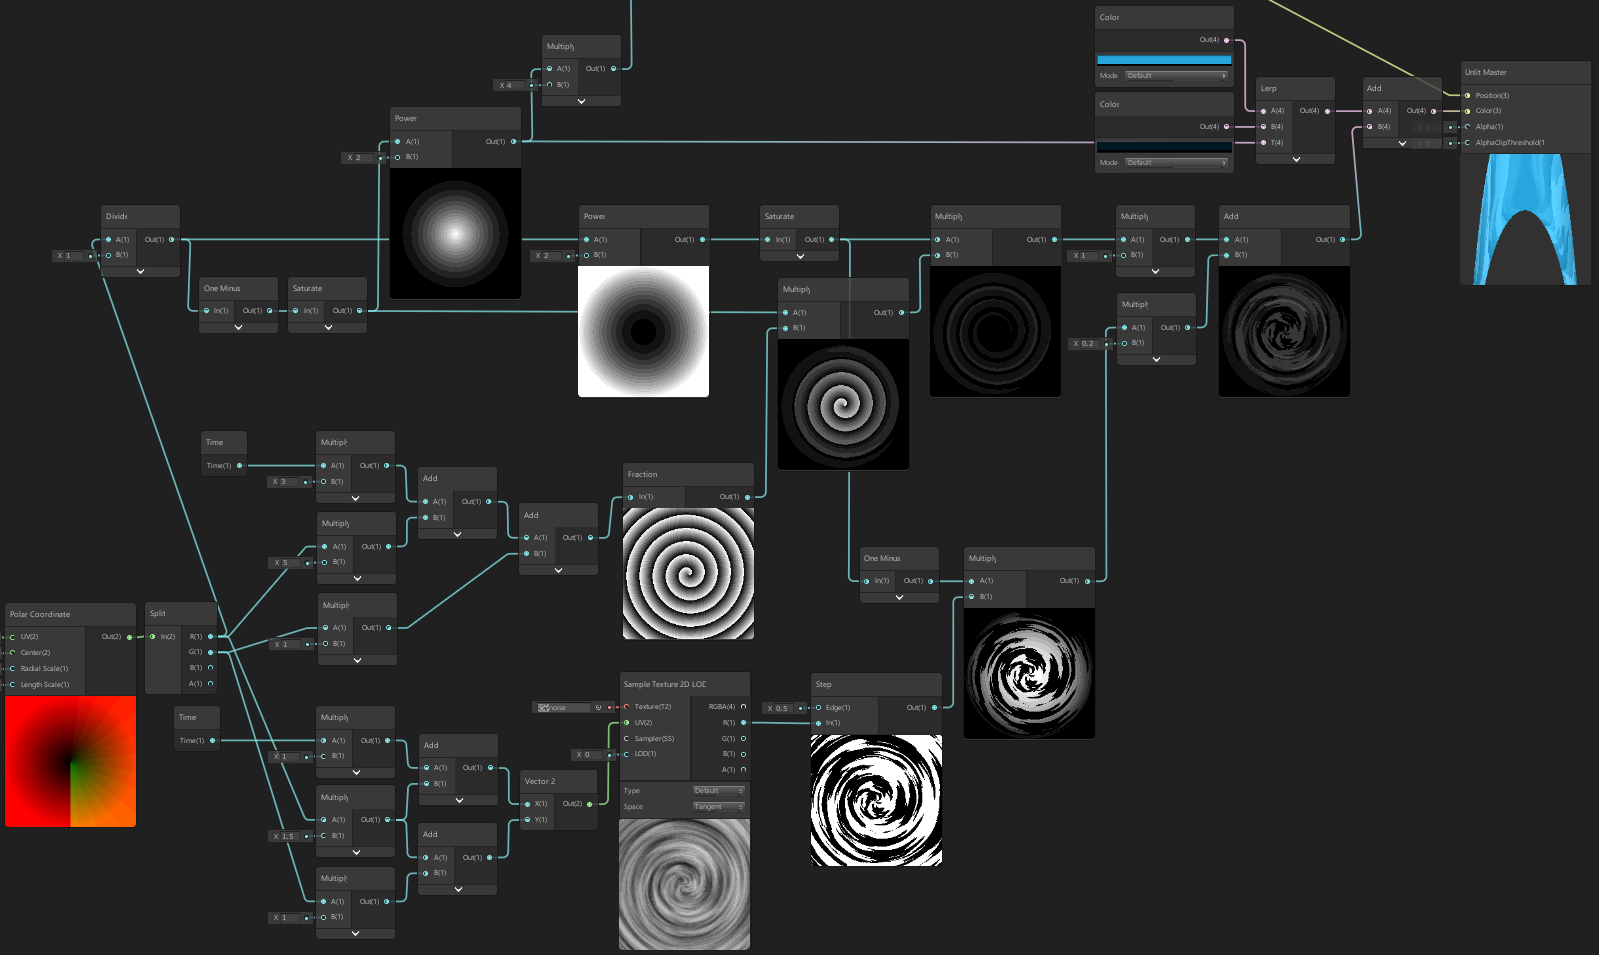
First create a Polar Coordinates node and put it into a Split node. We can use the X/R output, which is the distance part of our coordinates, to offset vertices to create a funnel-like shape for our whirlpool. In order to control the size of our whirlpool funnel later, we’ll first put our X/R output into a Divide node, leaving the second input as 1 for now.
Our distance value currently returns 0 at the center of our whirlpool, and increases as it goes outwards. However in order to create funnel shape we need to change this so it has a value of 1 at the center, going out to 0 – as we want to offset vertices closer to center more. To do this we can simply put our output into a One Minus node, and then into a Saturate node – which will also clamp between 0 and 1, so the further parts don’t go into any negatives.
We can then put this into a Power node using 2 for the second input, which will give our funnel a more curved shape, and then Multiply by a vertical scaling value/property, which we’ll set to 4 for now.
In order to actually offset vertices we need to create a Position node set to Object space. We’ll Split it, then create a Vector3 node and put the X/R output into the X input, and the Z/B output into the Z input. Then create a Subtract node with the first input as the Y/G output, and second as the funnel output (the Multiply node from before). Take the output of this and put it into the Y input on the Vector3 node and put that into the Position input on the Master node.
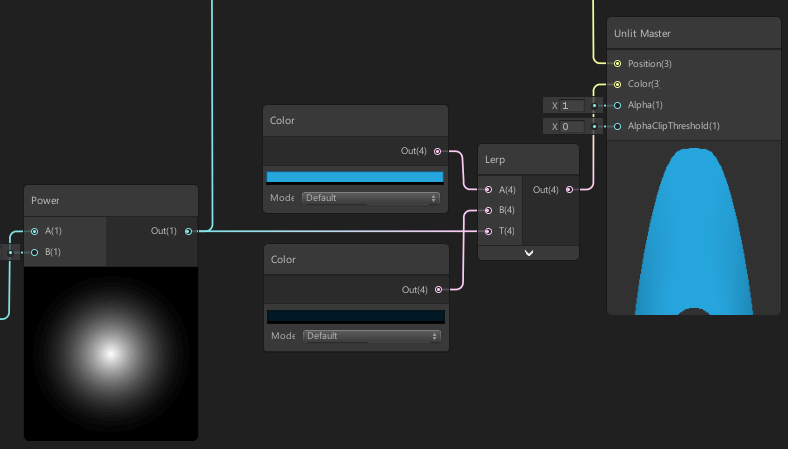
Next we will add some colour to help show the depth of our whirlpool. We can do this simply by taking the output from our Power node we used in order to create the funnel, and put this into the T input on a Lerp node. We’ll then put a water Color node into the A input, and a deep water Color node into the B input. Lerp means a linear interpolation between two values, based on T. When T is 0 it outputs A, when T is 1 it outputs B, and anything in-between is a blend of each of them. We can temporarily put the output of this into the Color input on the Master node and put the shader/material on a plane to see the effect in the Unity editor.
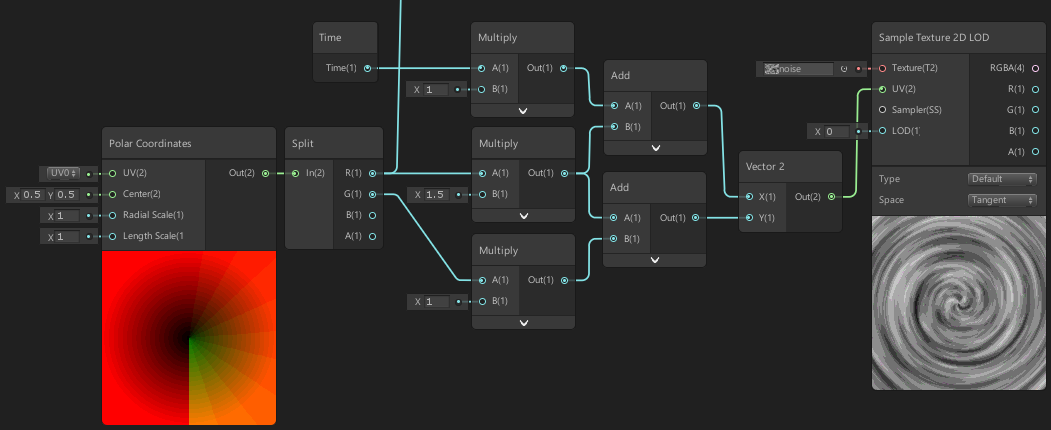
To create the swirling water effect for our whirlpool we’ll manipulate the outputs from the Polar Coordinates node and use them to sample a texture. So we have more control I’ll also be using a few Multiply nodes.
First create a Time node and put the Time output into a Multiply with a time-scaling value, which we will leave as 1 for now. We’ll then take the X/R output from our Polar Coodinates and put it into a Multiply with a distance-scaling value, which I’ll set to 1.5. We can then Add the outputs of these two nodes. This creates the effect of offsetting the distance part of the polar coordinates, which will make the texture look like it’s being sucked inwards (or downwards in the case of our whirlpool since we also offset the vertices). We can adjust the time-scaling value to slow down/speed up the effect and adjust the distance-scaling to tile the texture more.
Next we’ll take the Y/G output which gives us the angle part of the Polar Coordinates. By offsetting this we can rotate the effect – but if we offset it by a uniform value the entire thing will just rotate. We need to offset it based on distance so that further parts get rotated more in order to create a swirling effect. To do this, first Multiply the Y/G output with an angle-scaling value. We’ll just set this to 1 but it will allow us to tile the texture around the whirlpool more if required (note that this value must be a integer or you’ll get a seam where the texture won’t line up correctly). Then take the output of this and Add it with the scaled X/R value from before.
Put the outputs of these two Add nodes into a Vector2 node, the first being our offset distance and the second being the offset angle. We’ll use these as UVs in a Sample Texture 2D LOD node to sample a seamless/tileable noise texture.
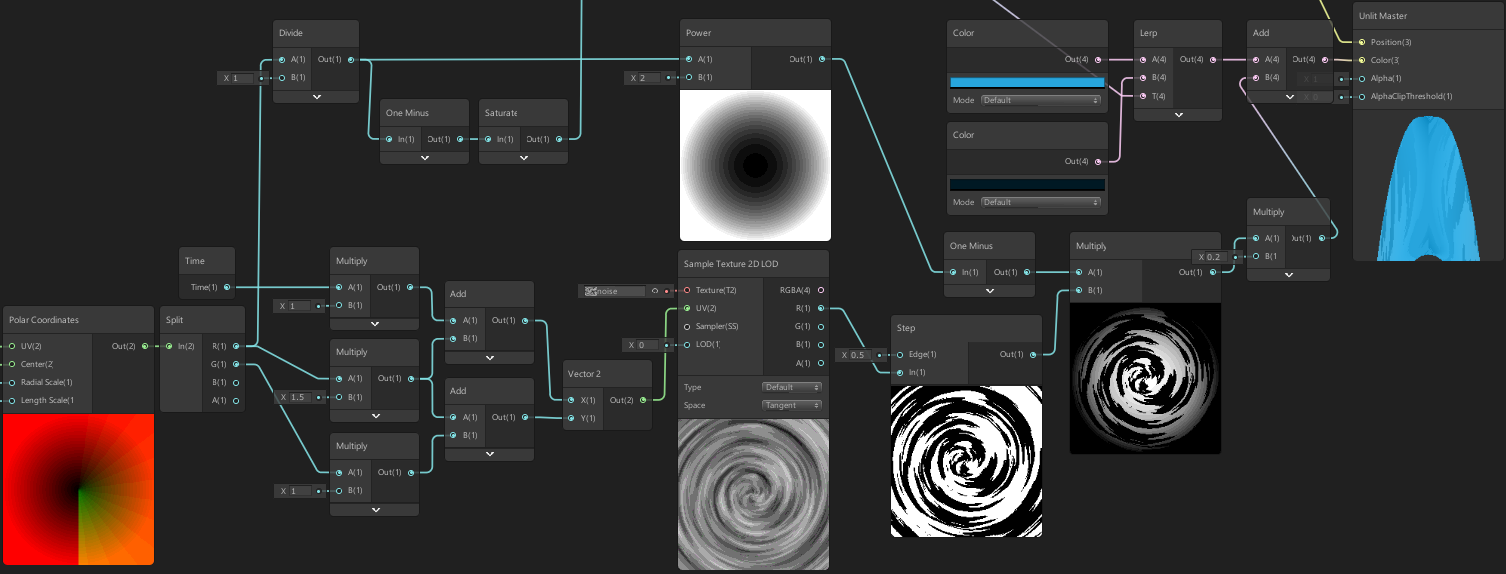
For a more stylised/toon look, I’m putting the R output from our sampled texture into a Step node, with a edge value of 0.5. This node returns 1 if the In input is greater than or equal to the edge input, otherwise it returns 0. You can leave this out or perhaps use a Smoothstep node instead for a softer effect.
Next we need to create a mask for this texture as we only want the swirling texture inside the funnel. We’ll take the output from our Divide node way back in the beginning of this post (the one that uses the X/R value from the polar coordinates) and put this into a Power node, then into a Saturate node. From the preview you can see this produces values close to 0 in the center, going outwards to 1. We can increase the other value in the Power node for a more harsher transition between the water surface and swirling pattern, but a value of 2 gives a nice soft blend.
To apply this mask take the output from the Saturate node and put it into a One Minus node, then Multiply it by the output of our Step (or straight from the texture output if you don’t want a stylised look). We’ll then Multiply this by 0.1, so it isn’t completely white, and Add it to the original colour from the Lerp node we created earlier.
Along with the texture I have a spiralling pattern layered on top to add to the effect, which is similar to the nodes we created for the texture sampling. First create a Time node and put the Time output into a Multiply with a time-scaling value of 3. We’ll then take the X/R output from the Polar Coordinates and put it into a Multiply with a distance-scaling value of 5. We can then Add the outputs of these two nodes, Add the Y/G output from the Polar Coordinates, and then put this into a Fraction node.
To mask this to the funnel, Multiply the output from this Fraction node with the output from the Saturate node (the Divide → One Minus → Saturate one from way back in the beginning of the post again). I then Multiply again with the other Saturate node from the mask we set up earlier, so it isn’t too bright in the whirlpool’s center. The image below should help show what this achieves. We can then Add this to the swirling texture effect, before adding it to the final colour.
All that is left is to add a bit of variation to the water surface. We could apply a repeating texture, perhaps using the same seamless noise texture, but I’m just going to use some world space based noise as we can also use it to offset vertices more to add some motion to the water’s surface – and not have to worry about seams between planes. To do this, we’ll create a Position node set to World space, Split it, then take the X/R and Z/B components and put them into a Vector2 node. Then put this into an Add node, leaving the other input empty for now. We’ll take the output of this and put it into a Simple Noise node with the Scale input as 1.
We can create a Time node, and Multiply the Time output by a time-scaling value such as 2 and use this to offset the noise in order to animate it a bit. So the motion is a little less constant, I’m also going to take the Sine Time output and Multiply it by 0.5, Add those two nodes together, then put this into the other input on the Add node from earlier.
To offset the vertices more, take the output from the Subtract node we created when offsetting the object position for the funnel shape, and Add the noise output to it then replace the input into the Vector3 node.
We’ll also take the output from the noise to change the water’s colour. For a more stylised look I Multiply this by 2, then put it into a Posterize node with 4 steps, to create bands of colour rather than a gradient. We also need to mask this so it doesn’t appear where the whirlpool is. Take the mask we created earlier (the Divide → Power → Saturate node output) and Multiply it by the output from the Posterize node. We can then Multiply this by 0.1 and Add this to the whirlpool colour before adding it to the Lerp colour output.
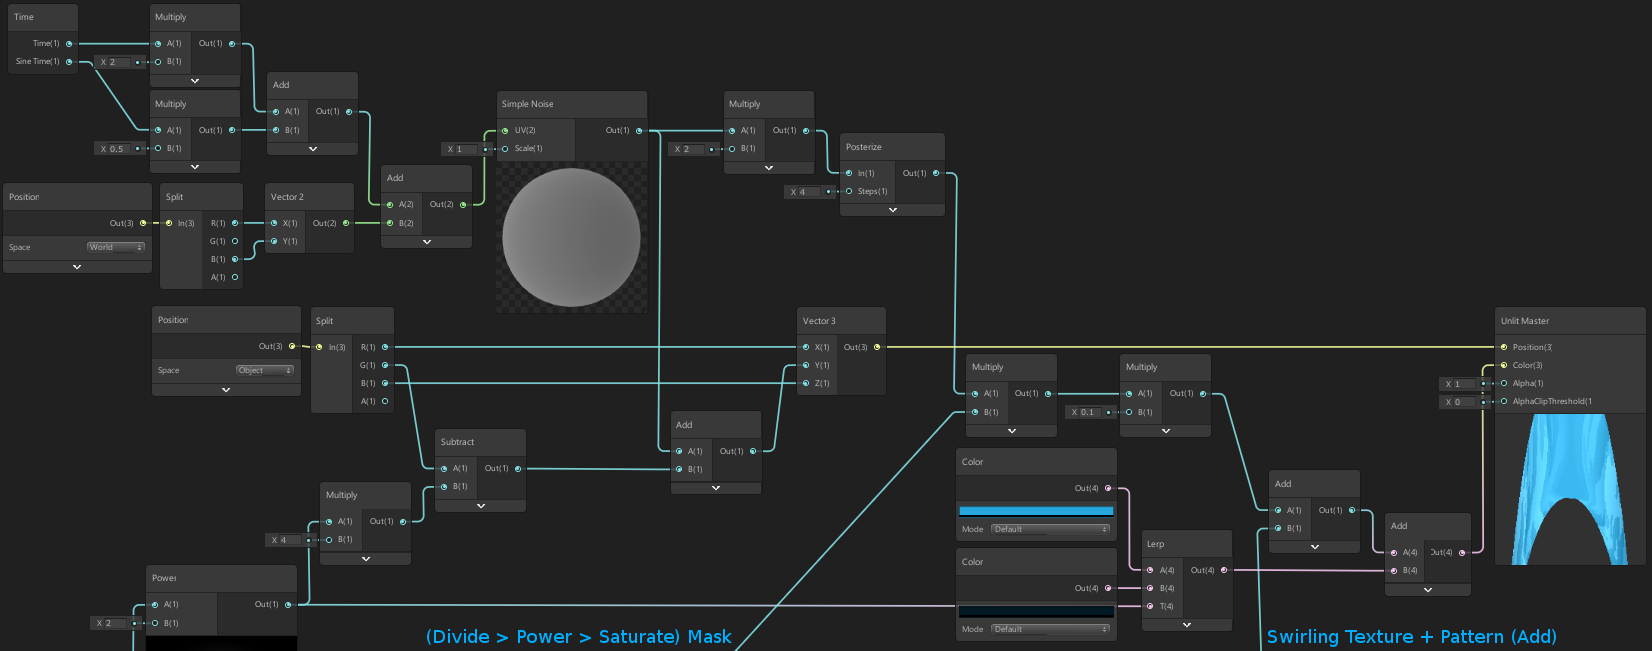
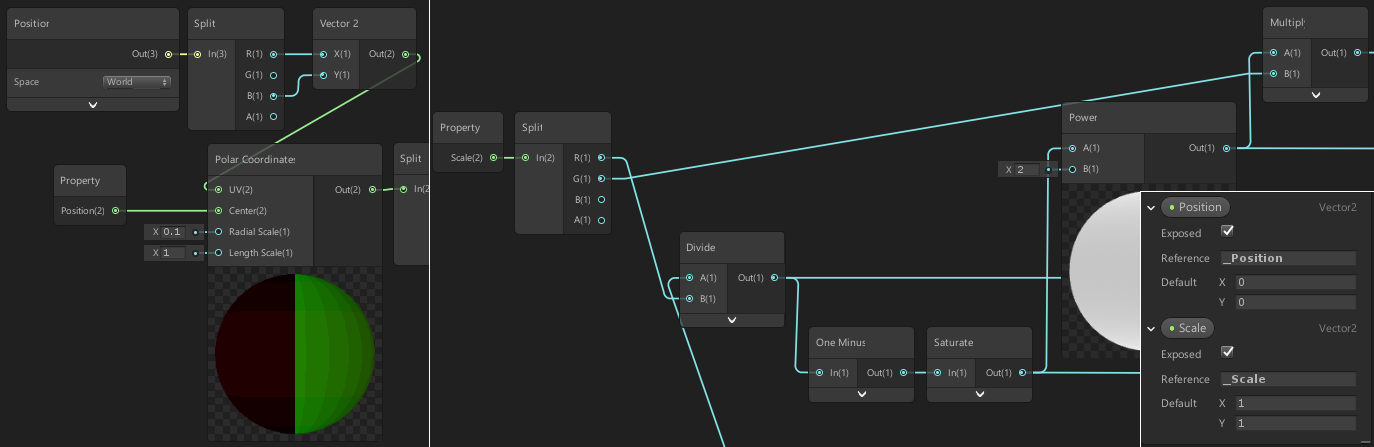
Before we finish, it would be useful to be able to control the position and scale of the whirlpool from outside of the shader. To do this we can set up some properties. (I’m using two Vector2 properties, but you could also combine these into a single Vector4). You can create these properties via the shadergraph blackboard, or create a Vector2 node, right-click and Convert to Property. You can then right-click the property in the blackboard to rename it. Be sure to click the little drop-down arrows next to the properties in the blackboard and change the Reference values to something like “_Position” and “_Scale” as these are what we’ll use to set the values via a C# script. You may also want to change the default values for the scale to 1, otherwise our previews won’t look very good.
So these properties actually do something, create a Position node set to World space, Split it and put the X/R and Z/B values into a Vector2, then into the UV input on the Polar Coordinates node. We can then put our Position property in the Center input on that node too.
Since we’re adjusting it to use world space positions rather that the object’s UVs we also need to change the Radial Scale to 0.1, as the default unity plane mesh UVs spans 10 units per scale unit (1/10 = 0.1). If we don’t do this our whirlpool is going to be really small unless we specify a larger scale value.
As a note, using a Position node here also will change all our previews later on in the chain to a 3D view rather than the 2D one. This makes it really hard to visualise the effect, hence why I’m doing this last. You can simply remove the input if you ever need to adjust the effect slightly and want to see the previews again, just make sure to reconnect it after.
For the scaling, we need to Split the Scale property and put the X/R value into the second input on the Divide node from the beginning of this post (the one that divides the X/R output from the Polar Coordinates), and put the Y/G output from our Scale property into the Multiply that used a vertical-scaling value when creating the funnel part (replacing what was set to a value of 4).
The image below should help show how these are all connected.
To update these properties using an empty GameObject, I am simply putting this C# Script on it, with the whirlpool material set in the inspector. Again, make sure to change the Reference of the properties in the blackboard to match the “_Position” and “_Scale” in the script.
|
|
Thanks for reading! 😊
If you find this post helpful, please consider sharing it with others / on socials
Donations are also greatly appreciated! 🙏✨
(Keeps this site free from ads and allows me to focus more on tutorials)