Tornado Shader Breakdown
Intro
Recently made this tornado which involves a few layers of alpha-clipped scrolling noise and vertex displacement to make it wobble. Each layer is a separate GameObject/MeshRenderer with various scalings, though you could also combine them into a single mesh with multiple sub-meshes to apply separate materials. There’s also a subtle Rim/Fresnel effect applied to the alpha, to remove noise at the very edges as it curves around to help hide the shape of the mesh.
In hindsight it may have made sense to apply rotation (e.g. with Rotate About Axis node) in the vertex shader instead of scrolling the textures. But if the mesh is combined it would be harder to spin each layer at different speeds, so I’ll stick with the original method I used.
The tweet gif also includes some particle trails (simulating wind) that swirls around the tornado. If this were used in an actual game, I can imagine something like this would help show the range that the tornado will affect. I’ll also include a section below going over the settings I used to achieve that.
One thing I didn’t add to this shader that might be nice if you’re interested in a small challenge, is a vertical dissolve-like effect for when the tornado is forming or dissipating.
Notes
- This is an Unlit shader. Might also work with Lit but unsure how shadows will look with each layer. May want to turn off shadow casting on the outer layers.
- Uses Alpha Clipping (enabled under Graph Settings)
- To prevent a visible seam, you should use a noise texture which can repeat seamlessly (and integer tiling value). I haven’t got any resources on generating/creating this (yet), so you’ll need to search online.
- If you need to be able to see the tornado from above / inside you may want to enable Two Sided (aka Render Face : Both) in Graph Settings.
Breakdown
Mesh
Before beginning the shader we need to create a mesh. I’m using a funnel-like shape, with UVs that are unwrapped in a cylindrical projection.
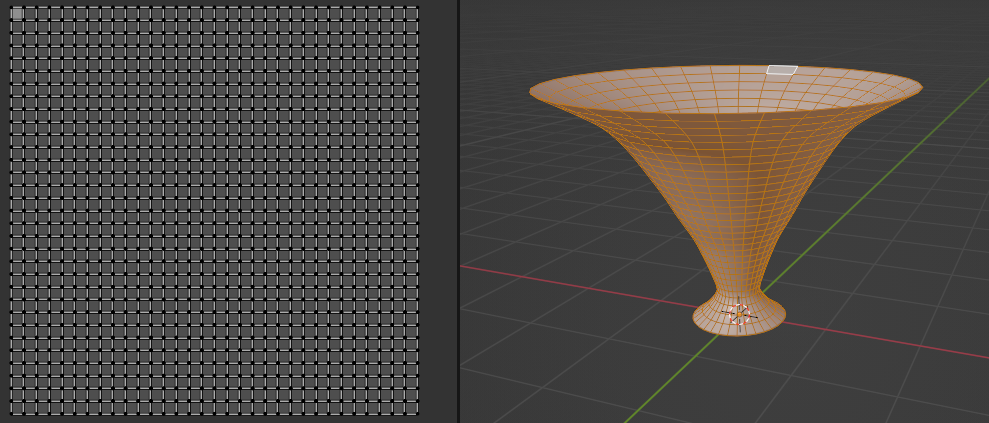
I’m no expert with Blender but these are the steps I took :
- Start with a Circle and extrude upwards (E) (or Cylinder and remove end faces)
- Select the bottom loop (Alt + Click on edge) (For me it’s right-click to select but that might differ based on version / preferences)
- Scale it smaller (S)
- Make a loop cut (Ctrl+R), scale it (S) then repeat until you get a decent funnel shape. Can re-select loops (Alt+Click) and scale again if necessary.
- When happy with the shape, enter Front-Orthographic view (numpad 1) and select the whole mesh (A)
- Unrwap UVs (U), selecting “Cylinder Projection”. In the bottom left, check “Scale to Bounds” in the settings for the projection.
When exporting you’ll want to make sure that it’s Y-up to match Unity, so that the height of the tornado mesh corresponds with the Y axis in object space. Otherwise you may need to change the axis around in the vertex shader.
Fragment
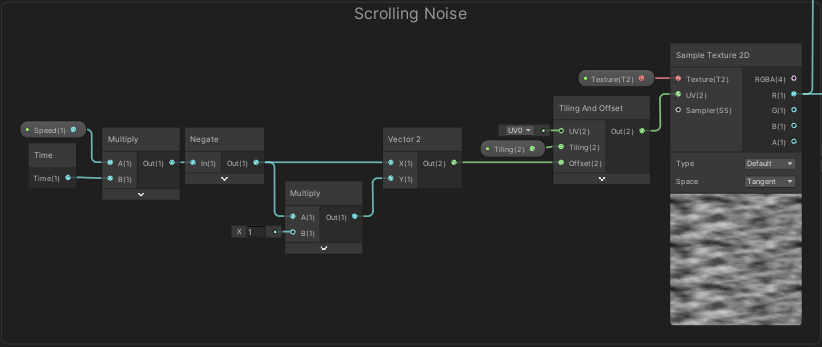
We’ll start with the fragment stage of the graph, which involves setting up a scrolling seamless noise texture. We use a Sample Texture 2D node with a Tiling And Offset node in the UV input. The Texture input is set to a Texture2D property so we can edit it from the material. I’m also using a Vector2 property for the Tiling port (should set the Default value to at least (1,1) so the previews still work). It’s important that the tiling values stay set to integers (at least on the X axis) to prevent a seam (and the texture must repeat seamlessly too).
We use the Time output from a Time node and Multiply by a Float property to control the speed of the scrolling. I then Negate this so it spins anti-clockwise (which is apparently more common for the Northern Hemisphere) but you could alternatively set the speed to a negative value, or have it spin clockwise. Whether you need to do this will also depend on the UVs.
I’ve put this into a Vector2 node with the option to adjust the vertical speed, but could also put the result straight into the Offset port if that isn’t needed.
Because the noise texture is greyscale it doesn’t really matter which port we use so I’m using the R port (though if the texture is compressed the green channel may provide the most precision). I don’t want the colour of the tornado to be as dark as the noise is, so I’ve done a bit of remapping with a Multiply and Add node, then tint with another Multiply and Colour property. May also want to Saturate to clamp the value to the 0-1 range.
Could alternatively Lerp between two colour properties if you want more control over the colours. The output of this is put into the Base Color port on the Master Stack.
If you haven’t already, enable Alpha Clipping in the Graph Settings (tab in Graph Inspector window). This should make the Alpha and Alpha Clip Threshold ports appear in the Master Stack.
We put a Float property in the Alpha Clip Threshold port so we can control that from the material. The result from the noise is used for the Alpha, but I first Multiply by a subtle Rim / Fresnel Effect with a Power of 8, put through a One Minus.
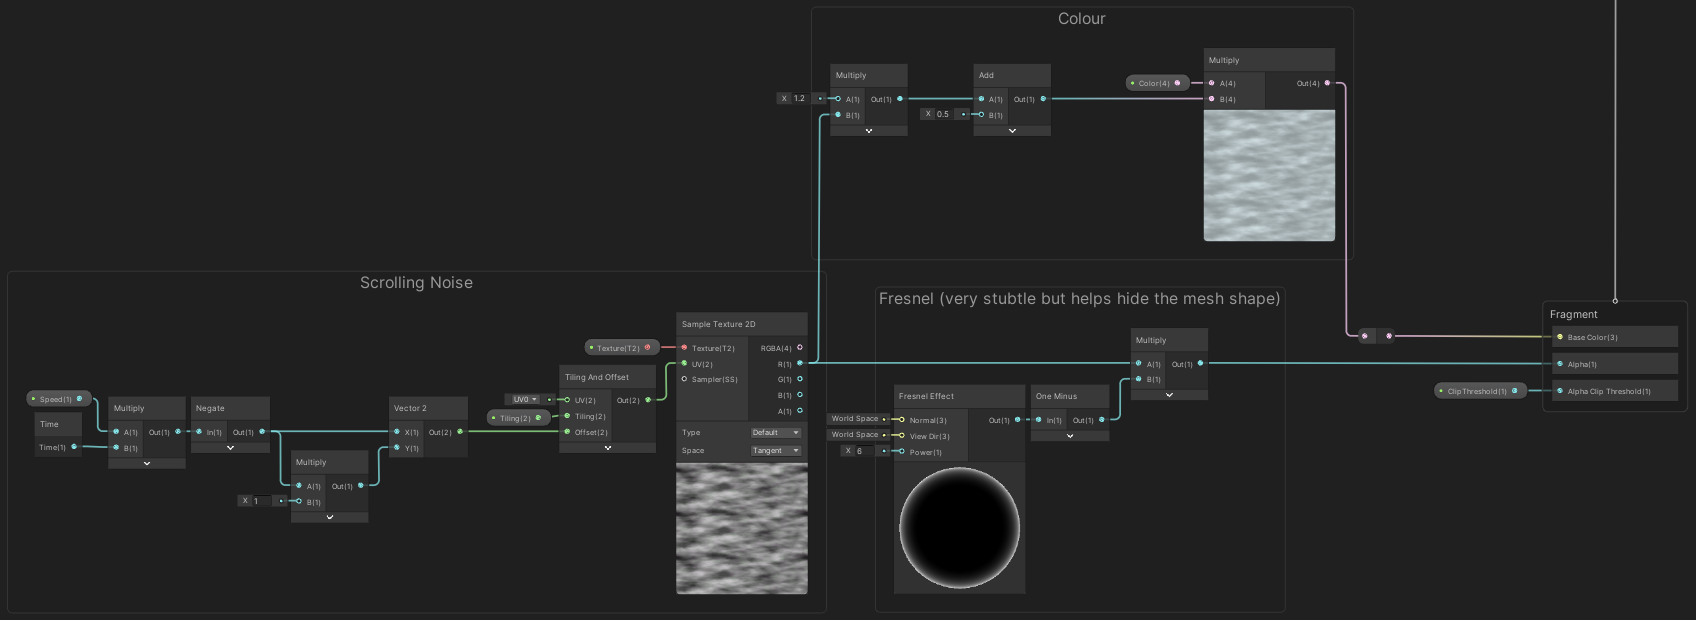
(Click image to view fullscreen in new tab)
The Fresnel group is optional but helps to hide the shape of the mesh a bit. It’s fairly subtle but here’s an image to compare it. If you’re fine without that, put the noise output straight into the Alpha port.
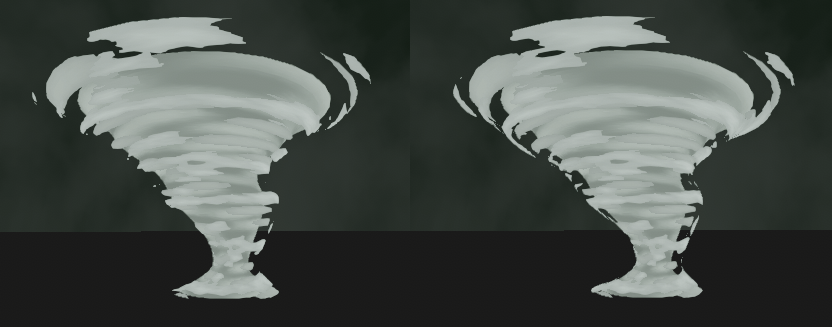
(Left : Fresnel On, Right : Fresnel Off)
It may now be a good idea to save the graph (Save Asset in top left) and preview it in the Scene View. You’ll want to duplicate our tornado mesh GameObject a few times (3 layers in total), with each being scaled a little on the X and Z axis (e.g. Specifically I used scales of (1,1,1), (1.2, 1, 1.2) and (1.3, 1, 1.3)). Can put them inside another GameObject so you can control the scale of the whole tornado at once.
Each layer also uses a different material, with the scroll speed set to different values. The inner layer spins the fastest (1), while the middle and outer layers spin at speeds of 0.6 and 0.5 respectively. The two inner layers use a lower detail noise texture (e.g. single-octave perlin noise, visually similar to the Gradient Noise node, but seamless), while the outer layer instead uses a more detailed fractal noise (multiple octaves, visually similar to the Simple Noise node, but again seamless).
Vertex
For the vertex stage, we’ll be displacing the vertex positions to make our tornado sort of pulsate (via scaling), and then wobble (via translation).
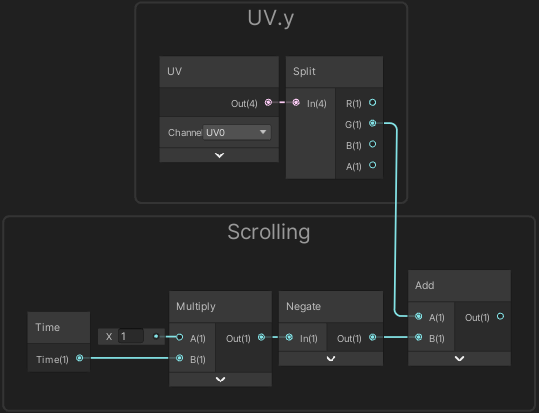
Use the UV node, Split and take the G output to obtain a gradient for the height of the tornado. Put this into an Add node. The other port will use a setup similar to what we did for the texture scrolling; use the Time output of the Time node and Negate. I’m also multiplying by an optional speed value but this needs to remain constant for all layers or they will wobble at different rates, so I’ve hardcoded it to 1. I’ve put this in a group called “Scrolling” as groups are a great way to keep the graph organised. We’ll need the output of this twice.
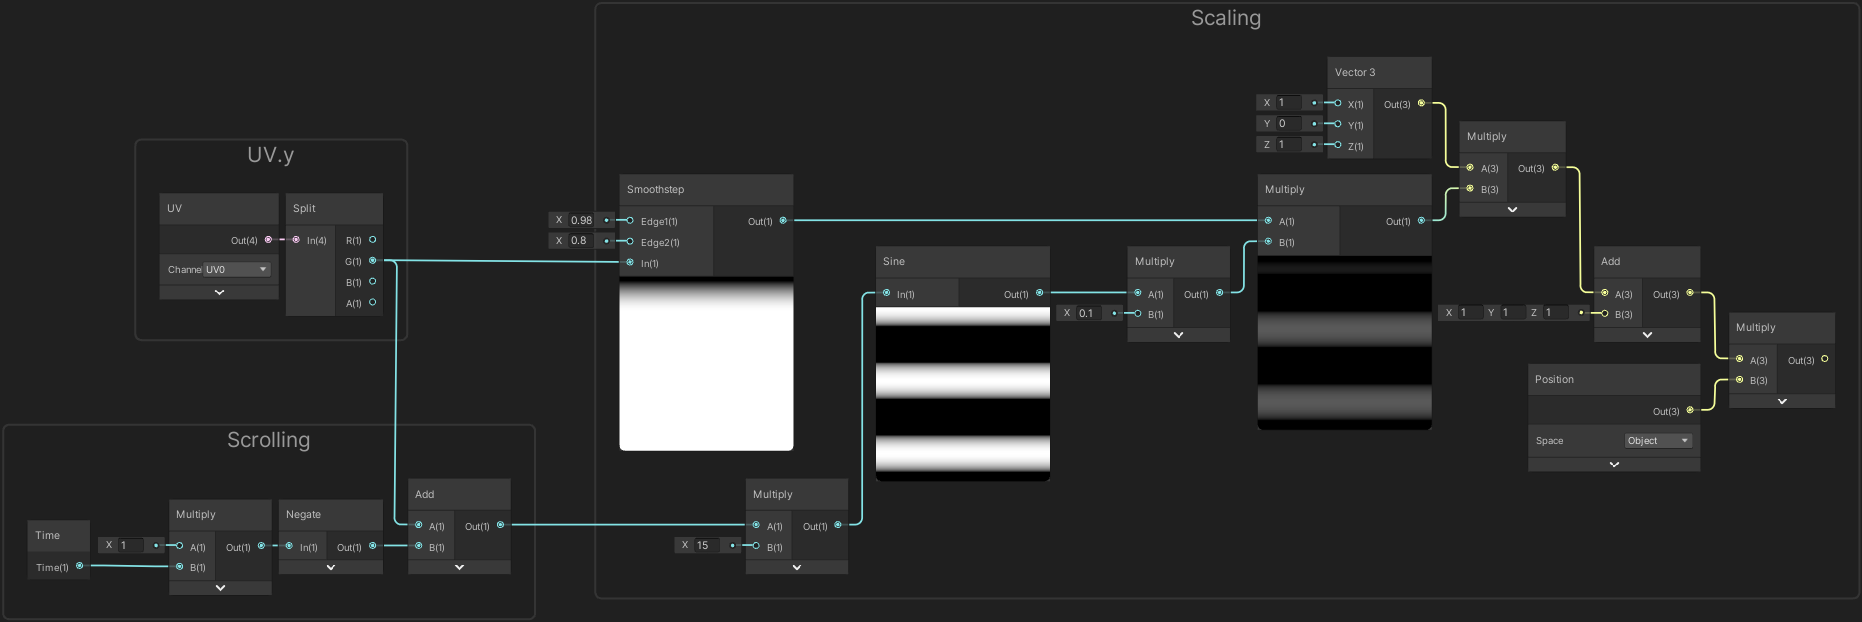
For the pulsating/scaling, we Multiply our output by 15, then use a Sine node. We only want to scale a little, so Multiply by 0.1.
Since the top of our funnel is already larger and we don’t want that to pulsate, we need to mask this effect so put the output into another Multiply. For the other port, take the G output from the Split (from UV node) again, then put it into a Smoothstep node. I’ve used values of 0.98 for Edge1 and 0.8 for Edge2.
We only want to apply the scaling on the X and Z axis, so Multiply again, this time with a Vector3 node set to (1, 0, 1). Then Add (1, 1, 1) since we want this applied to the original scale (not override it). Then Multiply by the Position node (Object space). If you want to preview this, put it into the Position port on the Master Stack, then check the Main Preview window or save the graph and check the result in Scene View.
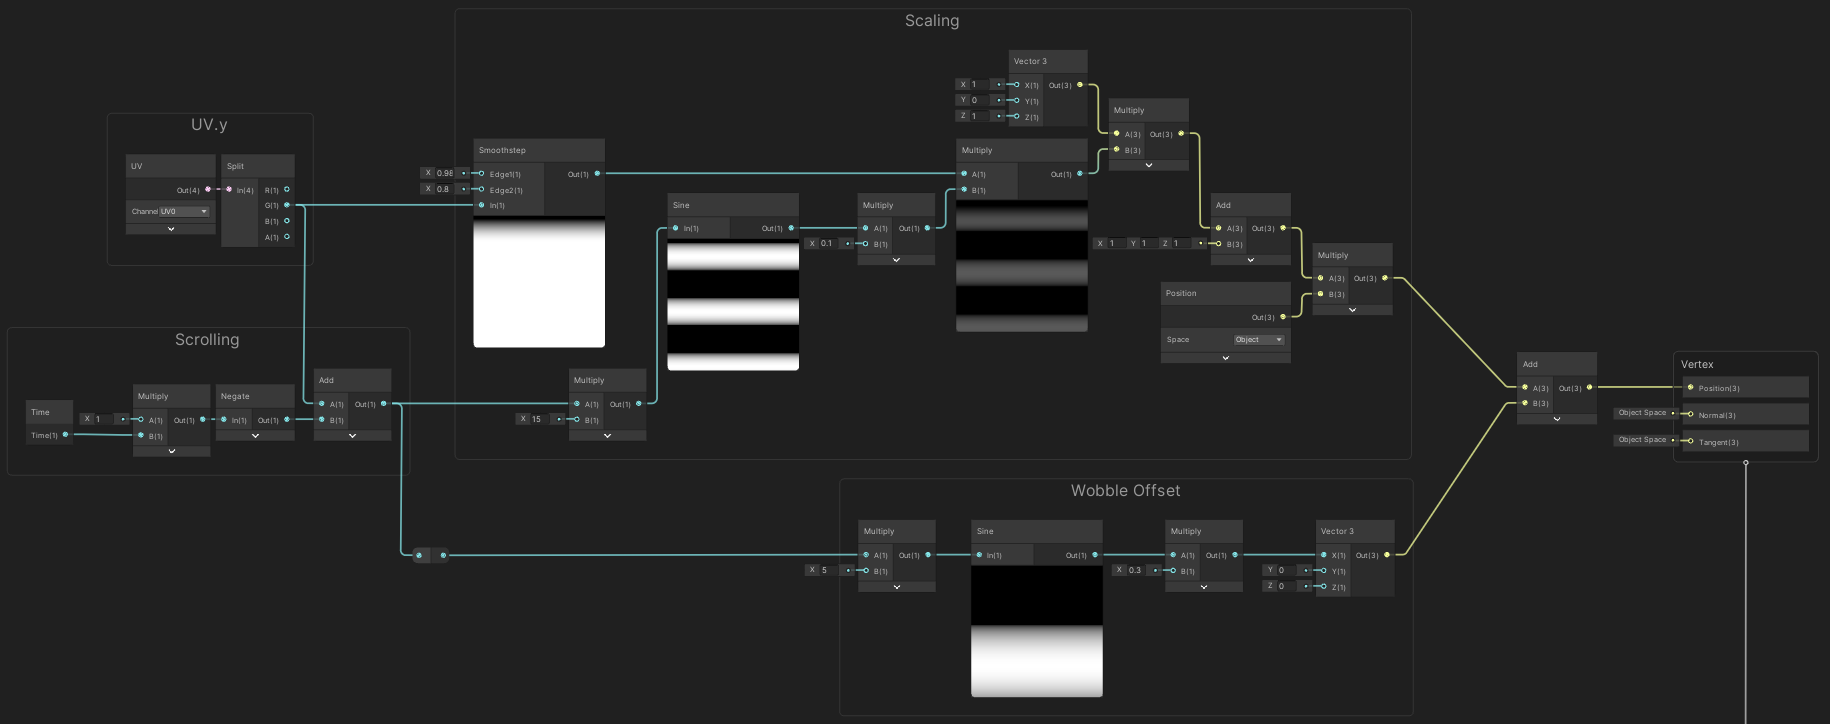
For the wobbling, we take the output of our Scrolling group again. Similar to before we Multiply then put into a Sine node, but this time with a smaller value of 5.
Since we only want to offset a little, we Multiply by 0.3 and the offset should only be applied to the X axis, so is put into the X input on a Vector3 node. We then Add to the output of our Scaling group and connect this to the Position port on the Master Stack.
(Click image to view fullscreen in new tab)
Particle Trails
As mentioned in the intro, the twitter gif also includes some particle trails swirling around the tornado. For these I used the Particle System component (Shuriken). In short, it involves spawning particles in a large cylinder, and using the Velocity over Lifetime module to apply some Linear, Orbital and Radial velocities to make the particles swirl into it’s origin. Trails module is also enabled and rendering the regular particles is disabled (so only the trails are shown).
There’s a lot of settings on the component but here’s a list of the more important ones that need editing from the defaults :
- Start Lifetime : 1.2
- Start Speed : 0
- Start Size : 0.2
- Start Color : Kinda dark grey (which appears more transparent as I’m using an additive material). Slightly tinted green as my tornado is also tinted that colour.
- Emission
- Rate over Time : 20
- Shape
- Shape : Cone
- Angle : 0
- Radius : 20
- Radius Thickness : 0
- Emit from : Volume
- Length : 8.5
- Position : (0, -10, 0)
- Rotation : (-90, 0, 0)
- Velocity over Lifetime
- Linear : (0, 2, 0)
- Orbital : (0, -5, 0)
- Radial : -15
- Trails
- Lifetime : 0.2
- Renderer
- Render Mode : None
- Trail Material : Material using URP/Particles/Unlit shader, Transparent, Additive blending, using circle texture.
Thanks for reading! 😊
If you find this post helpful, please consider sharing it with others / on socials
Donations are also greatly appreciated! 🙏✨
(Keeps this site free from ads and allows me to focus more on tutorials)