Sword Slash Shader Breakdown
Intro
Hey! This shader uses a technique similar to that of a "soulercoaster" (which are similar to ribbons/trails, commonly used in VFX involving magic spells). It involves panning a texture across a premade mesh, masking sections of it to be visible over time. In this case the mesh is a ring that will surround the player and we’ll be panning two textures - one trianglular shaped one which masks the shape of the slash, and a noise texture to add detail.
Notes
- This is an Unlit shader.
- I’m applying the effect to a regular Mesh Renderer but disabling it when the effect isn’t playing so we aren’t wasting time rendering something completely transparent. You could alternatively use a Particle System that emits a single mesh-based particle.
- To animate the effect (and sword mesh) in the twitter gif I’m adjusting the values of shader properties in a animation clip created via the Animation window. This tutorial won’t go over that part though, sorry.
- Bloom and ACES Tonemapping Post Processing is used in the Preview/Gif. There’s also some small particles applied to the sword (Cone shape with small angle, Emit 15 over distance, World simulation space, Noise module to make movement interesting)
Breakdown
Setup
Before we go through the shader, you should create a ring mesh to test it on (with UVs as shown), as well as a triangular shaped texture similar to the one shown below. Alternatively, you can download the mesh & texture I made here.
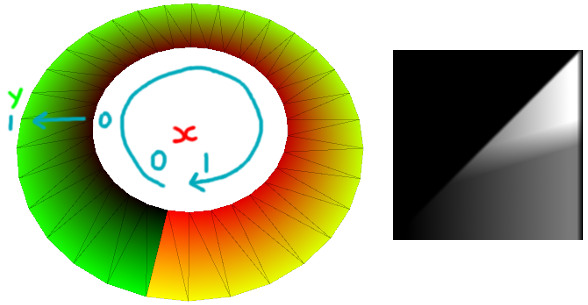
Also in the texture import settings, I’ve set the wrap mode to Clamp as we don’t need the texture to repeat. This isn’t too important as the shader will mask it out anyway, but it does help previews make a little more sense.
You should also get a seamless noise texture (or could use Simple Noise node but it’s nice to be able to swap it out for different noise types, and probably less expensive)
Graph
First we’ll go through making the slash shape. Create these properties in the Blackboard :
- Texture2D “SlashTex”, Default set to the triangle texture
- Float “Length”, Default set to 0.5, mode to Slider (keeping MinMax of 0 and 1))
- Float “Slash”, Default set to 0.5)
We should also set the References for these float properties. The exact reference string isn’t too important but I’m using the Animation window to animate them later, so it’s much easier if they are readable (e.g. _Slash and _Length). The animation also moves the sword mesh in my case, but you could probably instead play it alongside a regular character animation. (Note this breakdown won’t go over how to set up the animation side of things, just the shader, sorry!)
In hindsight, it may also have been better to have two length properties, one to animate (e.g. _AnimLength) and one to adjust per-material (_Length) as the animation currently overrides the length value which makes it difficult to change. The two properties would then be multipled together to obtain the actual length used. Feel free to do this, but the graph below won’t mention it.
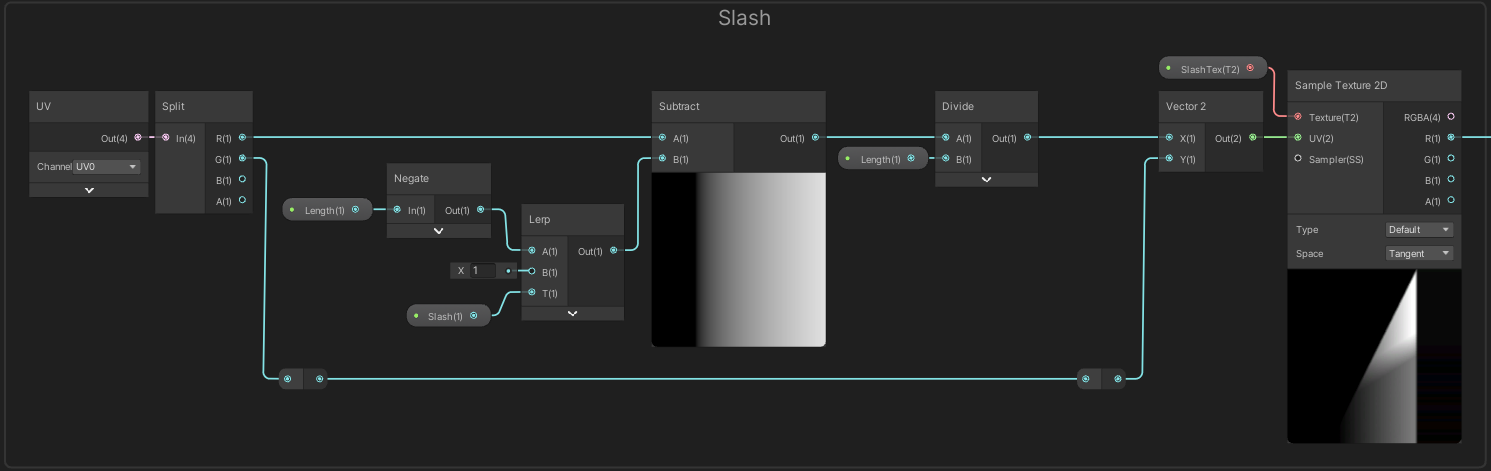
We’ll start by creating a Sample Texture 2D node with the SlashTex property as the Texture input. We want to offset the X axis of the texture so that at Slash == 0 the triangle is only just off the left of the preview, and at Slash == 1 it’s just off the right of the preview. This is achieved by :
(Click images to view them full size)
The UV node is Split to obtain each axis, from the R/X output we Subtract a Lerp node with A set to the Length property put through a Negate node. B is left at a value of 1 and T is set to the Slash property. Then Divide by the Length property. This is put into the X input on a Vector2 node, with the Y input set to the G/Y from the Split from earlier, then into the UV input on the Sample Texture 2D node.
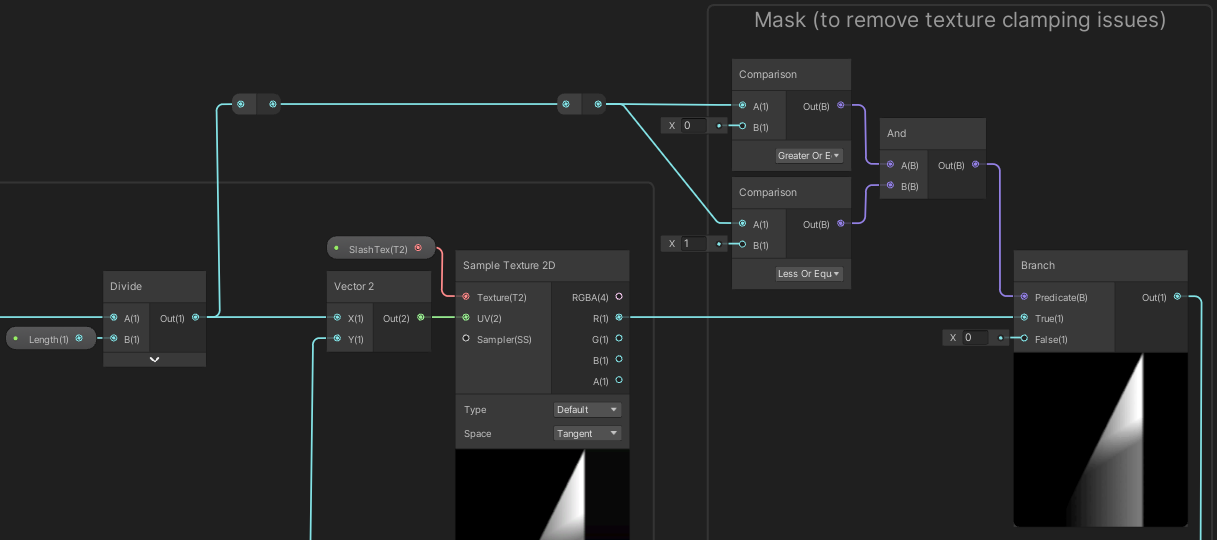
To remove any repetitions or clamping artifacts from the texture, we’ll also take the output from the Divide node and put it into two Comparison nodes. The first with B set to 0 and the mode set to Greater Or Equal, and the second with B set to 1 and using Less Or Equal. The boolean output of these is put into an And node, then into the Predicate on a Branch with the texture result in True and 0 in False.
We also want to fade the texture at the edges of the mesh to help hide the mesh shape. Use another UV node and Subtract a Vector2 node set to (0.5, 0.5). We then use an Absolute node to make all values positive. The values at the edge are only 0.5 but we want them to be 1 so we need to Multiply by (2.7, 2) (The X value is slightly larger as we want the texture to fade in more along the ring, you could also use a Vector2 property to control this).
We then One Minus as that’s what we need for the mask, and Saturate to remove any negative values. We can then Split and Multiply the R and G outputs together.
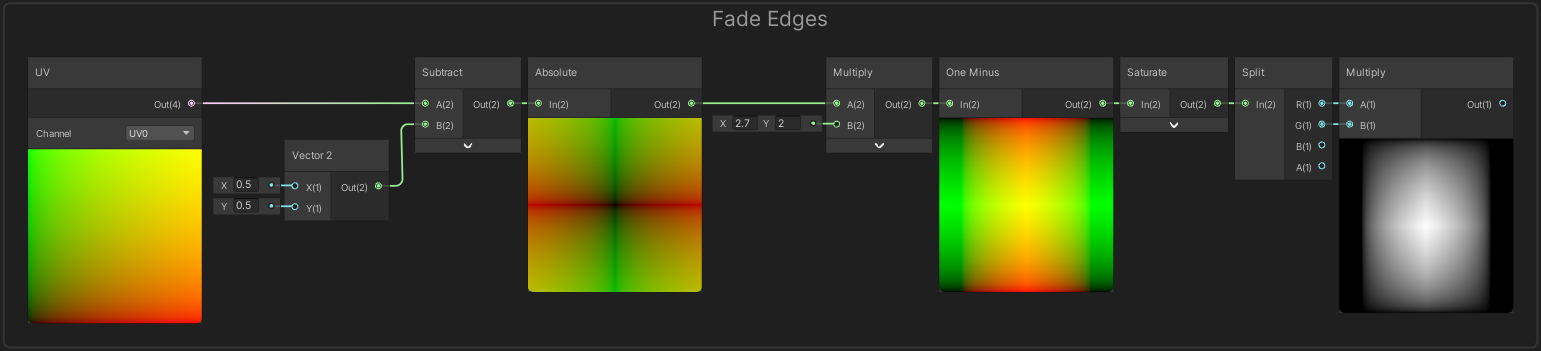
It might be hard to visualise because of the red/green in the previews, but we are fading both sides at the same time by using a Vector2, instead of doing the calculations separately which would be less efficient.
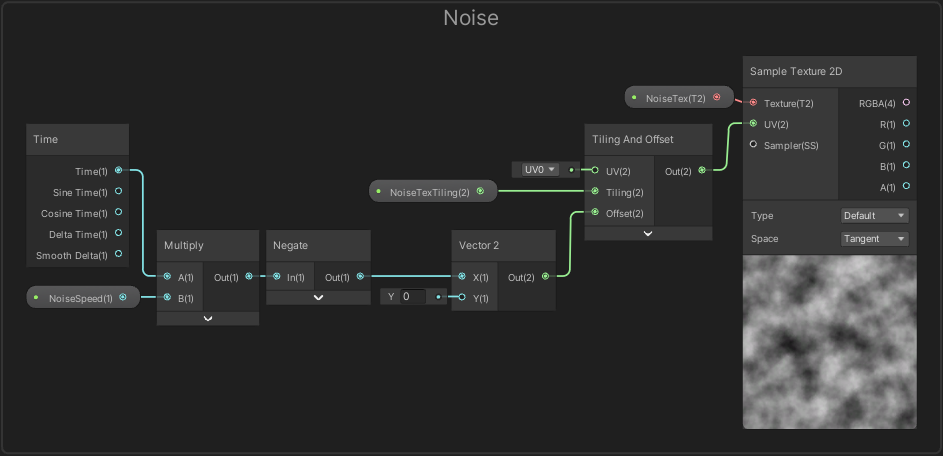
We haven’t connected this group into the rest of the graph yet but don’t worry, we’ll come back to it. We’ll first set up the Noise to add some detail to the slash. This will just be a regular panning texture. We’ll need some more properties to be set up in the Blackboard :
- Texture2D “NoiseTex”, Default set to a noise texture (repeatable without seams)
- Vector2 “NoiseTexTiling”, Default set to (1, 1)
- Float “NoiseSpeed”, Default set to 2
We use a Sample Texture 2D node to sample the NoiseTex property, with the UV set to a Tiling And Offset node. The Tiling is set to a NoiseTexTiling property and Offset is set to a Vector2 node. The Y input remains at 0 but X is set to a Time node, multiplied by the NoiseSpeed property put into a Negate node.
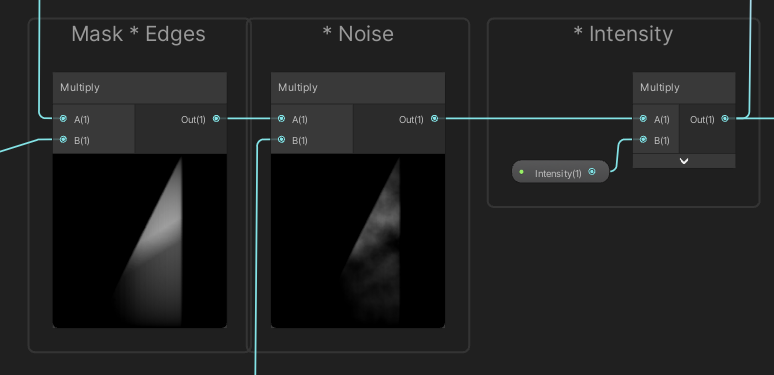
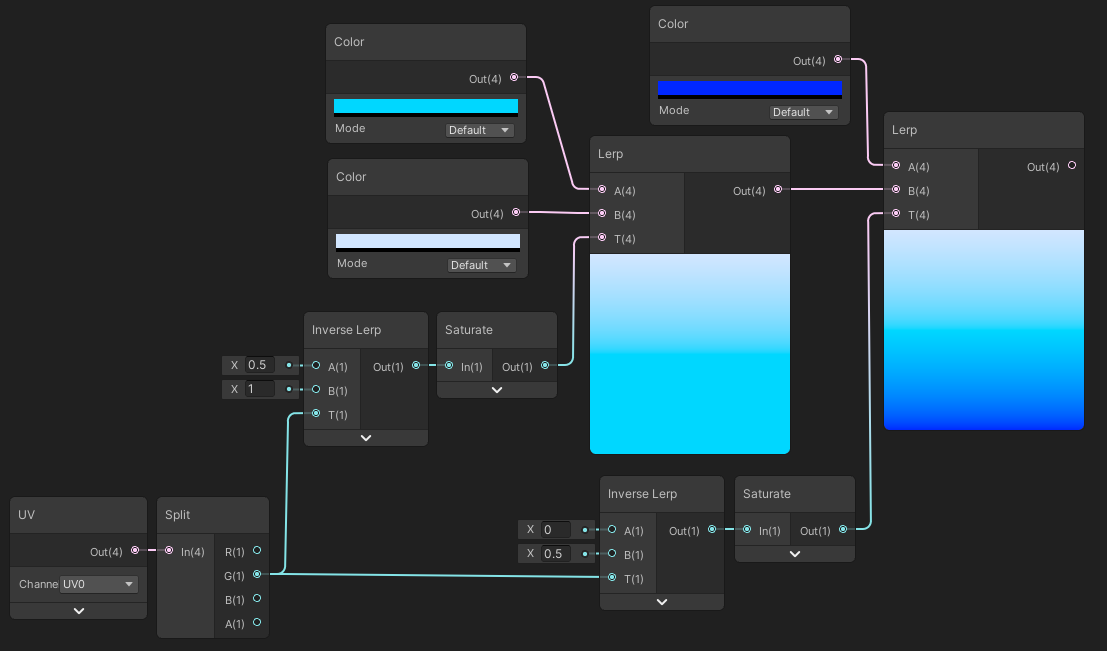
In order to combine these groups, we use two Multiply nodes. The order they are multiplied is not important. We also want another Multiply with a Float “Intensity” property (set to a Default value of 20).
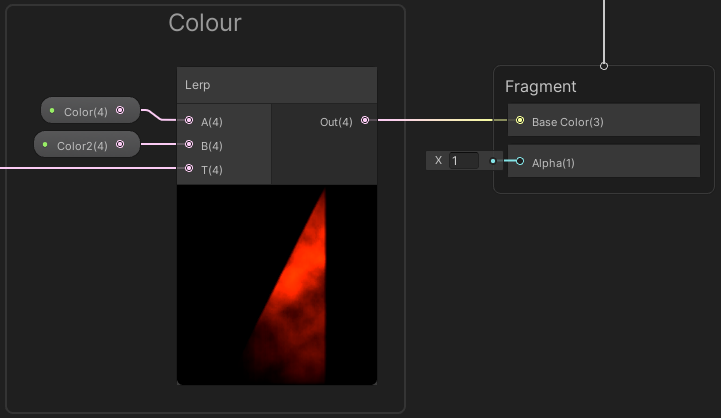
We can then put this into the T on a Lerp node with A and B set to two Color properties. This is put into the Base Color (aka Albedo) port on the Master Stack.
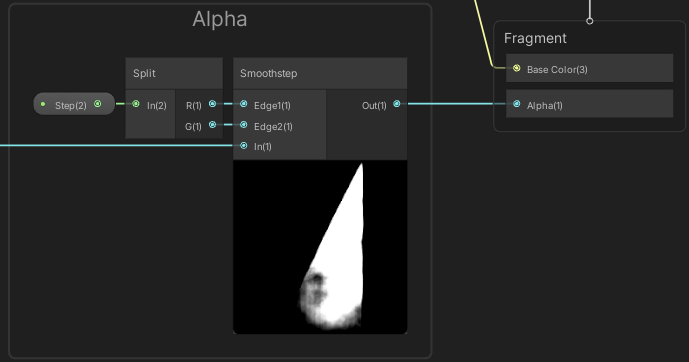
The output of the Intensity group is also put into the In input of a Smoothstep node, with Edge1 and Edge2 set to a Vector2 “Step” property (Default set to (0, 0.1)) put through a Split.
Enabling HDR on the URP Asset and using Bloom Post Processing and ACES Tonemapping can improve the look further. For more control over the colours you could also try adding a 3-way colour gradient or sample a gradient texture (or Gradient property, though they can’t be exposed).
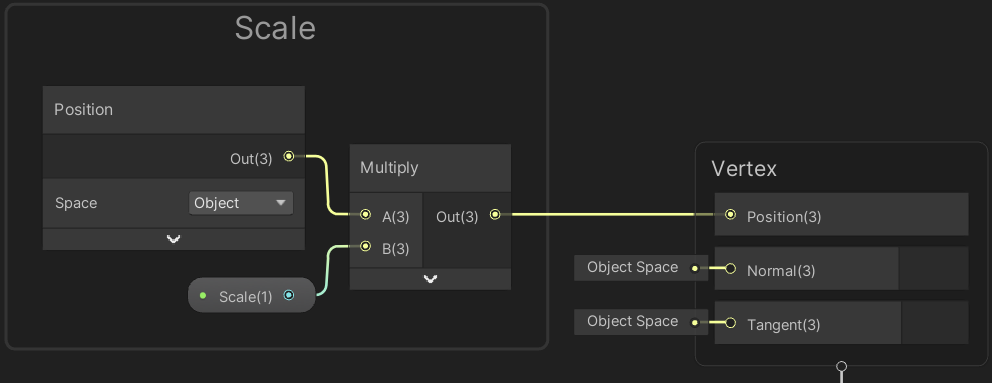
You can also optionally have a Float “Scale” property and Multiply it with the Position node (Object space) to put into the Position port on the Vertex stage of the Master Stack. This can be used in the animation to change the size of the slash effect (e.g. start small and grow), assuming the origin of the mesh is at the center of the ring. This size change could probably also be baked into the ring mesh by having it shaped more like a slash than a perfect ring.
Thanks for reading! 😊
If you find this post helpful, please consider sharing it with others / on socials
Donations are also greatly appreciated! 🙏✨
(Keeps this site free from ads and allows me to focus more on tutorials)