Sprite Stencil Overlay Breakdown
Intro
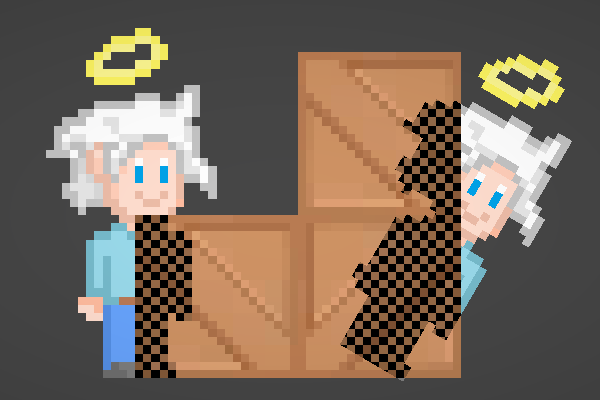
Hey! I recently helped someone out with an effect they wanted to create, which involved creating a dithering-like overlay effect when the character is behind other sprites, (similar to the example shown in the tweet above). I thought this might provide a nice example of how to use the Universal RP’s Renderer Features to override Stencil values.
The tutorial was written for the Universal Renderer (aka Forward Renderer in older versions). As of Unity 2021.2+ the 2D Renderer also supports Renderer Features so may work with that too.
Though note, the 2D Renderer only exposes the “Default/Filtering Layer Mask” in 2022.3.61f1, 6000.0.42f1, or newer. For older versions you could not prevent objects rendering in normal queues, meaning the ‘Infront’ layer would render twice (or needed an additional override material with ColorMask 0 to only render stencil values - which prevented writing to the color buffer twice, but would still be two passes)
It is also possible to handle stencils separate from renderer features too which could work instead (though is not the focus of this tutorial). e.g. writing Stencil operations in the shaders directly (see Stencil docs page), or the Sprite Mask component may be more suitable.
Notes
- This uses an Unlit Sprite shader for the checkerboard pattern overlay, but the main focus is on RenderObjects feature in URP.
- This example is for 2D/Sprites, but a similar approach would work for 3D and opaque geometry too (though the setup may need to be slightly different). You can also achieve a similar effect in 3D using the depth overrides instead of stencil, as shown in this Brackeys video.
- Due to the way the RenderObjects feature works, the objects on the Infront layer and Player overlay will always render on top of everything else transparent, regardless of the SpriteRenderer’s sorting layers / order in layer, and/or material’s Render Queue. If you want to render something after this effect you might need to set up an additional layer and RenderObjects feature.
Breakdown
Layer Setup
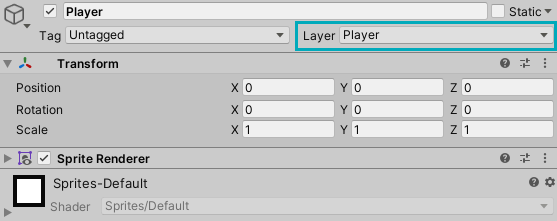
To start with this effect, our Player GameObject (with the SpriteRenderer) needs to be assigned to a new Layer, which we will call “Player”.
Objects that are in-front of the player (where the overlay will appear) will also be assigned to another layer, named “Infront” (or “Foreground”, the name isn’t too important).
Example Overlay Shader
Next we need to write a shader for the overlay effect, for this I’ve used a Sprite Unlit Graph. There is a Checkerboard node, however this is anti-aliased, so will have transparent parts, which may not be the intended result if using a pixel perfect approach. Instead, I’m creating the checker pattern by using a combination of Fraction, Step and Lerp nodes – (but play around with each approach and see which suits your project best!)
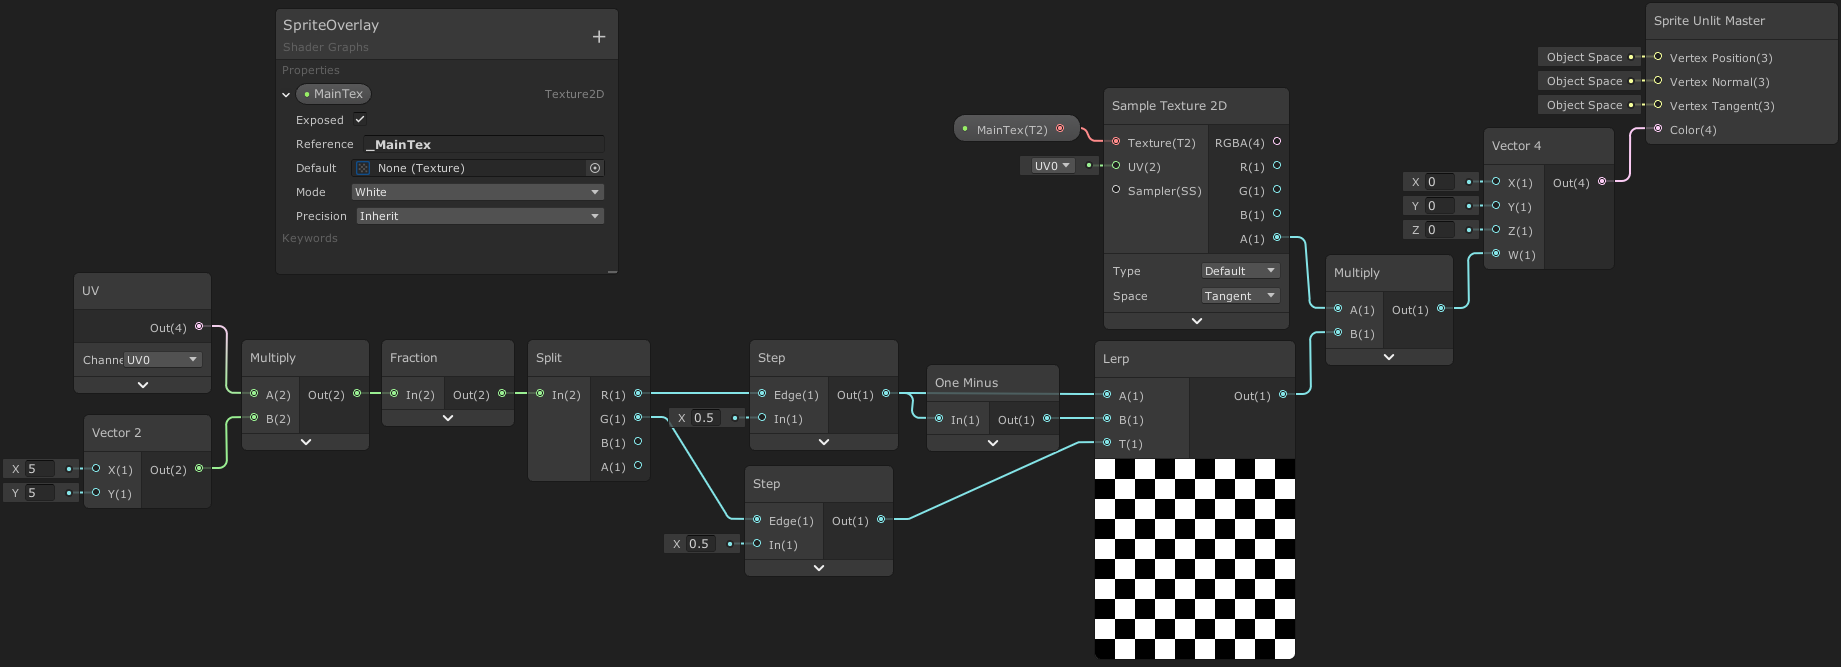
Can use Position set to World rather than UVs if you don’t want the effect being stretched & scaled by UVs. (Note, the twitter gif also uses Add 0.5 after the Lerp).
To use the sprite from the SpriteRenderer component, we use the Texture2D property with the _MainTex reference. Since this is just for an overlay, I only need the alpha component of the texture, which is multiplied with the checkerboard effect to ensure it stays within the bounds of the sprite.
Create a new Material using this graph. We’ll be using Stencil overrides on the Renderer asset to overlay this material on top of the player sprite - but only when it is hidden behind objects in the Infront/Foreground layer.
Renderer Asset
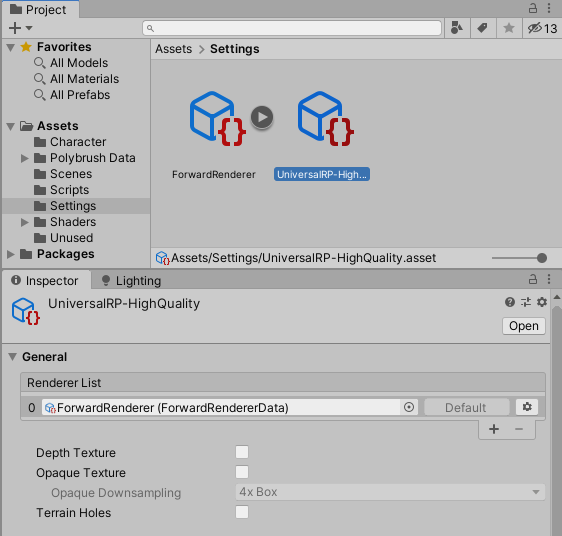
Assuming you have URP set up correctly, under your project/assets you should have a Renderer Asset. At the bottom of this (in the inspector) is a list where you can add Renderer Features. Unity provides some features, one of which is RenderObjects which re-renders any objects specified by the Filters on the feature, while also allowing certain things to be overridden - such as Depth, Stencil and Camera projection. We’ll only be focusing on the Stencil overrides in this post.
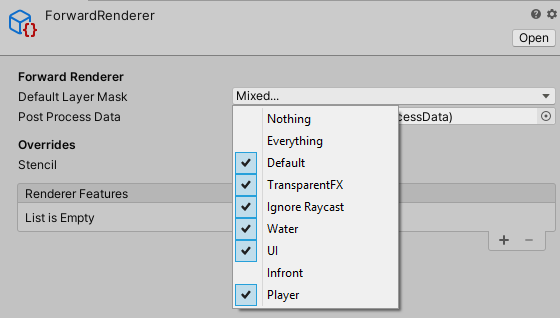
Ideally, we don’t want to render objects on the Infront layer twice, so should also exclude them from the Default Layer Mask (split into Opaque and Transparent Layer Masks in newer versions), at the top of the Renderer Asset (though only for the Universal/Forward Renderer). This means we won’t render objects normally on that layer, so in the scene/game view those objects should disappear. But we can then add a RenderObjects feature to render them, specifying the additional overrides (as explained below).
For the Player layer, we want to render it twice so should keep it in the default mask. This is because we will be overriding the material to create the overlay and still want the normal sprite/material to show.
Stencil Overrides
The Stencil overrides allow us to write a value to the Stencil buffer (for shaders this is usually an 8 bit integer value which is 0 to 255, however the Stencil Value slider only allows values of 0 to 15… for some reason. We only need to use a single value for the effect anyway though).
We can also test against the value currently in the buffer at the same time, based on operations like Less, Greater, Equal, Not Equal, etc. If the test fails, it discards the pixel, and the Pass, Fail and Z Fail settings show what happens to the value in the buffer when the test passes or fails (e.g. Keep the current value in the buffer, add/remove 1 from the current value, or Replace it entirely with the value that was tested).
For more information on the stencil buffer and operations, see the Stencil docs page, (note that it is for code-written shaders but still applies).
Render Infront Objects
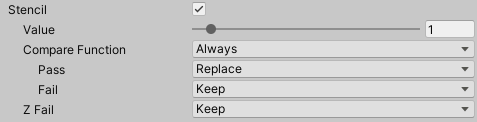
So in order to create our overlay effect, we first need to have our Infront layer objects write a value of 1 into the Stencil buffer. Will need Replace to do this. Since we don’t want a comparison here, we use Always. The full RenderObjects feature is as shown :
Note that all objects are currently using the default sprite material, which places them into the Transparent render queue. We need to specify this in the Queue under the Filters on the feature.
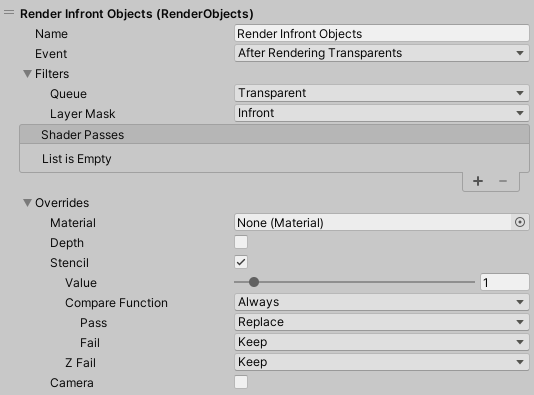
- Name : Render Infront Objects
- Event : After Rendering Transparents
- Filters
- Queue : Transparent
- Layer Mask : Infront (/Foreground)
- Overrides
- Stencil : enabled
- Value : 1
- Compare Function : Always (or Disabled).
- Pass : Replace
- (Fail settings don’t matter, as Always and Disabled will always pass)
- Stencil : enabled
Render Player Overlay
Now we need to render the Player (for a second time - since the Default Layer Mask includes that layer too), using another RenderObjects feature. This time testing against the value in the buffer (Equal comparison), and overriding the material to show our overlay :
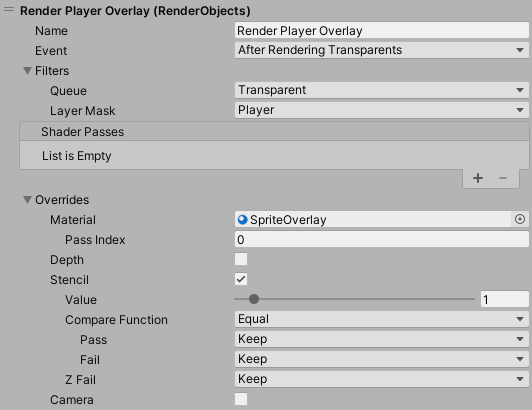
- Name : Render Player Overlay
- Event : After Rendering Transparents
- Filters
- Queue : Transparent
- Layer Mask : Player
- Overrides
- Material : SpriteOverlay Material
- Stencil : enabled
- Value : 1
- Compare Function : Equal
- (Stencil writing settings (Pass/Fail) don’t matter here, as we aren’t doing any stencil testing after this)
By using the Equal comparison function, we test for the value of 1 in the stencil buffer, which we wrote in the previous RenderObjects feature.
If the stencil buffer contains a value of 1, the test passes, so renders the pixel. If it fails, it discards the pixel.
We’ve also overridden the Material used for rendering, to use our SpriteOverlay material which is using the checkerboard Shader Graph example from earlier. This produces the final result as shown below and in the tweet at the start.
Thanks for reading! 😊
If you find this post helpful, please consider sharing it with others / on socials
Donations are also greatly appreciated! 🙏✨
(Keeps this site free from ads and allows me to focus more on tutorials)