Book (w/ Turnable Pages) Breakdown
Intro
I’ve been taking an extended break recently so haven’t made or written any tutorials in a while. But the latest shader experiment I did involved a Grimore/Spellbook, which had turnable pages. I’ve already shared some info & graphs on socials - though it’s not always easy to find content there (and who knows how long Twitter/X will last… 🙄), so here’s a proper breakdown too!
I wanted the book to be able to open and close, and felt that rigging the model and animating it in the usual way made sense. While I could have rigged pages too, I thought it was more interesting to use a vertex shader to turn these. The page only really needs to flip around it’s origin - so should be a fairly simple displacement. (Though this assumes the book is fully open)
A C# script is used to control when pages should flip - (in my case, when the mouse is clicked). It also pools the page GameObjects and reuses them to avoid unnecessary instantiation & destroying, and is responsible for setting material properties to control the turning/flipping and which pages are displayed.
Notes
- Made this in URP using Lit Graph, but may work in others.
- In my original attempt (shown in tweet above), the normals on the flippable page didn’t exactly match that of the book mesh (due to issues with the model). I’ve since fixed this.
- Note that the heights of the page stacks on either side of the book mesh do not change. It always appears to be halfway through regardless of which page is shown. Might be possible to change the shaders to account for this, but it isn’t something I tried to tackle.
Breakdown
Model & Setup
First up, we’ll need models for the book and a page. As I want the tutorial to focus more on the shader, I’m not going through the modelling process here in any detail - (I’m certainly no expert at that anyway).
If interested you can download a Book Model I made (CC0 License). It’s similar to the one shown in the tweet at the start of the post, but without the pentagram decoration on the front cover. It is rigged & animated - (but if you don’t want that can disable those in the import settings). To handle the animation you’ll probably want to create an Animator Controller but that’s somewhat outside the scope of the tutorial.
Alternatively you can make your own - the foldout below will go through some tips & things important for the shader to work correctly, (or can look at the models I made as examples).
Model setup tips/info
- The origin of the book (and page model) should be in the center - though it’s only important for the X axis iirc. In my case I have it at the center along it’s spine.
- Modelling the book in it’s open state may help keep normals consistent.
- Fairly important the book is symmetrical. If using Blender, I’d recommend using the Mirror modifier. Can use the mirror on both the X and Y axis. (I did this as two separate modifiers to also flip the UVs correctly)
- To make it easier to apply textures/shaders, I apply different materials to the top faces/pages of the book. With this you can unwrap the rest of the book in basically any way you want - But the pages can be unwrapped with “Project From View (Bounds)”. If using mirror modifiers like I am, you’d want to scale this down and move it to a corner :
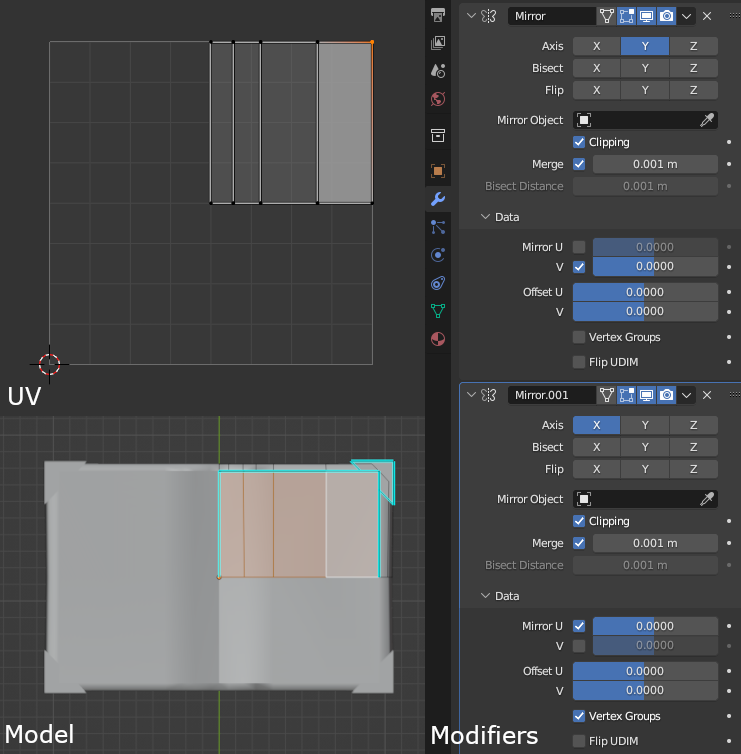
- Once modelled and unwrapped, you’ll want to duplicate the right page. Can do this in Blender by highlighting faces, Shift+D to duplicate, P to separate (by selection). Go into object mode, select new object and remove the second mirror modifier. (If the model is already rigged/animated, may need to first duplicate the whole model and apply the armature modifier while the book is open)
Import the model into Unity and place it in scene. While Shader Graph itself gives previews (including Main Preview which can have custom meshes), I’ve always found it much easier to save the graph asset and visualise in scene. You may want to do this at various times during the tutorial to see how nodes affect the result.
We’ll need to create two Lit Graphs. In my case I’ve named them “BookPages” and “PageTurn”. Create materials using these shaders and apply them to the book’s pages and separate page objects respectively.
For my model, the book has two submeshes so will need two materials applied. The cover can use a regular material using the default shader (Standard, URP/Lit, etc). I’m not going through that part, you can unwrap that part of the model and texture this as you wish.
Shader Graph (Book Pages)
The book uses a shader graph as we want to apply page textures. While these could be put into a Texture2DArray (assuming target platform supports them), I chose to instead just use a long Texture2D. We can then offset the UV coordinates to select which page should be shown - and to make this easier, we can use the Flipbook node.
You’ll probably want to create your own texture later - (I show how I generated mine in the final section, or you can manually draw one) - but for now it’ll be easier to use this :

0-7 Numbered Pages Texture (CC0 License)
First, set up some properties in the Blackboard :
- PagesTex (Texture2D), Default = (set to 0-7 numbered texture above)
- PageCount (Float), Default = 8 (for this texture)
- PageIndexL (Float), Default = 0
- PageIndexR (Float), Default = 1
Make sure the Reference fields of these properties match the name, but starting with “_”
Shader Graph should do this automatically, but older versions may instead use an auto-generated string of characters which will need to be changed - otherwise the C# script later will not work.
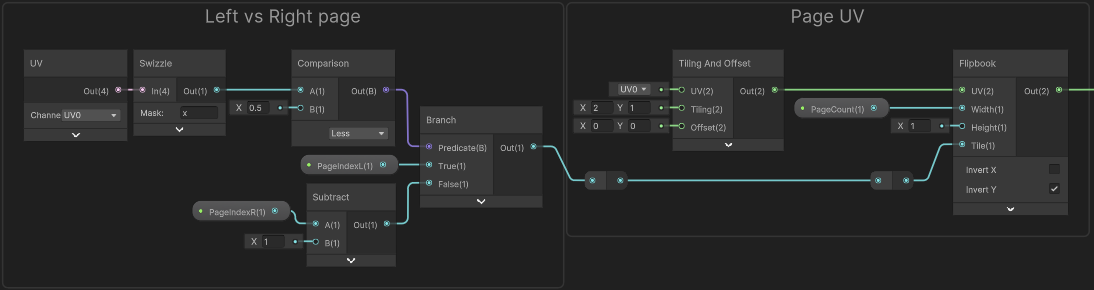
Set the Width port of the Flipbook to the PageCount property, and Height to 1. As we want to map the texture to both pages, we’ll need to use a Tiling And Offset node with Tiling set to (2, 1) for the UV port.
For the Tile input, we need to use either the PageIndexL or PageIndexR properties depending which page the fragment/pixel is part of. Can handle this with a Branch where the Predicate is set to a Comparison (Less) between the X coordinate of the UV and 0.5.
We actually also need to Subtract 1 from the PageIndexR to obtain the correct result, due to the tiling.
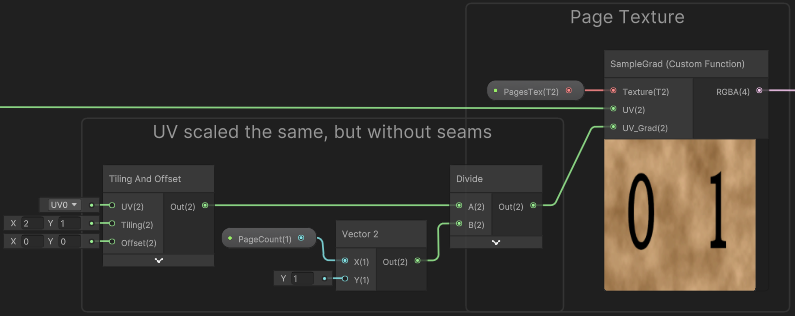
With this we can sample the texture. But instead of a Sample Texture 2D I’m actually using a Custom Function node instead to handle this. Given the function body here is fairly short, I find it easiest to use the String mode - (can put it in a SubGraph if you want to reuse it) :
Inputs :
- Texture (Texture2D)
- UV (Vector2)
- UV_Grad (Vector2)
Outputs :
- RGBA (Vector4)
- A (Float)
Name :
- SampleGrad
Body :
RGBA = SAMPLE_TEXTURE2D_GRAD(Texture, Texture.samplerstate, UV, ddx(UV_Grad), ddy(UV_Grad));
A = RGBA.a;
We pass in our UV and a second UV set scaled in the same way. Reasons for this is explained in the foldout below.
Why are we avoiding Sample Texture 2D here?
Technically, you could use that node instead. But as our Flipbook node can select different Tiles for the left and right pages, it can cause a jump/seam in the UVs down the center of the book. This leads to a larger derivative (difference in values) across the 2x2 pixel blocks that fragment shaders run in.
This is interpreted as needing to fit more of the texture inbetween those pixels, so the gpu samples a higher mipmap level (more blurry / smaller resolution). It only does this for those pixels along the seam so isn’t a huge issue, but it can be noticeable and I wanted to avoid it.
To fix this, there are some options:
- We can disable mipmaps on the texture (or use Sample Texture 2D LOD with LOD set to 0). But this leads to visual artifacts when viewing it at a distance - what mipmaps are intended to solve.
- We can use the Calculate Level Of Detail Texture 2D node for the LOD level in the Sample Texture 2D LOD node. This somewhat works, but only based on distance - it ignores Anisotropic filtering which helps sharpen the texture/mipmap when viewing the texture from a side angle.
- Instead, we can use different UV coordinates for calculating derivatives across the 2x2 pixel block. There isn’t a node in ShaderGraph that handles this, but we can use the
SAMPLE_TEXTURE2D_GRADmacro in a Custom Function. We’d want to scale the other UVs in the same way (as shown by the UV_Grad input used below), but avoid creating seams.
My book pages mesh also includes the sides of the pages which currently may be textured a bit strangely.
To apply a different textures/colour to the side we first need some way to distinguish between these faces. I (somewhat lazily) used the Normal Vector as only the top faces have normals pointing roughly upwards, so can Split to take the Y/G axis and do a Comparison with a value of 0.6-ish. (Could alternatively use Vertex Color)
This can be put into the Predicate on a Branch node - the True port being the top, so result from our SampleGrad Custom Function, while False is for the sides. To look like a stack of paper/pages, I sample a noise texture for this with the X Tiling set to 0, but you could instead make a texture with random lines. (Could also use maths, but I’d recommend textures as mipmaps help avoid aliasing/moiré artifacts when viewing from a distance)
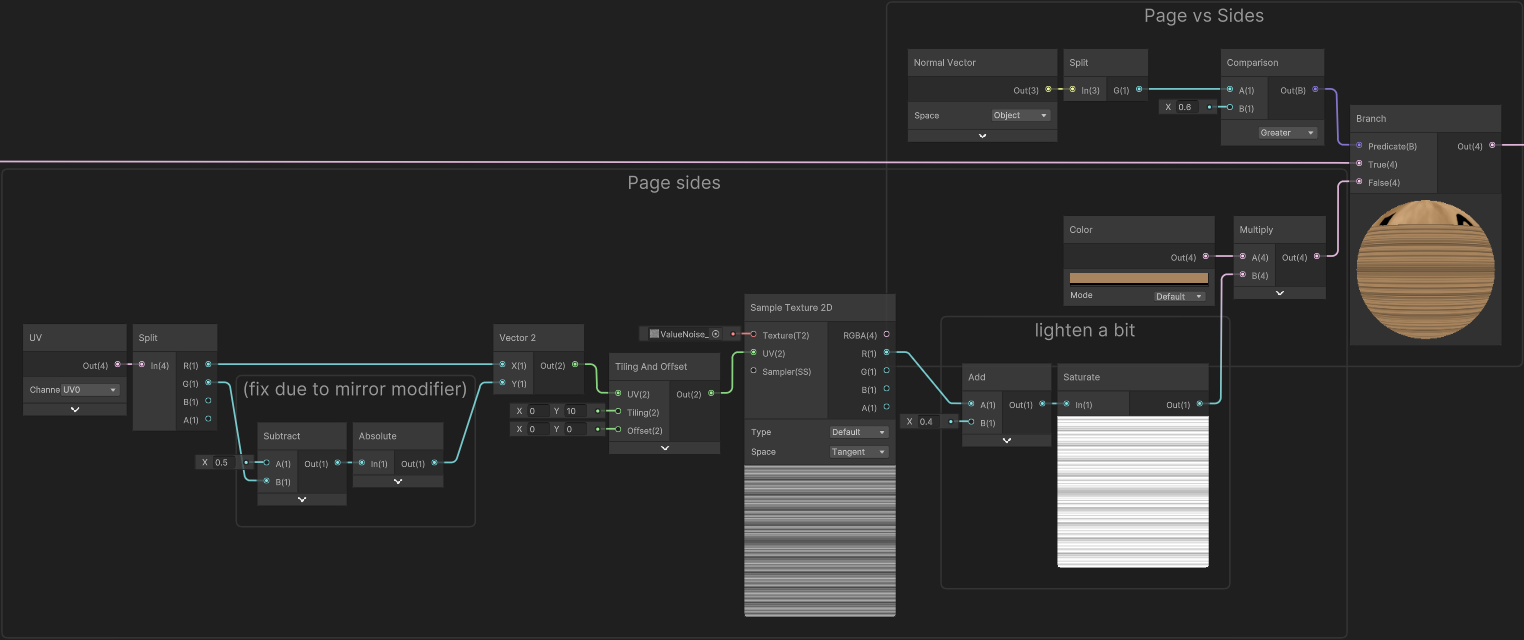
Due to how the mirror modifier works on the mesh UVs (which I haven’t applied, so don’t have full control over), there will be a seam at the middle if you use the UV as-is. To fix this, I Subtract and Absolute as shown above, to undo the mirroring (for sides only).
Finally, connect the output of the Branch to the Base Color on the Master Stack. I’ve also hardcoded Smoothness and Metallic at 0 as they shouldn’t really be needed here, but you can create properties for these other ports if you prefer.
Shader Graph (Page Turn)
Our book can now select different pages, but to complete the illusion we need to be able to spawn extra page objects that turn. We’ll worry about spawning them later - for now, we’ll set up our second graph for these pages.
Under the Graph Settings set Render Face to Both. With this, both front and back faces of the mesh are visible. We’ll be able to texture these differently later, by using Is Front Face nodes.
Vertex
But first, let’s tackle the vertex stage. Our page mesh is currently on the right side of the book. You might think about rotating the vertices counter-clockwise with the Rotate About Axis node, but the page isn’t perfectly flat (it bends slightly in the middle) so makes it trickier - the page mesh would be upside down!
In order to turn correctly we want it to end up mirrored/flipped across the book (object space X axis). In terms of math, that means multiplying the vertex position by (-1, 1, 1). The first component should start at 1 (page on right side), and animate towards -1 (page on left side). For animating there is the Time node, but this is constant increasing and can’t be started/stopped. For complete control, we should instead create a Float Property. In my case I named it “PageFlip”.
It’s somewhat arbitary what range of values the property could use, but it makes the most sense to pass it in from C# in a 0-1 range (similar to the “t” input in lerp and other interpolations). You may also want to set the type of the property to Slider to make testing from the Material Inspector easier.
In the shader we could remap the property into the -1 to 1 range we need for mirroring, but as this is meant to simulate a rotation we’ll want to instead be using trigonometric functions (Sine and Cosine).
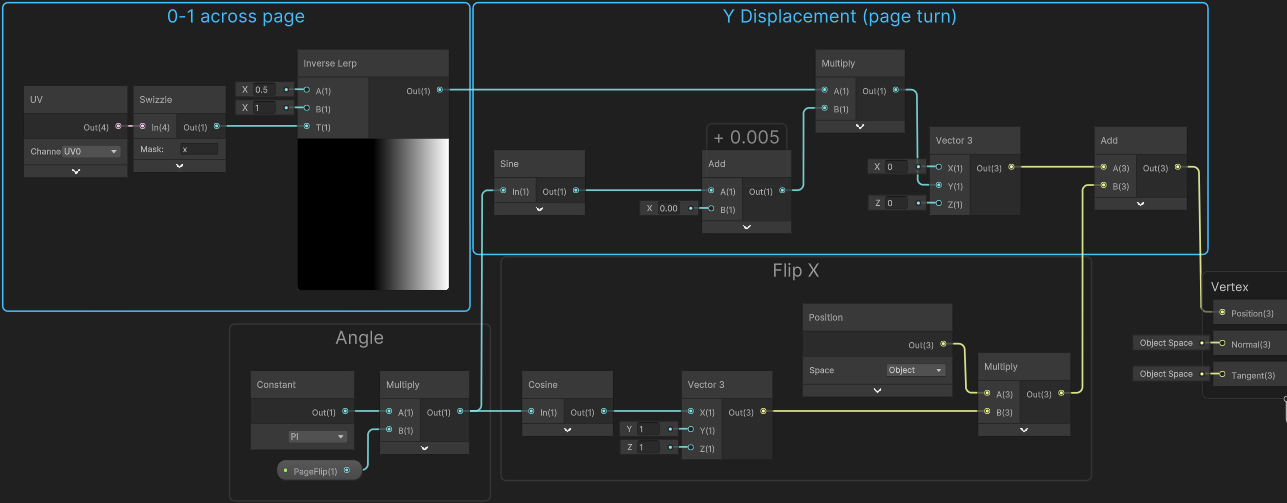
As these functions take an angle in radians, we first Multiply the property by PI from a Constant node - (equivalent to 180 degrees). Put this into Cosine, then into X port on a Vector3 node with Y and Z set to 1. To apply this, Multiply this by the Position node (set to Object space).
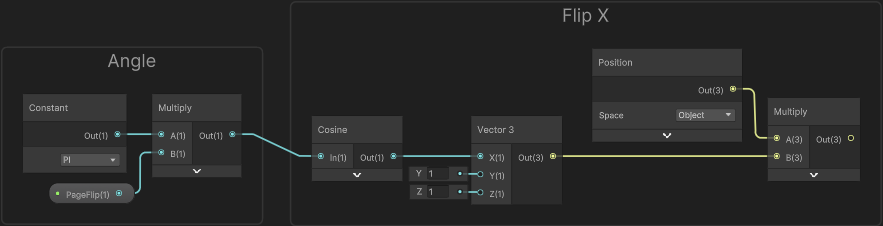
Feel free to attach this to the Position port in the Vertex stage of the Master Stack. Then adjust the property on the material to see how it affects the mesh.
To actually make the page move in an arc / semi-circular motion we’ll need to add some offset to the Y axis. Take the angle again, but this time put it into a Sine node. We’ll also want to Add a small amount (i.e. 0.005) to avoid the page Z-Fighting with the pages of the book mesh.
We don’t want vertices closer to the center of the book moving as much. We’ll want to take the UV, Split to take the X/R axis (or Swizzle with “x”) as that’s horizontal along the page. As the mesh UVs take up the right half of the UV quad, we’ll also need to remap slightly. Put this into the T input on an Inverse Lerp node, with A set to 0.5 and B set to 1.
Multiply with the result of the Add node from before, and put into the Y input on a Vector3 node, leaving X and Z at 0. Then Add this to the scaled/mirrored position from before to apply the offset. Put this into the Position port in the Master Stack.
(Selected groups are the new additions)
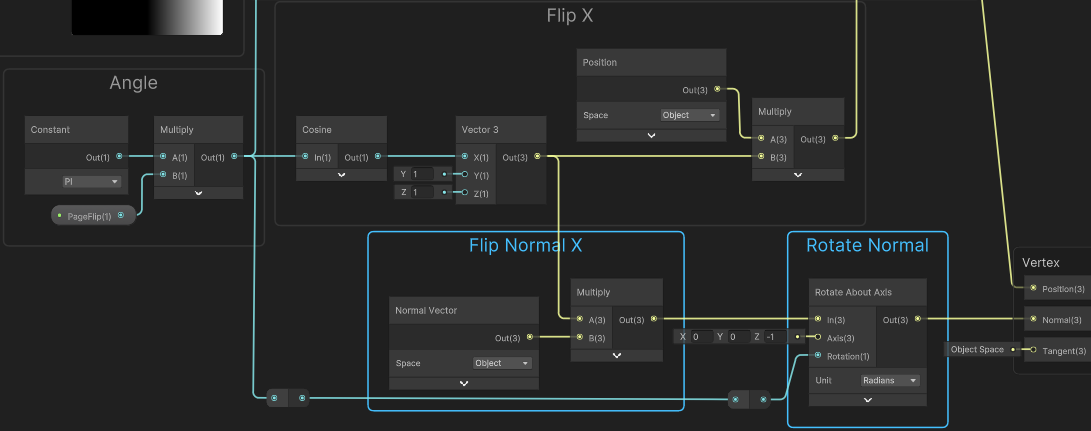
This works quite well, but when mirrored the shading doesn’t perfectly match the left page of the book mesh. This is because while we’ve changed the vertex positions, the normals remain untouched.
Calculating new normals for this displacement is actually quite easy - we can take the Vector3 used in the mirroring and Multiply this with the current Normal Vector, flipping it in the same way. We can then use a Rotate About Axis node with Axis set to (0, 0, -1) and set the Rotation to our angle we calculated earlier. (Can use this node as normals are directions - not positions, so the page not being flat doesn’t really affect us here)
(Selected groups are the new additions)
Fragment
Similar to the prior graph, we’ll use a Flipbook node to select a portion of our long pages Texture2D. As there is no issue with seams this time, we can also use a Sample Texture 2D node.
Set up the following properties in the Blackboard :
- PagesTex (Texture2D), Default = (set to 0-7 numbered texture)
- PageCount (Float), Default = 8 (for this texture)
- PageIndex (Float), Default = 0
Make sure the Reference fields of these properties match the name, but starting with “_”
Shader Graph should do this automatically, but older versions may instead use an auto-generated string of characters which will need to be changed - otherwise the C# script later will not work.
Like before, set the Width port to the PageCount property, and Height to 1.
Since this graph is applied to the single-page mesh, we only need one PageIndex this time. The other side of the page does need to be different - but it’ll always be the next page, so we can easily Add a value of 1 to obtain that. We can use an Is Front Face and Branch to select between these two indices, which is used as the Tile input on the Flipbook.
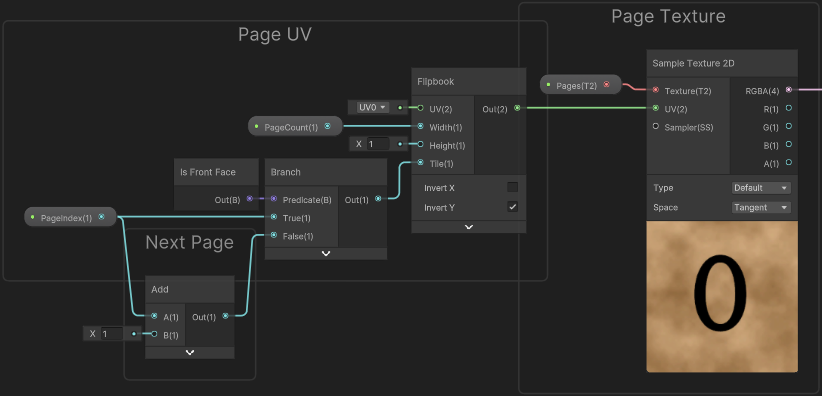
Currently the texture takes up the entire UV quad, but since we copied the right page for this mesh, it’s UVs are still set to only the right half. (While we could have edited the UVs in the mesh itself, I thought it easier to keep them consistent with the book mesh). To account for this, we can put the UV.x into the T of an Inverse Lerp node with A set to 0.5 and B set to 1. This results in a 0-1 gradient across the range provided.
As the vertices & UV coordinates are the same for both sides of the face, the page texture will actually be flipped on the back face. To fix this, use a One Minus node - but only for back faces, so use another Is Front Face and Branch setup.
Put the result into the X port on a Vector2, with Y set to the Y/G axis of the UV.
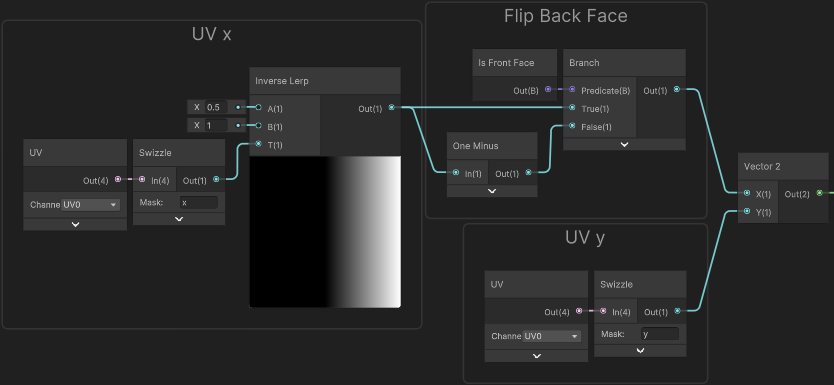
Connect this to the UV port on the Flipbook. The sampled texture preview should now show “7 | 0”, but the left side can be ignored as that part isn’t mapped to any part of the mesh.
Connect the Sample Texture 2D RGBA output to the Base Color in the Master Stack. Also set the Metallic/Smoothness/etc to the same values as used in the book graph - it’s important it looks the same so there isn’t any noticeable flicker as the page is spawned in.
C# Script
These two shaders should all be set up now, but currently the only way to test if they’re working correctly is by manually adjusting properties on the materials. To handle spawning of page objects and turning them on mouse presses (left and right), I use the following C# Script. It’s a bit long, so I’ve put it under a foldout.
Hopefully it’s clear how it works based on the comments.
View Code
|
|
That’s mostly it for the tutorial, though I will quickly mention how I made the pages for my Grimoire/Spellbook scene (tweet at beginning of post) :
Pages Texture
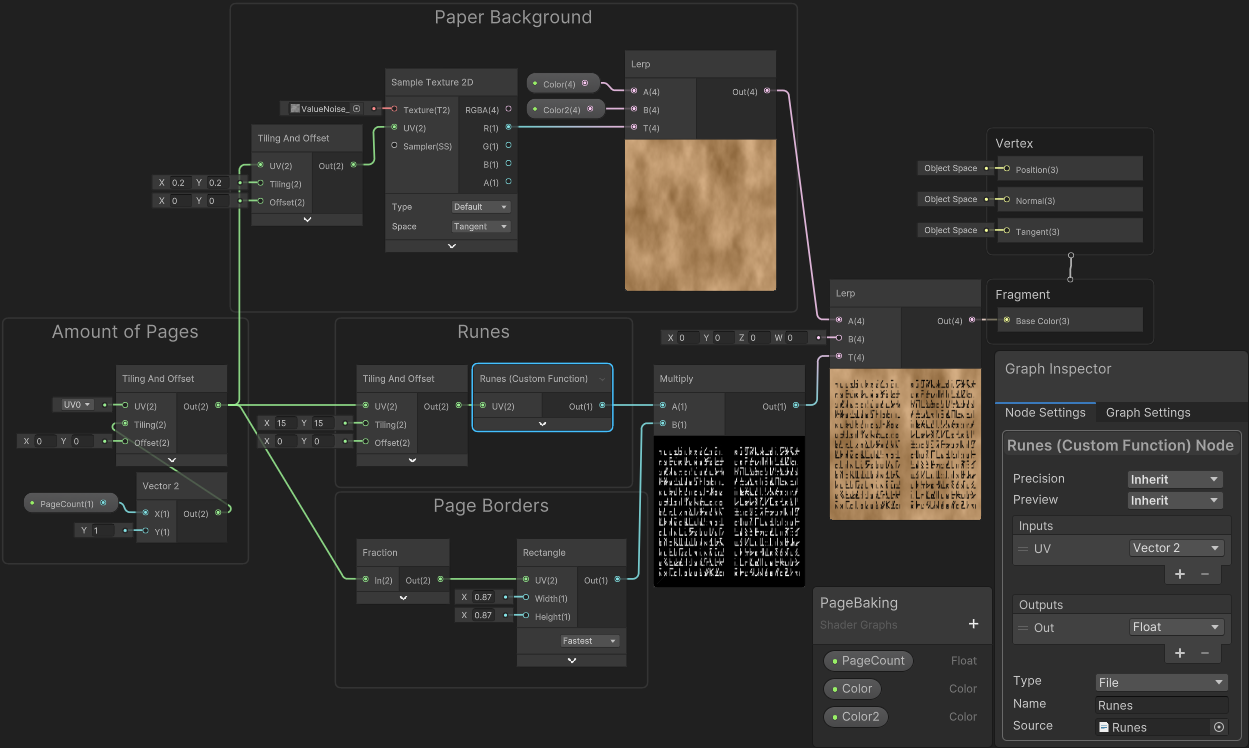
You could manually draw out textures for the pages, but in my scene I used some procedurally generated runes based on this GLSL shader on shadertoy - which I rewrote in HLSL as a Custom Function :
- Type : File (Runes.hlsl, as shown below)
- Name : Runes
- Input : UV (Vector2)
- Output : Out (Float)
|
|
Used in this Unlit Graph :
(Click image to view full screen)
The PageCount property in the graph above defaults to 2, to make previews easier to visualise. When baking, you’d likely want to change this on the Material. I used my BakeShader tool to bake this out to a long texture (Texture2D/png, specifically 8 pages, 2048x256, set under Window → Cyanilux → Bake Shader).
In GIMP (free image manipulation software), I then manually removed some runes and drew random magic circles, symbols and eyes to make the pages a bit more unique and interesting. (To make this easier, I actually edited the graph above to bake the background and runes to separate textures, then combined them in GIMP)
I only made 8 pages for this scene, but it can support any number - the texture just needs to be longer and properties updated. I also made the pages repeat (to make it look like the book is larger) but the C# Script has an option to turn this off.
Thanks for reading! 😊
If you find this post helpful, please consider sharing it with others / on socials
Donations are also greatly appreciated! 🙏✨
(Keeps this site free from ads and allows me to focus more on tutorials)