Rain Effects Breakdown
(Also alternative pink version with a few small improvements)
Intro
I’ve recently been experimenting with some rain VFX and wanted to share how I’ve handled it. There’s some rain particles, which is a relatively simple (Shuriken) Particle System, spawning Stretched Billboard particles in a box with gravity - nothing too special there really. But I’ve also got some neat shader effects such as water ripples and raindrops appearing & sliding down surfaces, to help show that the rain is affecting the scene.
The ripples uses this Ripple Flipbook texture, which I baked by using the result of a ShaderGraph using my BakeShader editor tool. I still want to explain how I set that up below, but feel free to use that flipbook if you prefer.
The umbrella shader has some dots & scrolling lines to suggest the rain is interacting with it. Though this only really affects the colour slightly. Back in 2021 I also did a Rainy Window Shader which has a similar theme, but is a bit more complicated and distorts the Scene Color to produce a more realistic looking result. I’ve included a section to break that down a bit too~!
Sections :
- Rain Particles (Shuriken)
- Water Ripples
- Raindrops on Surfaces (Simple)
- Raindrops on Surfaces (Complex)
Breakdown
Rain Particles (Shuriken)
As mentioned in the intro I used a Particle System component (also known as Shuriken) for the rain.
But if you’re in URP or HDRP, using the Visual Effect Graph could be better for these as that handles particle simulation on the GPU. If interested, Daniel Illett has a similar URP Rain tutorial that uses that, with additional splash particles spawned when it collides with the ground. I didn’t do splashes here, though that could be done in Shuriken too with the Collision and Sub Emitter modules.
The particle system has the following settings :
- Start Speed : 0
- Start Size : 0.01
- Gravity Modifier : 1
- Simulation Space : Global, probably. So the system can follow the camera without existing particles moving with it.
- Scaling Mode : Shape, so that the particles themselves stay at a constant size but the GameObject can be scaled to affect the area the particles can spawn in.
- Max Particles to some large value. I’ve got it set to 10,000.
- Emission Module :
- Rate Over Time : 2500
- Shape Module :
- I’m using a Box, scale is kept at (1,1,1) but the GameObject is scaled to something like (8, 1, 8) and raised somewhere above/infront of the camera. You’d likely want to parent it to the camera, or use a C# Script to make it follow.
- Renderer Module :
- Render Mode : Stretched Billboard
- Camera Scale 0
- Speed Scale 0.1
- Length Scale 1
- Render Mode : Stretched Billboard
- Set Material to something appropiate. For example BiRP would use one under the Particles heading, or for URP under the
Universal Render Pipeline/Particles. I’ve used Unlit, set to Transparent with a low alpha value.
The umbrella mesh in my tweet has a small rim with another similar Particle System that spawns dripping raindrops. It’s the same setup, but I additionally used the Force Over Lifetime module with a Curve on the Y axis to better control how the water drops (slower at beginning).
Water Ripples
While we could add collision to our particle system and use a sub-emitter to create ripple particles, I wanted to use a cheaper approach by sampling a Flipbook texture in the water shader itself. This is also a normal map so properly affects the shading/reflections of the water.
The water shader here could also be masked with a texture and put on a mesh/decal to create puddles on the ground, though that’s not actually something I’ll be going through here.
Custom Function
For creating the ripples I’m using a Custom Function node that is somewhat similar to generating Voronoi/Worley noise. It involves splitting the UV space into square cells, each containing a random point. Each fragment/pixel loops over a 3x3 block of cells, taking the distances to those random points. With Voronoi that takes whichever distance is smallest. But here, we want to use the distances to generate a ripple based on a sine wave with random time offsets & some masking.
To make things slightly more complicated, I’d like normal vectors rather than a greyscale result for our ripples (though I left this as an output too). These normals from each cell are combined additively and the result is normalised.
|
|
This would need to be put into a .HLSL file which is used with a Custom Function set to File mode. Name of function is “Rain” and we need the same inputs & outputs as shown by the params in the Ripples_float function.
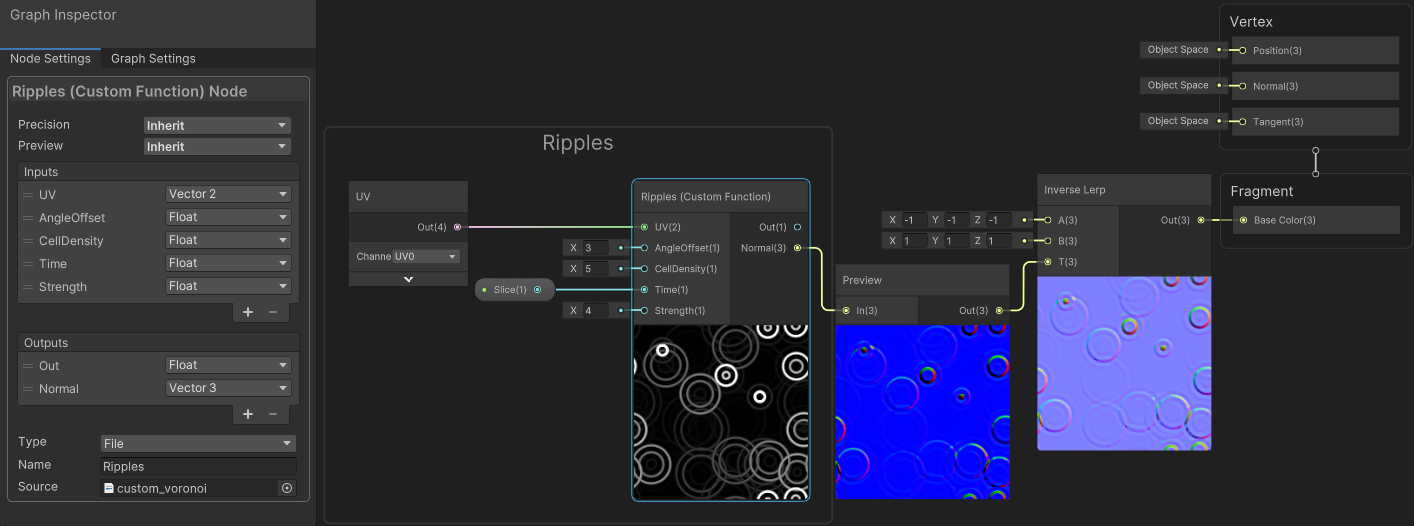
The graph here has been setup with baking it to a texture in mind, so it is Unlit, with the result put into the Base Color. It uses a “Slice” Float property in the Time input of our function, and a Inverse Lerp node is used to convert from a -1 to 1 range, into a 0-1 range, since that’s what a .png can store.
Baking
While we could use the outputs from our ripples Custom Function as-is, it’ll be cheaper if we bake the result of this to a Flipbook texture - that’s a texture containing multiple frames which we’ll switch between to make the result look animated.
If you just want to use the one I created, you can download this Ripple Flipbook texture, but I still wanted to also show how it was created.
The shader/material is baked by using a bunch of Graphics.Blit calls to a 3D Render Texture, then reading that back to the CPU. I have a BakeShader repo shared on Github which I recently updated to include this Flipbook option. It can be installed via the Package Manager using the git URL (see the README for info).
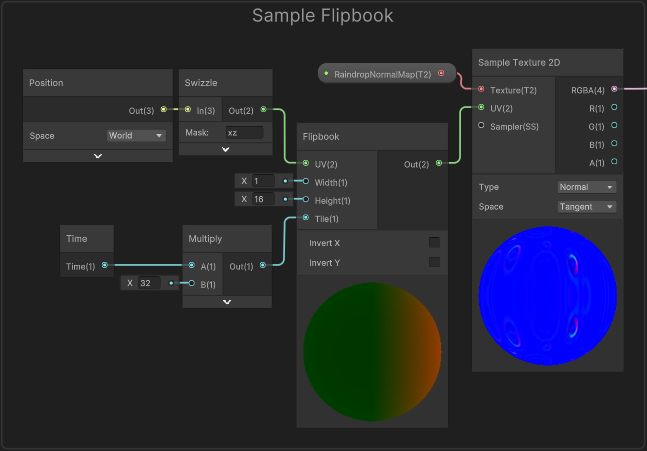
Once installed you can go to Window → Cyanilux → BakeShader, select Flipbook and drag/assign a Material using the Shader Graph created in the previous section.
You should be able to find the resulting texture under the Assets/BakedTextures folder. (If you don’t see that, try baking again). It should be a fairly long vertical texture, as that’s apparently the order a Texture3D is stored in when read from the GPU and the tool doesn’t do anything to reformat it (as of writing).
Water Shader
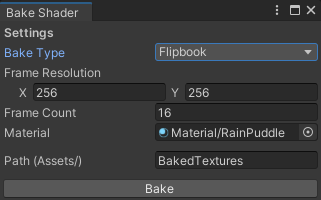
When importing the flipbook texture we created in the previous section, be sure to set it as a Normal Map rather than a regular texture.
For the puddle shader I’m using a new Lit Graph, with Smoothness set to 1, Metallic set to 0.5 and Base Color uses a bluish-grey colour. Feel free to use properties here if you want to configure these from the material.
Assign the flipbook texture we created in the previous section to a Texture2D property in the Blackboard and use the Sample Texture 2D node to sample it. Change the mode to Normal since we’re sampling a normal map.
Connect a Flipbook node to the UV port. This handy node will take a single frame from our texture. We need to provide it with the amount of rows/columns in our flipbook (for my texture it’s only 1 frame wide but 16 frames tall).
Can also connect an Absolute World space Position node put through a Swizzle (with “xz”) to the UV port on our Flipbook. This planar mapping will keep the rain texture tiling consistent across objects even at different scales.
So it actually animates, we need to connect a Time node to the Tile port. But first, Multiply that by some value to control the speed of the animation.
Can put the output of this into a Normal Strength node to reduce the strength (around 0.2 seems good for my flipbook), then connect to the Normal (Tangent Space) port in the Master Stack.
In the tweet above I also Multiply this strength with a circle mask so ripples don’t appear under the umbrella. This looks something like :
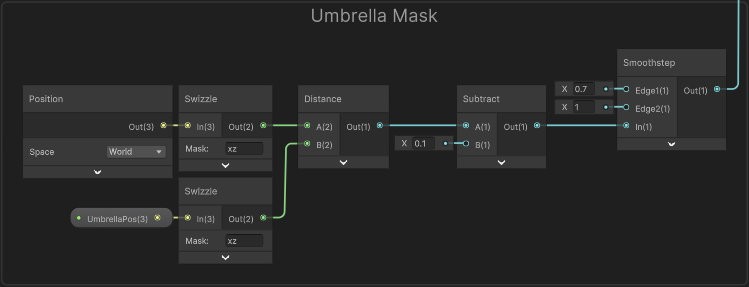
Of course this only works with one object. If you wanted to support multiple, an orthographic camera pointing downwards and rendering to a Render Texture asset might be better to capture occulders. But that is outside the scope of this breakdown.
Raindrops on Surfaces (Simple)
As mentioned in the intro, the umbrella material I made has some raindrops (dots & scrolling lines, as shown in the tweet above) to give the idea that the rain is interacting with it. There’s multiple ways to handle this, but in this section I’m trying to keep it as simple as possible - while the next section goes over slightly more complex techniques.
The effect is based on UV coordinates. It’ll be up to you unwrap your model, but the Y axis of the UV will be the direction of scrolling. You’ll likely want something similar to the “Unwrap → Sphere Projection” in Blender. Can always use a secondary UV channel if necessary (and UV1 on nodes instead of UV0). Since it’s based on UVs the scrolling will be in the wrong direction if the model is rotated, I’m not accounting for this currently.
If you want to avoid using Mesh UVs, you could instead project textures using worldspace coordinates and blend between them based on the Normal Vector (similar to triplanar mapping). That’ll work even with rotated models, however it may be a bit more expensive due to the additional texture samples.
I’m using a Lit Graph here and I’ve set the Smoothness to 0.9, Metallic to 0.2, and Alpha to 0.25 to get a similar look to those transparent plastic umbrellas. I’ve hardcoded these values but you could use Float properties to be able to control them from the material, especially if you want the same shader to work for multiple meshes/surfaces. I’ve also got a Color property connected to the Base Color port, which is set to a light grey.
Raindrop Dots
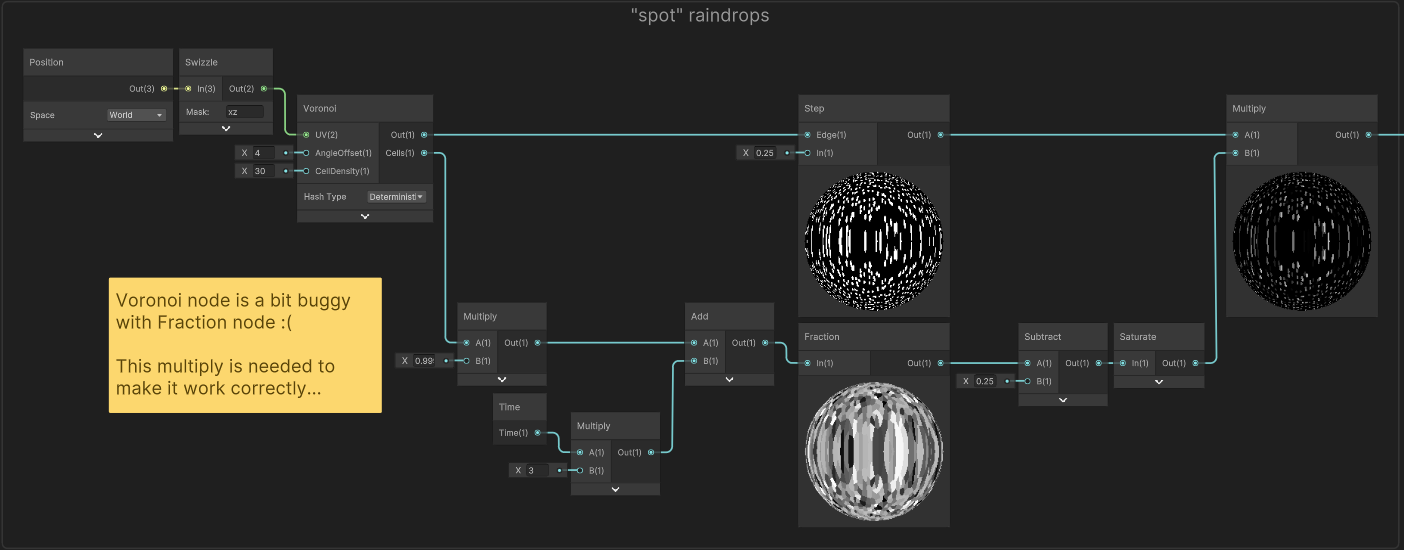
For creating raindrop “dots” I’ve used the Voronoi node - though it’s likely that using a texture could be cheaper. The Out port is put into the Edge of a Step and In set to 0.25 as this’ll give us a bunch of dots. You’ll also want to increase the Cell Density, I’ve set it to 30 though this may vary depending on the mesh and it’s UVs.
To fade these dots out, we need a random value per dot. Luckily, the Cells output gives us this. But we also need to Multiply this by 0.999 (or 1.001). While mathematically this doesn’t change the value all that much, it is currently needed as a workound of a bug when the Fraction node is used directly on the Voronoi outputs (at a guess something to do with the nested loop it uses).
Before using that node, we’ll need to Add the Time output from the Time node so it actually animates, and may want to Multiply by some value first, to control the speed. We can put that into a Fraction node, which will turn the seconds from our time into repeating values from 0 - 1.
I’d rather the dots didn’t reappear straight after fading, so will also Subtract a value of 0.25 then Saturate to remove those negative values. We then Multiply this with the output from our Step to mask these changing values to our dots.
Mask (Top)
It may also make sense to mask these raindrops so they only appear on surfaces that are facing upwards. I haven’t done this for the umbrella as I want the rain visible from the underside but you’d likely want to do this for other props/surfaces. Could handle this with a Normal Vector node, and Smoothstep on the Y/G axis. For example :
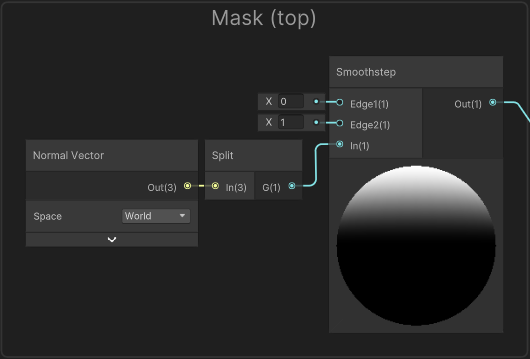
The mask contains values of 1 where the rain should appear, and 0 where it should be hidden. Therefore, too use this mask you’d Multiply with the current raindrops output. Or in the case of the complex version later where we use normals, you’d use it as the Strength of a Normal Strength node (or Multiply with an existing strength value)
Sliding Raindrops
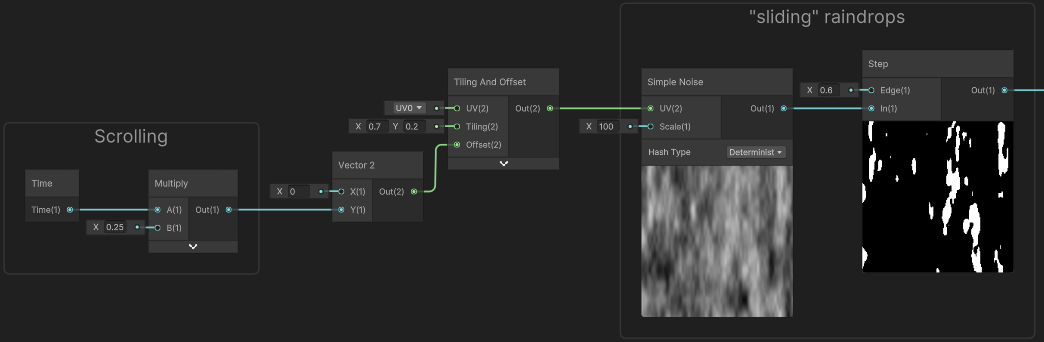
For creating raindrops that “slide” down the mesh, we’ll use a noise texture (or Simple Noise), with a Tiling And Offset node in the UV port. Adjust the Tiling so the noise is stretched vertically, and use a Time node multiplied by a speed value into the Y on a Vector2 and connect to the Offset port to scroll the texture vertically.
I’ve put the output of the noise through a Step node, but you could use a Smoothstep if you prefer.
To make these raindrops a bit more interesting we can also add some horizontal distortion to the UV coordinates. Here I’m using a Sine wave setup on the Y/G axis of the UV coordinates, with some Multiply nodes to control the frequency, speed and amplitude.
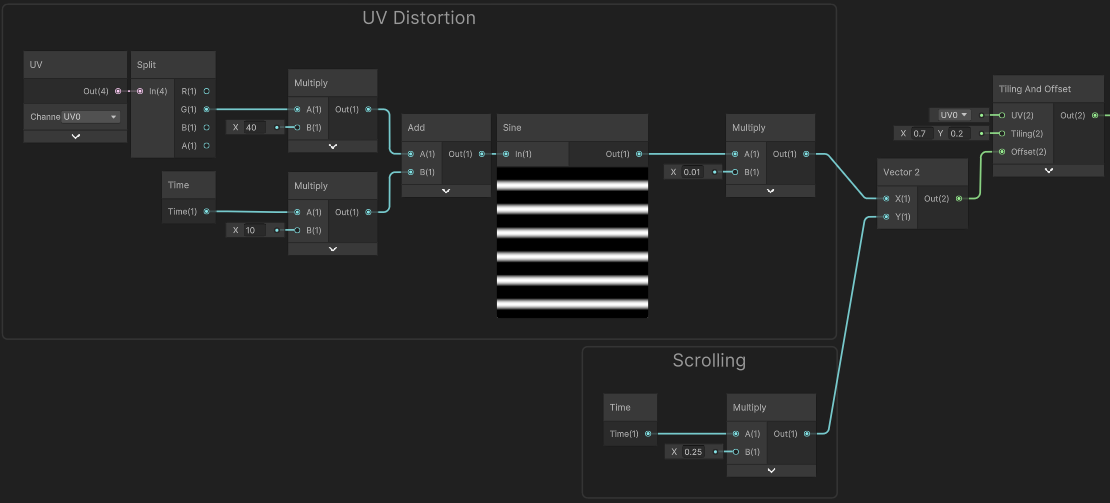
The result of this group, is put into the X port of that Vector2 for our Offset.
Mask (Sides)
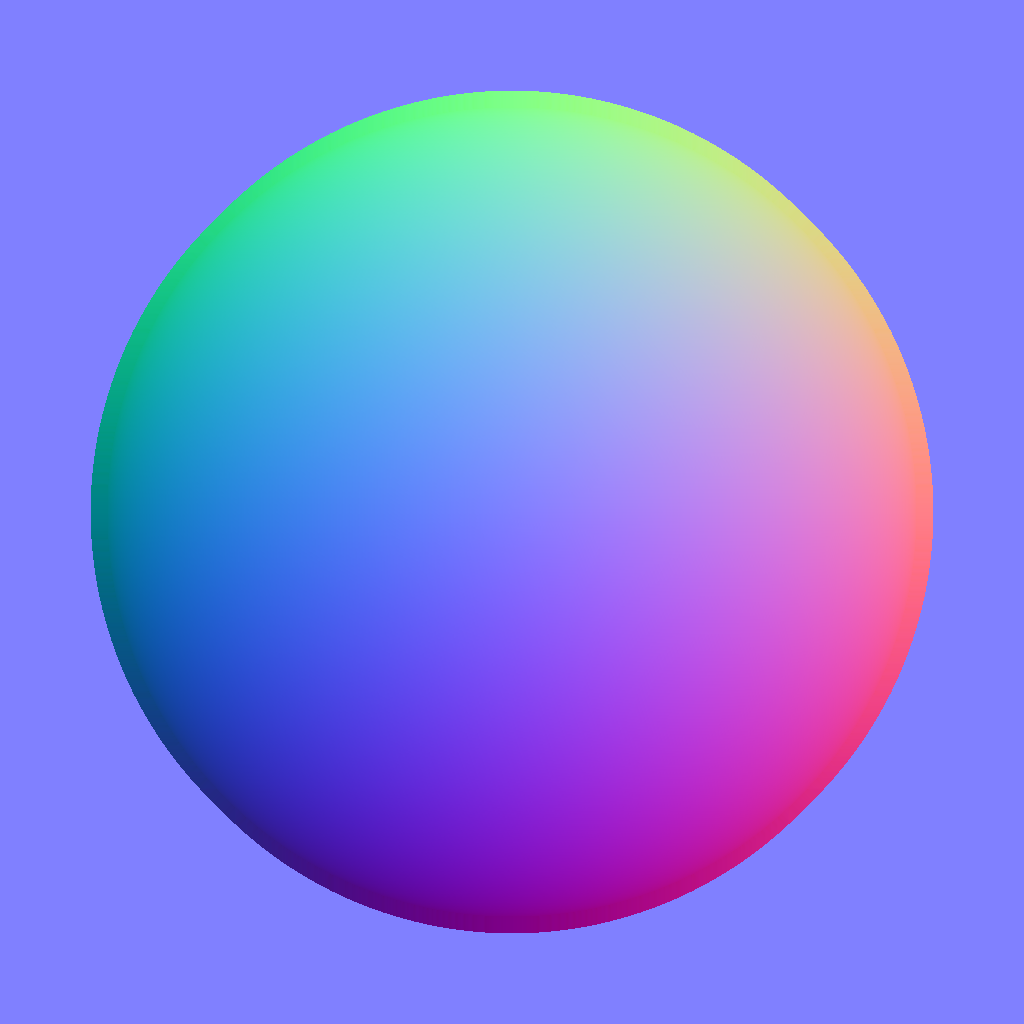
Again it may make sense to mask these raindrops, in this case so they only appear on the sides and not on surfaces pointing directly upwards. Can handle this with a Normal Vector node, Split and take the Y/G axis. Use a Absolute so we remove both the top and bottom surfaces, and Smoothstep, with the A input set to a larger value, to invert the result. Alternatively could One Minus.
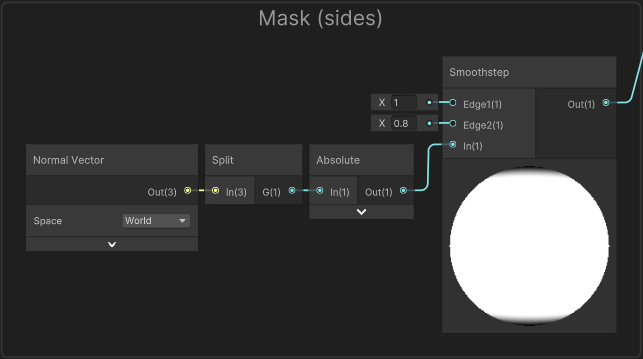
The mask contains values of 1 where the rain should appear, and 0 where it should be hidden. Therefore, too use this mask you’d Multiply with the current raindrops output. Or in the case of the complex version later where we use normals, you’d use it as the Strength of a Normal Strength node (or Multiply with an existing strength value)
Combine
We can use Multiply nodes on these two raindrop outputs to control their strengths (possibly with Float properties if you want to be able to control it from the Material or C#). We can then combine by using a Maximum node, and I’ve put the result into the Emission port. It may also make sense to use a Boolean Keyword before that if you want to be able to toggle the rain calculations on/off.
For the umbrella in particular I’m also flipping the Normal Vector for back faces as without this the shading is incorrect for those faces. For more details, see this question in FAQ page. Though due to transparent-sorting issues it may be better to instead have duplicate faces in the mesh - see “Pre-sorting Mesh Triangle Order” heading under this answer.
Raindrops on Surfaces (Complex)
I made this Rainy Window shader back in 2021, based off this Raindrop Shader tweet thread by @klemen_lozar. That included dots and sliding raindrops similar to the simplfied example above, but here we’re manipulating the UV coordinates even further, in order to animate the effects in a much more interesting way.
Again like the simple version, the effect is still based on the Mesh UVs, though projecting textures using worldspace coordinates could also be an option.
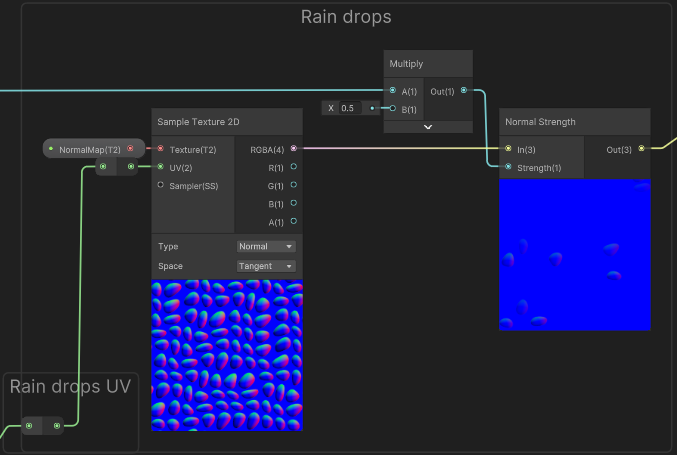
Rather than a greyscale result, we’re also using the following Normal Map here. This’ll be used to affect the shading and create distortion which will help the result to look more realistic compared to the simple version.
You should import this with the Normal Map type, and set Wrap Mode to Repeat. I’ve kept mipmaps enabled but ticked the “Replicate Border” (aka “Border Mipmaps”) so the edges of each mipmap are kept the same, which helped to reduce some artifacts.
Raindrop Dots
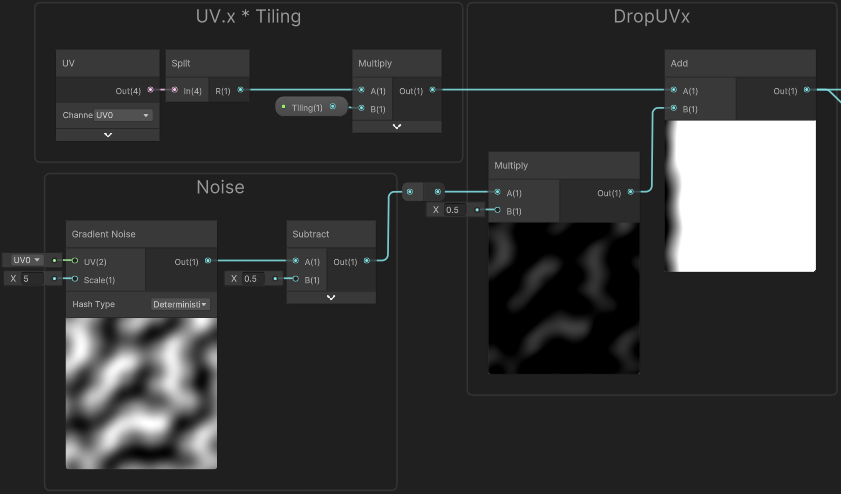
For creating raindrop “dots” we’ll use the Tiling And Offset node to increase the tiling of our UVs, while also distorting with some noise. I’m using the Gradient Noise node for this but could also use a seamless noise texture.
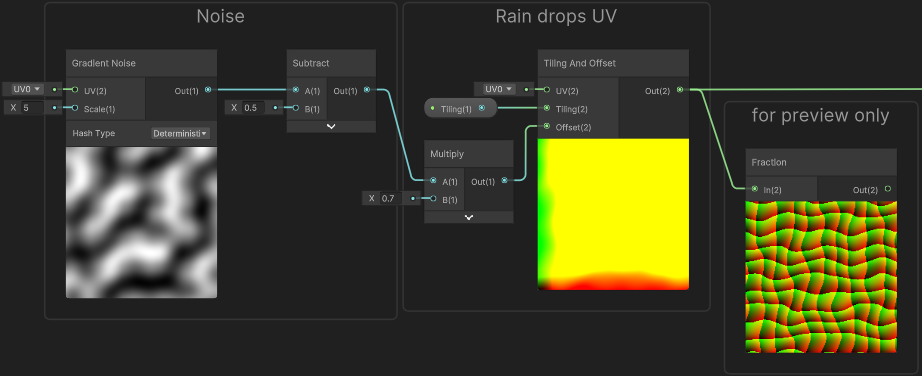
I’ve used a Fraction node to help visualise these UVs, but it is not actually needed in calculations as the texture itself should have the Repeat wrap mode as mentioned earlier.
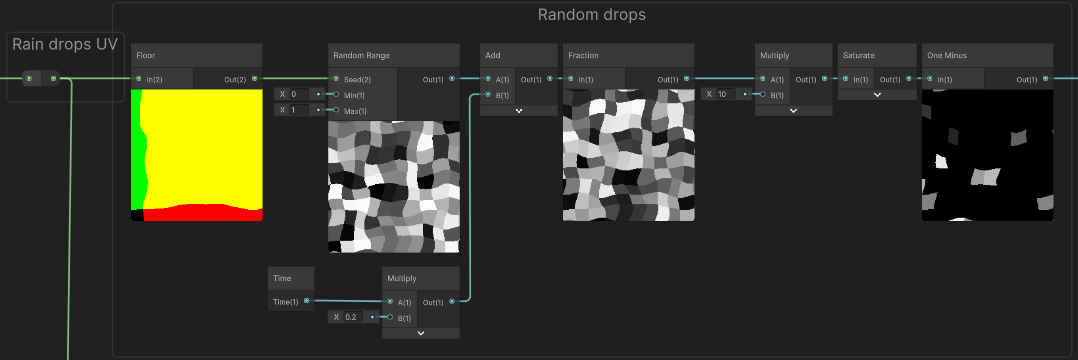
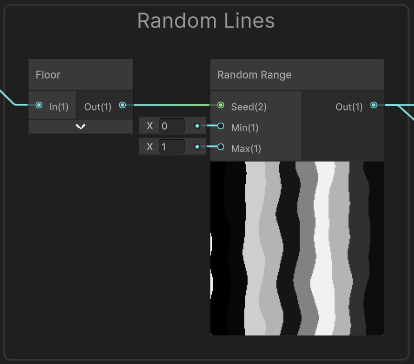
Similar to the simple version, we want the raindrops to randomally appear then fade out. We can assign a random value to each drop by using a Floor node on our tiled UV, then using a Random Range node. This is equivalent to frac(sin(dot(Seed, float2(12.9898, 78.233)))*43758.5453) which is a commonly used calculation for random numbers in shaders. It’ll return the same value provided the Seed doesn’t change, hence why the Floor node is needed - making each unit square of the UVs the same. If we had use the UVs without flooring, their value would be different per pixel/fragment, and so the seed and random value would be too.
For animating, We’ll need to Add some scaled Time from the Time node and put it into a Fraction node to convert that to repeating values of 0-1.
I don’t want the drops to reappear straight away, and compared to our simple version before, the dots here are aligned to a more obvious grid so we’ll need a longer interval to hide that somewhat. To handle this, I’ve used a Multiply with other port set to 10, to scale the values into a 0-10 range, then Saturate to clamp any values above 1 and take a One Minus.
We can now sample our normal map with a Sample Texture 2D node (Type set to Normal), using our “Raindrop UVs” in the UV port. Take the RGBA output and put that into the In port of a Normal Strength node. For the Strength we’ll use the random fading we just calculated. Can also Multiply just before to adjust the strength a bit.
Sliding Raindrops
For our more complex sliding raindrops, we’ll be constructing some UV coords which involves distorted lines and scrolling them vertically at different speeds.
Take the horizontal (R/X) component of the UV coords and Multiply by some tiling amount, then Add some noise. This can be the same noise as used before.
Similar to the random values we just did for the drops, to convert these coordinates to random lines we’ll Floor then use a Random Range node.
We can use these “Random Lines” values as our different speeds for scrolling, though they are currently in a 0-1 range and we don’t want any drops to move slowly (or not at all). While we could just change the Min/Max on the Random Range itself, I’ll be reusing the values later so instead put them into the T of a Lerp node to handle the remapping. Set A and B to the minimum and maximum speeds the lines/raindrops should scroll at (i.e. 0.7 and 1.7).
To actually scroll, Multiply this by Time, then Add to the vertical (G/Y) component of the UV. I then Multiply by 0.3 to scale everything.
Currently at Time=0, this results in the UV.y as normal, so all the lines are aligned to eachother. To prevent this, I Add the RandomLines to provide an inital offset.
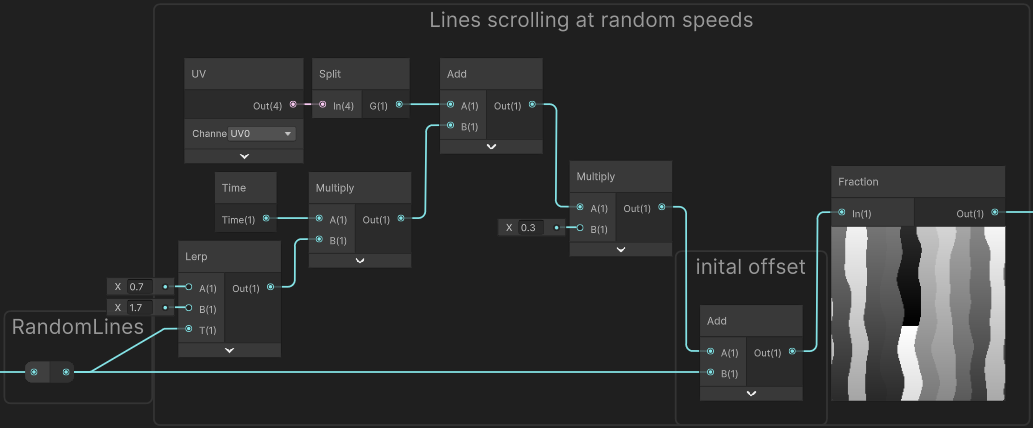
We use a Fraction node so the values in these lines repeat vertically in a 0-1 range. We can now Multiply to scale the values in each repeating section, then Saturate. This allows us to scale the raindrop while leaving a gap between the next one. For random sizes, we’ll use the RandomLines output again put into the T of another Lerp node, with A/B set to the Min/Max sizes (i.e. 2 and 8).
Inbetween the Multiply and Saturate, I’ve also used a One Minus, Power and another One Minus to make the result more 💧 shaped, rather than circular like it is in the normal map.
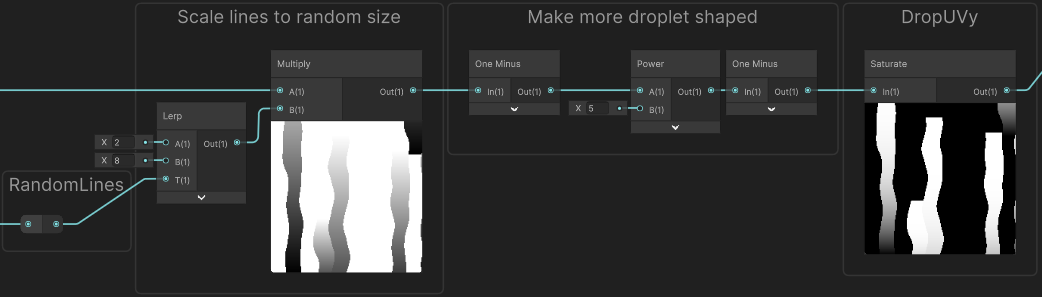
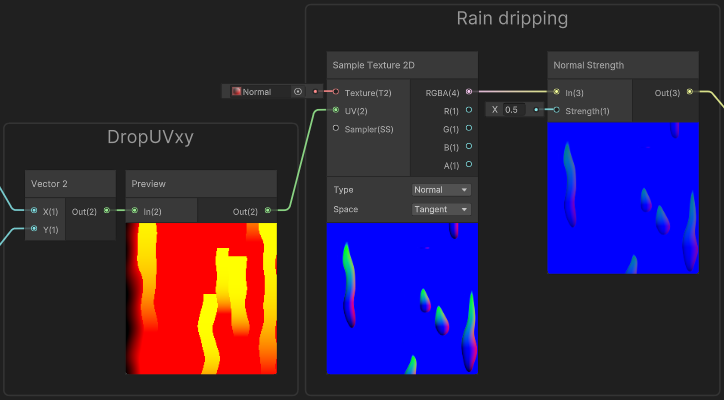
Finally we can combine the “DropUVx” and “DropUVy” groups using a Combine or Vector2 node, and use that as the UV coordinates for a Sample Texture 2D of our normal map. Make sure to set the Type on the sample to Normal. Can also use a Normal Strength node to adjust the strength if required.
Masking
Similar to the simple version it would make sense to mask these rain effects so the dots only appear on surfaces that are facing upwards (roughly) and sliding drops only appear on the sides. See the Mask (Top) and Mask (Sides) sections from before for examples on how to handle this.
Usage (Opaque)
For Opaque materials, we’ll want to combine our calculated normals with a Normal Blend node, then connect directly to the Normal (Tangent Space) port of the Master Stack (of a Lit Graph).
You may also want to adjust the Smoothness to a value around or above 0.8, since wet materials are likely to be quite specular/shiny. Can use a Float property so this can be controlled from the material or C#.
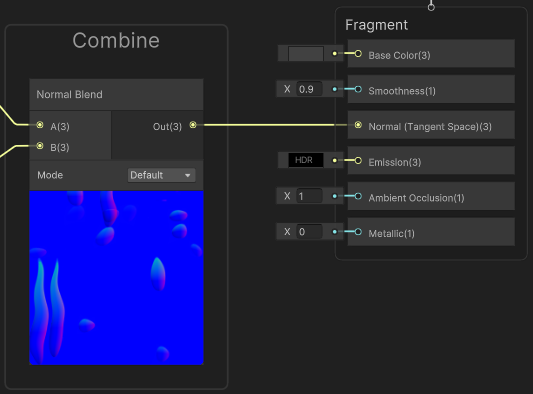
Similar to what was mentioned in the simple version above, you may also want to use a Float property (or two) for the Strength of Normal Blend node(s) to control the strength of the rain effects, and/or a Boolean Keyword if you want to be able to toggle the rain calculations on/off.
Usage (Transparent)
For transparent materials (such as glass windows or my plastic umbrella), I also use these calculated normals to apply distortion to the view through the object. For this, we’ll need to change the surface type to Transparent under the Graph Settings.
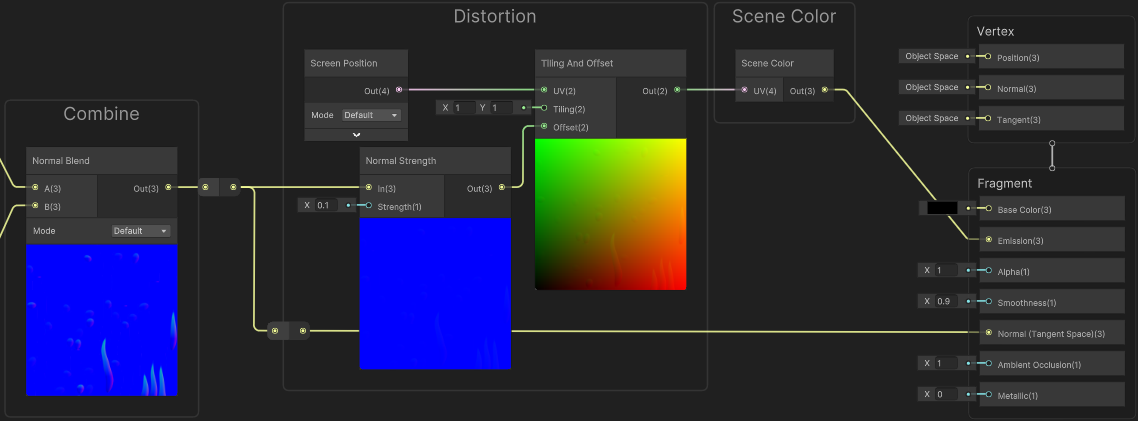
Same as in the Opaque version, we combine the calculated normals with a Normal Blend node and connect that to the Normal (Tangent Space) port.
To handle the distortion, we can use the Camera’s Opaque Texture (aka Scene Color node). This normally uses the Screen Position, but to distort this connect it to a Tiling And Offset, using the Offset port for the distortion amount. Alternatively can use an Add node.
This distortion amount will be our normals output, but you’ll also want to use another Normal Strength node (or just Multiply) to lower the strength further (for the distortion only). The result of the Scene Color should then be attached to the Emission port as it needs to be unaffected by the shading of the Lit Graph. Also set the Base Color to Black (or another dark colour to tint the result).
Be aware that if you are in the Built-in RP the Scene Color node won’t work, unless you manually copy the camera colour target to the _CameraOpaqueTexture global texture property. This github gist can handle that for you.
In HDRP there’s also a HD Scene Color which may be more suitable. I think that also provides LODs/mipmaps which could make the glass look more frosted or condensated.
Thanks for reading! 😊
If you find this post helpful, please consider sharing it with others / on socials
Donations are also greatly appreciated! 🙏✨
(Keeps this site free from ads and allows me to focus more on tutorials)