Sun Beams / God Rays Shader Breakdown
Intro
In my current project I wanted to add some light/sun beams (also referred to as god rays or light shafts), to somewhat simulate light passing between leaves/trees in a dense forest.
(And to make the scene look pretty ✨)
There’s a few techniques I’m aware of that can achieve effects like this :
- Rendering light source (e.g. a sun) into an off-screen buffer while ztesting against camera, and apply a radial blur. This only works when looking towards the light source though, so not good for a top-down scene like in my case.
- Volumetric solutions also exist, likely involving raymarching through shadowmaps. Could be fairly expensive though.
- I did a stained glass shader effect a while ago that was something kinda similar, though I don’t have a tutorial on that.
- Using billboard quads / particles with top vertices displaced in light direction. We can also sample the shadowmap to control the alpha to hide them in areas fully in shadow. The post uses this method~
Setup
- Uses URP and my ShaderGraphCustomLighting package to obtain light direction and shadow info.
- The graph might work in other pipelines (by replacing light direction nodes with a global property), but if you want to mask based on shadows you’ll need to find your own replacement as I’m not aware of methods for that
- Uses Unlit Graph, Transparent surface mode with Alpha blending (Additive also works)
- Also set Render Face to Both and disable Cast Shadows
Breakdown
Billboarding
For rendering billboarded quads there’s a few options we should go through.
The simplest (and method I used) is to just use regular GameObjects with a quad mesh assigned to MeshFilter, and hope the SRP Batcher helps with optimising (assuming URP/HDRP). Alternatively, using GPU instanced draw calls from the Graphics/CommandBuffer APIs may be an option if you’re familiar with coding that kind of stuff. For either of these the shader would need to handle the billboarding calculations.
You could also use particles, as those systems are designed to handle billboarding for us, specifically :
- Particle System component (aka Shuriken), under the Renderer module you’ll want to use Render Mode : Vertical Billboard
- Would want Start Speed set to 0, and likely a Circle for Shape module, rotated 90 deg on X axis. For a system that follows the player/camera, could simulate in World Space and emit based on time/distance, fading particles in/out with Color Over Lifetime module. Or set the Start Lifetime to Infinity and under Emission have a single burst to produce a specific number of particles fixed at a location.
- Somewhat optional, but may want to use a 3D Start Size, with Y set to 0
- If the system moves with the player, may also be able to make particles wrap with something like this : https://gist.github.com/Andicraft/a80796f8542979e88b98bed352e883ec
- VFX Graph (URP/HDRP only), under the Particle Output Unlit Quad context, can add the Orient: Fixed Axis block with an Up axis of (0, 1, 0)
- Will also want to enable Support VFX Graph under the Graph Settings (or use the Visual Effect target in older Unity versions)
- If you don’t see the Shader Graph field in the output context, you may also need to enable Experimental Operators/Blocks under Edit → Preferences → Visual Effects
I won’t go over further details of how to set these systems up as I didn’t use them - I’m focusing more on the Shader Graph itself. But if you can figure it out and want to use particles, you can add a Position node set to World space to the Shader Graph and go to the next section, otherwise click the foldout below.
Shader Graph Billboarding (if not using particles)
For billboarding we typically want to skip using the view/camera matrix for rotation. This is fairly easy to do in shader code where the vertex shader is responsible for converting the vertex positions from object to clip space, but Shader Graph does this for us behind the scenes.
Instead, we can use Inverse View matrix from the Transformation Matrix node. The idea is to do the inverse of the view matrix so when it’s applied later by Shader Graph, it cancels out. Since we only want this on the rotational parts, we should Multiply using a 3x3 matrix, or (4x4 but set the W/A component of the input Vector4 to 0). When multiplying with matrices, the order is also important - the matrix should be in the A port in this case.
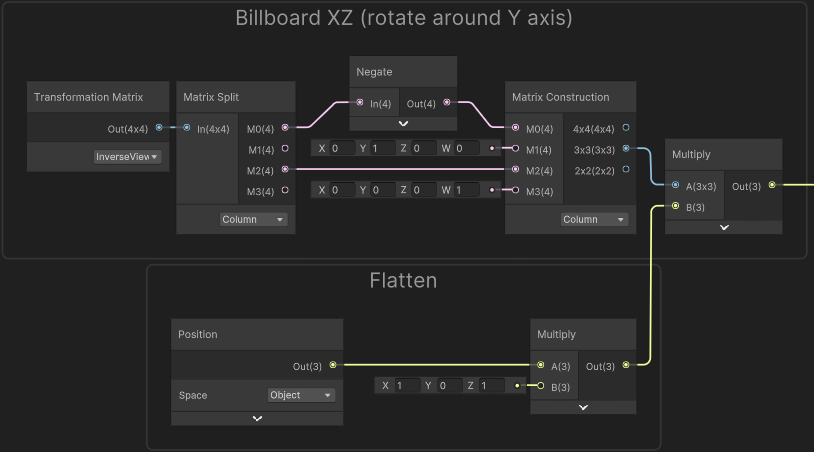
There’s also some extra nodes in the image though these are unlikely to make much difference in the final result - so I’d consider them optional :
- I’m removing one of the columns of this matrix so the billboarding isn’t applied to the Y axis
- The Negate node stops the face from flipping, though with the graph setting Render Face : Both we see both sides anyway
- We Multiply the Object space Position by (1, 0, 1) to remove the vertical component, as we can then accurately stretch in the light direction without the slight additional offsets.
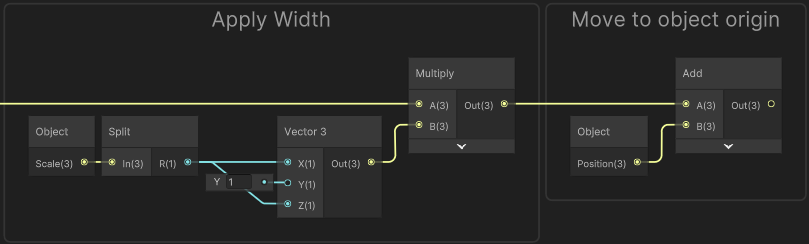
I’d like to apply the stretching (towards light) in world space, but want to avoid a Transform node here as I’d rather not apply rotations from the GameObject/Transform.
We still might want the ability to scale the god rays horizontally (e.g. for variation), so take the Scale output from the Object node, Split or Swizzle to obtain the R/X component and put it into the X and Z axis on a Vector3 node. Then Multiply with the output from our billboarding group.
And to apply translation, Add the Position output from the Object node.
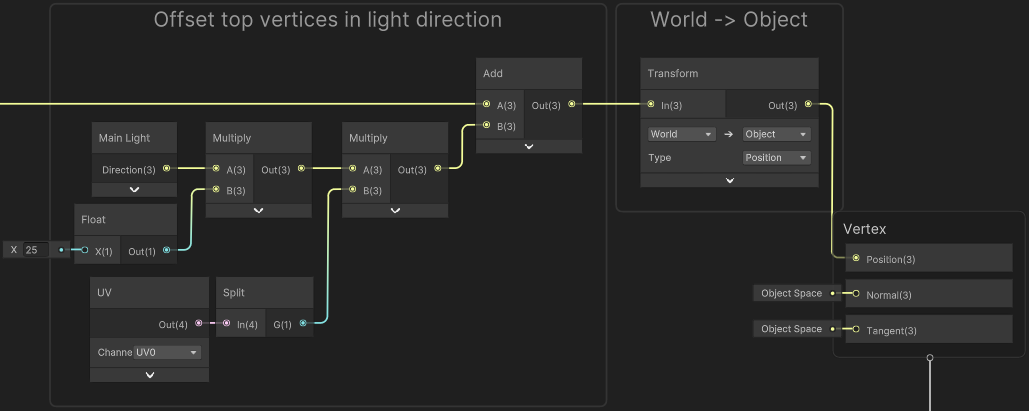
Stretch Towards Light
To stretch these quads towards the light, we’ll need the light direction. Newer versions of Shader Graph have a Get Main Light Direction node for this that should work in URP. My Custom Lighting package also contains a Main Light subgraph that outputs this. For other pipelines, another option is to use a Vector3 property (e.g. with Reference of _MainLightDirection, and Exposed option unticked to make it global) and a C# script on the light that uses Shader.SetGlobalVector("_MainLightDirection", -transform.forward);
Since the direction would only move vertices by a single unit, we’ll want to Multiply by some value to increase the length. I’ve hardcoded this as 25, but could use a float property if you want control from the Material. If the quads are rendered via GameObjects, could also use the Y axis of the Scale from the Object node.
We only want the top vertices to be displaced, so we Multiply by the G/Y component of the UV to mask it. (Which works as the bottom vertices have a value of 0 here, and top ones have a value of 1).
We Add this to our position (from the billboard group, or Position node set to World space if using particles). But before connecting to the Vertex stage of the Master Stack, we’ll also need to Transform from World to Object space as that is what space the Position port expects.
Scene & Camera Fades
For the fragment stage, we’ll be putting together a bunch of groups to mask the alpha. Most of these will be multiplied together and are mostly optional, depending on what you want the shader to do.
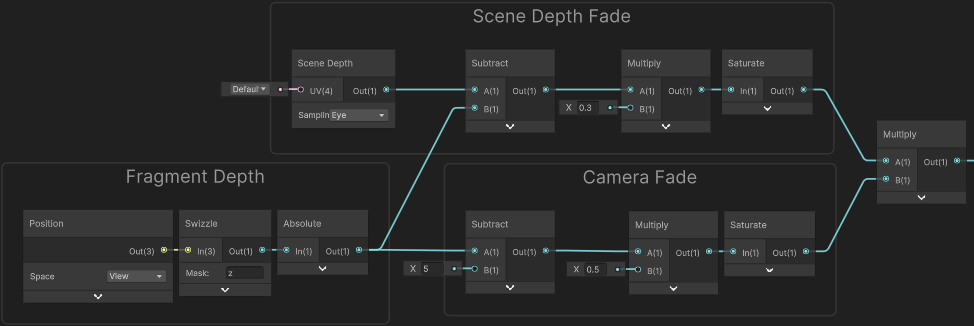
Ideally we don’t want to see the rays intersecting with objects or the camera near plane, so we’ll use depth values to fade the alpha.
To obtain the depth of the fragments/pixels being drawn, use the Position node set to View space, Split or Swizzle to obtain the B/Z axis and Absolute (or Negate). You’ll want to group this under a “Fragment Depth” to help keep track of it, as we’ll need the output twice.
To fade when the camera gets close, we just need to remap this a bit. Subtract the distance you want it to start fading (e.g. 5), and Multiply to control the falloff (e.g. 0.5). (Alternatively could use an Inverse Lerp or Smoothstep and specify the start and end points of the fade in the A/B or Edge ports). We should then Saturate to clamp the value between 0 and 1 (as values outside this range don’t make sense for alpha values, and would mess with the other masks)
To fade into the floor and other objects, can use the Scene Depth node (make sure Depth Texture is enabled on the URP Asset for this to work), and Subtract the “Fragment Depth” group. Use a Multiply to control the falloff and Saturate like before.
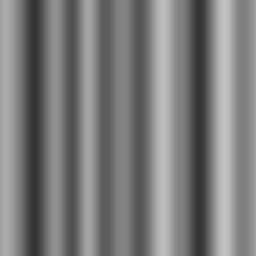
Stripes
Currently, the rays would mostly be a single transparency (unless multiple quads overlap that is). To add more variation we can sample a stripy texture, e.g.
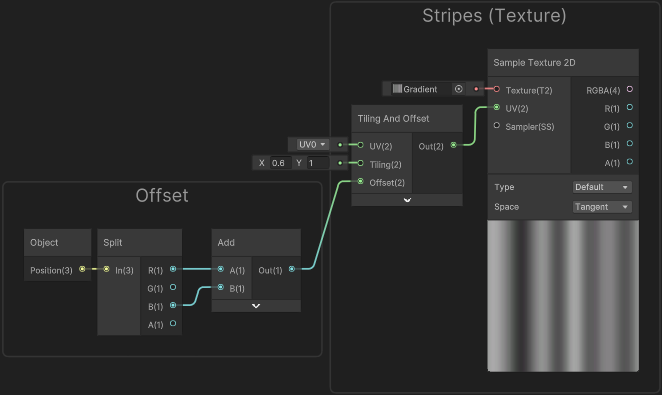
Or create one procedurally. e.g. using Gradient Noise with Tiling And Offset in the UV port and Y axis of the Tiling as 0 to stretch it vertically.
For added variation could use one of the following values as an Offset (assuming texture is imported with Repeat wrap mode!) :
- If quads are rendered using GameObjects that don’t move, can use Position output from the Object node, likely combining both the R/X and B/Z axis using Add, as shown in the above graph
- For a Particle System (Shuriken), you can pass a random value (StableRandom.x) using the Custom Vertex Streams option under the Renderer module, which would be accessed in graph using the UV node. I have a tutorial on my old site that may provide an example
- For VFX Graph, would likely use it’s Random Number node (as Per-Particle & Constant). To pass that into the shader, use a Float property (created in Shader Graph’s Blackboard. After saving, should appear under the Particle Output Unlit Quad context)
Could also add some scrolling to the Offset if you want, by adding Time output from Time node with Multiply to control the speed.
Fade Edges
If you want to fade the sides of the quad, use a Smoothstep on the X axis of the UV. Subtract a value of 0.5 (as that is the center of the quad) and put into Absolute to handle both sides at once.
Can also do the same on the Y axis of the UV to produce a mask which fades the top/bottom. (In my case I had to do this as the god rays can appear over the void, and so I couldn’t rely just on fading using scene depth)
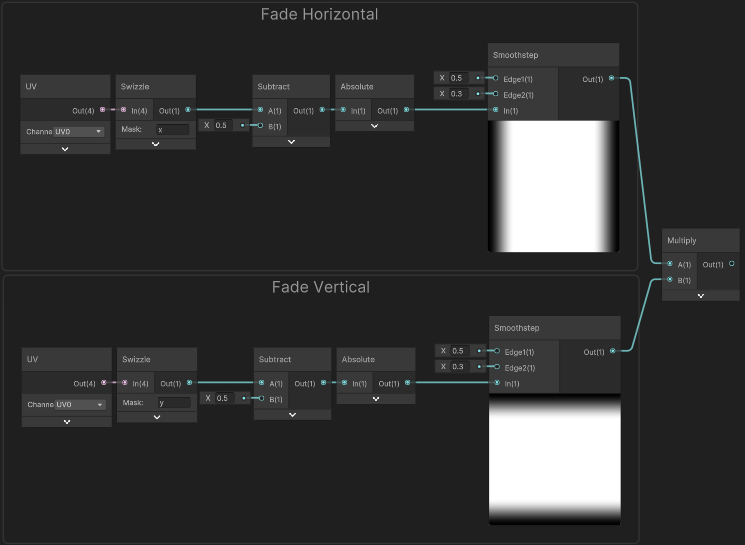
I chose to show them separately above, but we can even do both axis at the same time without duplicating nodes, by using “xy” in the Swizzle, and using a Split node to obtain the R and G channels after the Smoothstep.
Shadows
Ideally we wouldn’t want rays appearing in areas completely in shadow. You could hand-place them to prevent this, but that also assumes the light direction won’t change as areas of shadow would shift. If generating quads procedurally / using particles, it is likely we’d want to mask based on the shadowmap. If using URP, we can use the Main Light Shadows subgraph from my Custom Lighting package. (I’m not sure on methods for other pipelines, sorry~!)
This likely won’t apply to others, but in my case I also had to replicate some things from the toon shaders used in the scene, as shadows are put through a Step node for a harsh transition and I use the Main Light Cookie subgraph to fake additional shadows for clouds.
Dust/Sparkles
You may be able to handle dust/sparkles as additional particles, but so that they only appear in the light rays, I chose to use some good ol’ scrolling textures~
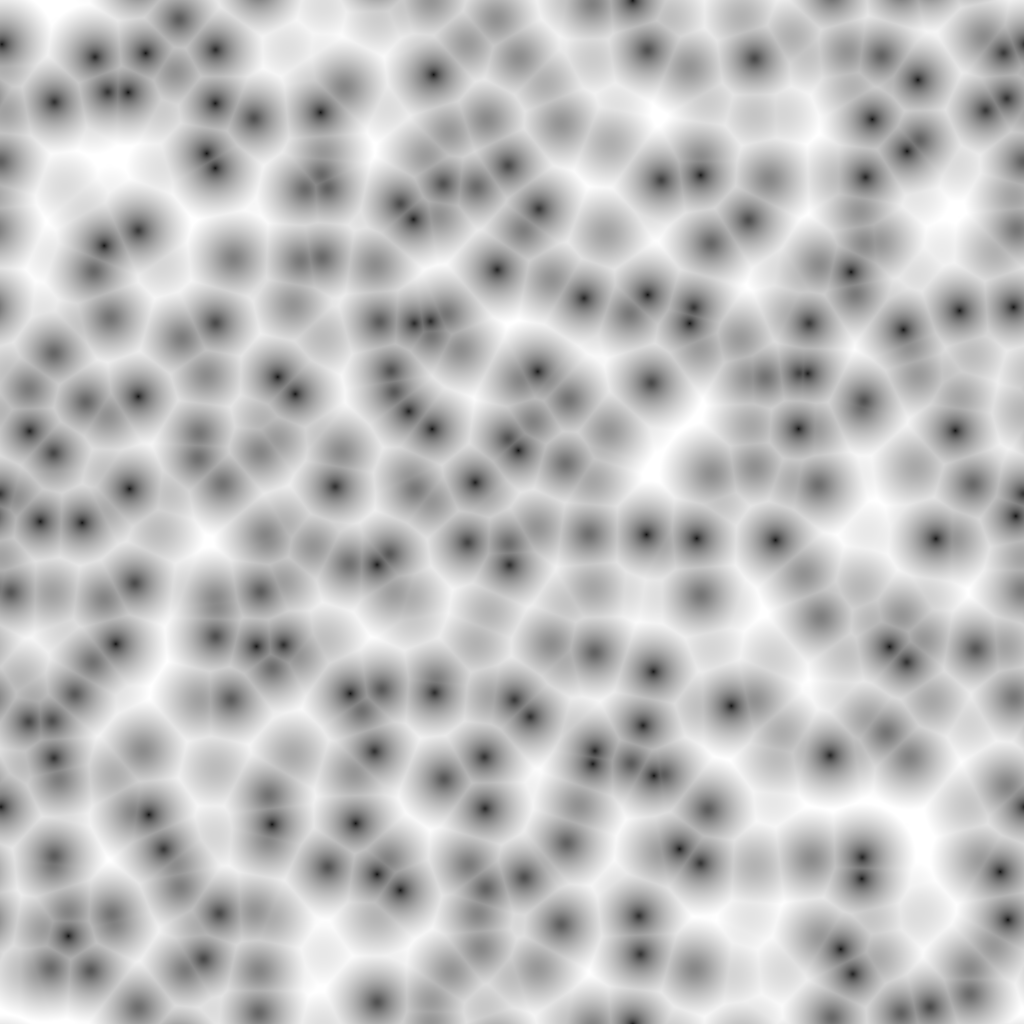
Voronoi/Worley Noise like the texture above, can produce a good distribution of dots (though as these are black in the above, we’ll also need to One Minus). While there is a Voronoi node, handling it procedurally is likely more costly than sampling a texture (using Sample Texture 2D), especially as I’d like to sample twice with different amounts/directions of scrolling, by using Time as an Offset to Tiling And Offset node. The Y axis of the Tiling should also higher since our quads are stretched vertically.
We can combine the two scrolling textures by using a Multiply, then Multiply again by 2 to increase the brightness a bit.
Currently the dots/texture in the preview is always visible, though some parts are brighter when the textures overlap. We can Smoothstep to remap and only obtain a few dots when the value falls into a given range (the Edge1 and Edge2 inputs). A smaller range means less dots - so with values of 0.9 and 1 it produces “occassional dots/sparkles”, which we can then Multiply by a high value (e.g. 200) to make them brighter - (can make that value a Float property if you want to control it from the material)
Could also use another Smoothstep with a lower Edge1 value, Multiply by a lower value and Add to the other, to produce a more common/ambient dust. (Though could be a bit excessive for an outside scene - probably better for interiors)
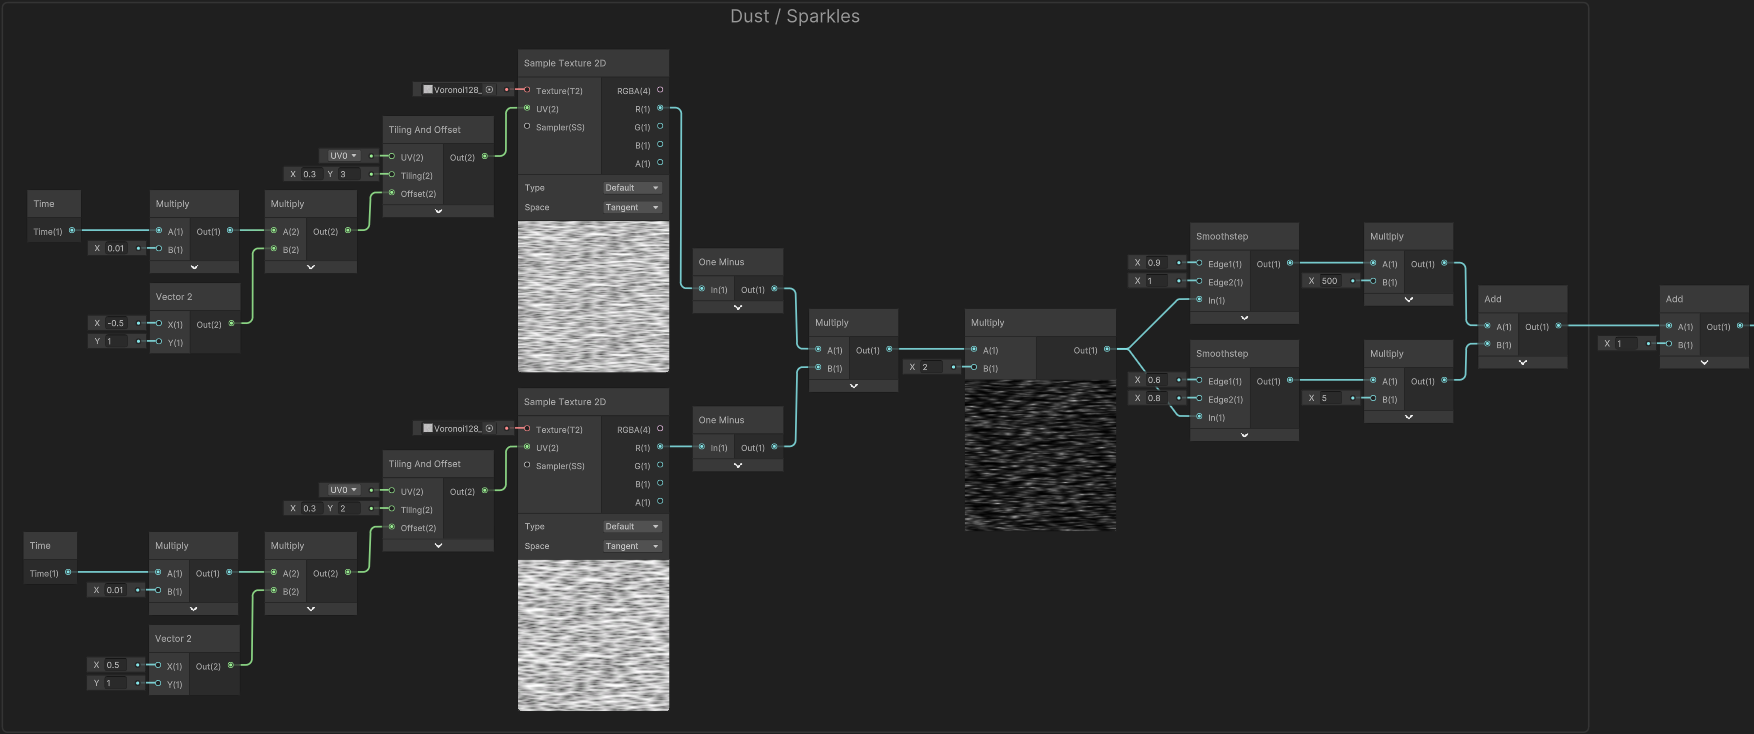
(Click image to view fullscreen)
Unlike the other groups we set up, the result here has values above 1. If using the result to control the Alpha we’d want to clamp/saturate (and add 1 so it can be multiplied like the other masks). But in this case I’m only using it for the Base Color (shown below) - and don’t want to clamp, as by keeping high intensity values in the final colour output it’ll cause the dust/sparkles the glow when using Bloom Post Processing (and assuming HDR is enabled on the URP asset).
Colour & Alpha
Finally, we can add a colour to tint and adjust the intensity of the god rays. If applying the shader to a Shuriken Particle System, can use the Vertex Color node - otherwise for VFX Graph or regular GameObjects & MeshRenderers, create a Color property in the Blackboard window. We can Add this to our dust/sparkles result (if using that group) and connect to the Base Color port in the Master Stack.
For the Alpha port, Split that colour, take the A component and Multiply with the result of all the masks (created in the above sections) multiplied together.
(0,0,0,0) while we want something like (255,255,255,10) here. Be sure to change the alpha component or the god rays will be invisible!

Final Notes
The shader should now be complete. We can assign it to a material on our objects / particle systems and manually place these in areas of the scene we want to draw attention to - maybe chests, level entrance/exits, etc.
We can also have these spawn around the player/camera for general ambient rays - assuming that’s appropriate for the scenery. In my case I used a script to generate & randomise the positions of the light ray quads, and teleport the rays to the opposite side as the player moves, to keep them inside a bounding box roughly the size of the screen. I’ve shared the script I wrote in the foldout below if interested in that kind of setup (but not compatible with particle system based spawning)
Script
|
|
Thanks for reading! 😊
If you find this post helpful, please consider sharing it with others / on socials
Donations are also greatly appreciated! 🙏✨
(Keeps this site free from ads and allows me to focus more on tutorials)