Fire/Flame Shader Breakdown
Intro
A fairly common method of creating fire is to use a particle system, however many transparent quads produces overdraw which can affect performance, especially for VR and mobile platforms.
When rendering Opaque geometry, Unity renders objects front-to-back (objects closer are rendered first). This allows z-testing to take place, where objects further away can discard fragments from being rendered if they will be covered by a closer object to avoid unnecessary calculations. However in the Transparent queue, Unity has to render those objects back-to-front instead in order to achieve the correct alpha blending. Rendering many objects on top of each other, like transparent quads from the particle system, is what is meant by overdraw – and this happens with UI and post-processing effects too.
Rather than using a particle system, a different approach to fire is a quad which faces the camera, where a noise texture is used to warp the UVs for sampling another texture (or generated ellipse / teardrop-like shape). This is a technique that I first saw from RiME.
I’ve had a version of this shader for a while but never got around to writing a proper breakdown. It’s a bit different from the RiME talk and I’m also using the Simple Noise node, but a seamless noise texture could work just as well and might be more performant for VR/mobile. (I don’t really work with those platforms though, so test & profile!)
Notes
- This is an Unlit shader. Transparent surface mode with either Alpha or Additive blending depending on what result you want.
Breakdown
In order to create the scrolling (aka moving) noise needed for the effect, we’ll use the Time node and Multiply it by a value to control the speed of the scrolling. (I’ve hardcoded this as 0.5, but you could use a Vector1 property if you want to be able to control it from the material inspector). I’d like this to scroll upwards, so need to Negate and put it into the Y input on a Vector2 node, leaving X as 0. Then use as the Offset input to a Tiling And Offset node.
We’ll also provide a Vector2 property to control the Noise Scale, which will be put into the Tiling input - allowing us to change the scale of our UVs per-axis. The output from our Tiling And Offset will then be put into a Simple Noise node with a Scale of 30-ish.
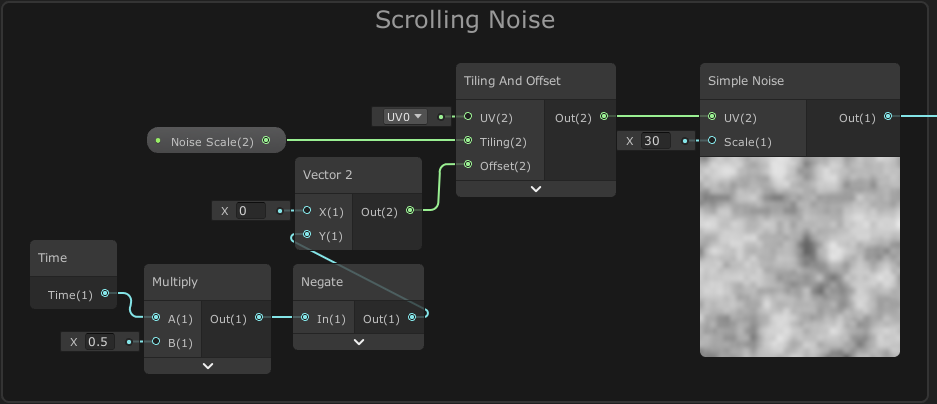
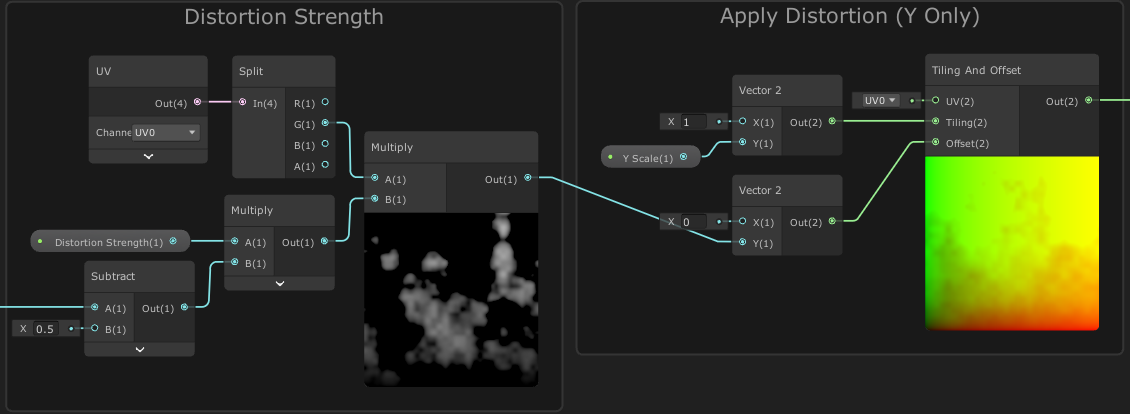
This noise will be used to offset the UVs for effects later. Unlike offsetting by a constant value or time (which changes, but is the same value for every UV coordinate), we are shifting each UV coordinate by a different value, which produces a distortion (aka warping) effect. Since our noise ranges from 0 to 1, we can also Subtract 0.5 (so it then ranges from -0.5 to 0.5) which “centers” the distortion - meaning it doesn’t offset more in one direction than the other.
Multiply this with a Vector1 property named Distortion Strength. We also want the top of the fire to be distorted more than the bottom, so we also Multiply with the Y axis of the UV (G output from Split). We put this result into the Y axis of a Vector2, then into the Offset input on a Tiling And Offset node to apply our distortion, only in the vertical direction.
The distortion will mean our UVs could now go outside of the 0-1 range and parts of the texture/ellipse used later could be cut-off. To help fix this, we’ll also include a Vector1 property called Y Scale and put it into the Y of a Vector2, with X as 1. Put this in the Tiling input. This will allow us to scale down the effect in the vertical direction, to try to keep the fire contained to the quad.
From here, I’m splitting the graph into two versions - a stylised version that uses Ellipse nodes to create a fireball shape, and another simpler version which uses a texture, specifically a flame texture from Kenney’s Particle Pack, which is a bit more realistic looking (though could probably look equally as stylised with an effect like Posterize also applied). With a texture it’s a bit easier to control the shape of the effect, but I’ve also used the ellipse method before so felt like sharing it too.
We could also go further and provide a Flipbook to animate the fire if we had an appropriate spritesheet-like texture, or maybe sample two different fire textures and Lerp between them with something like Sine Time (from Time node), remapped into the 0-1 range. I won’t be doing any of that here, but maybe that provides some examples if the fire texture is a bit too static.
Be sure to also check after both versions below for a section about producing a Billboarding effect.
Texture Version
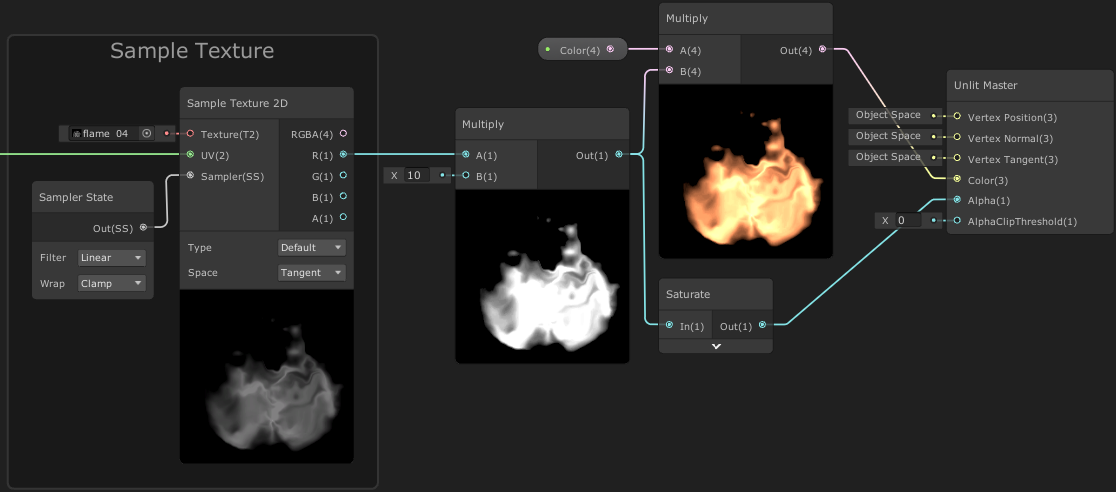
For the texture version, we mainly only need a Sample Texture 2D node. As the texture I’m using is greyscale I’m taking the R output and Multiply it by 10 so it’s a bit brighter. We then can Multiply with a Color property to apply the fire colour (which is also set to HDR mode and has an Intensity of 1.5, so it’ll glow a bit with Bloom post processing, but that can be expensive on mobile).
This is put into the Color input on the Unlit Master node which should also be set to Transparent via the small cog on the node. You can also choose which blending type you prefer, e.g. Alpha/Additive.
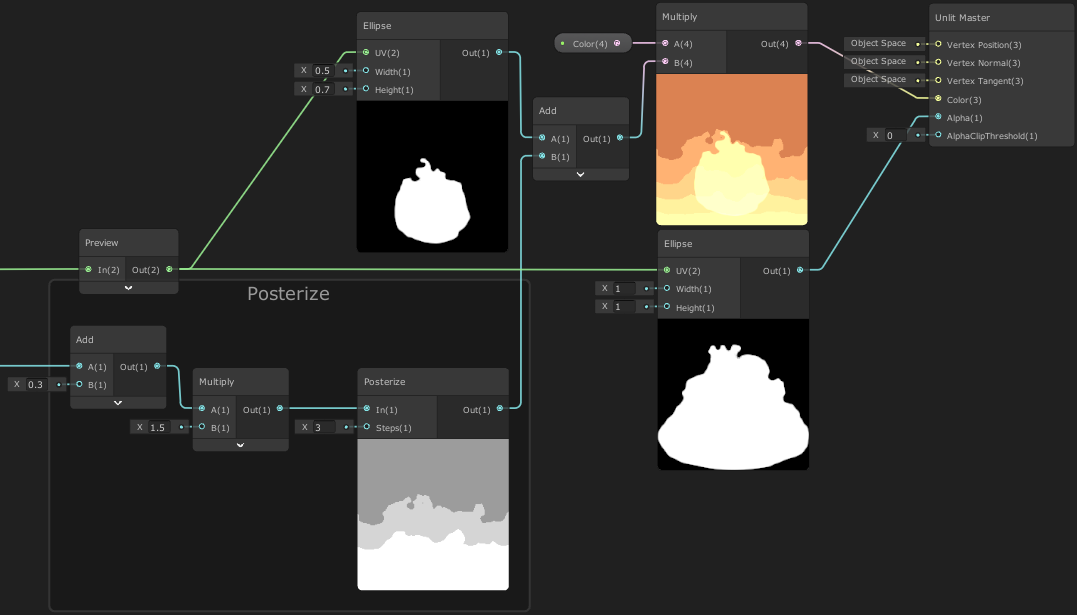
Ellipse Version
Another approach is generating a shape from math. Shader Graph provides an Ellipse node which helps with this.
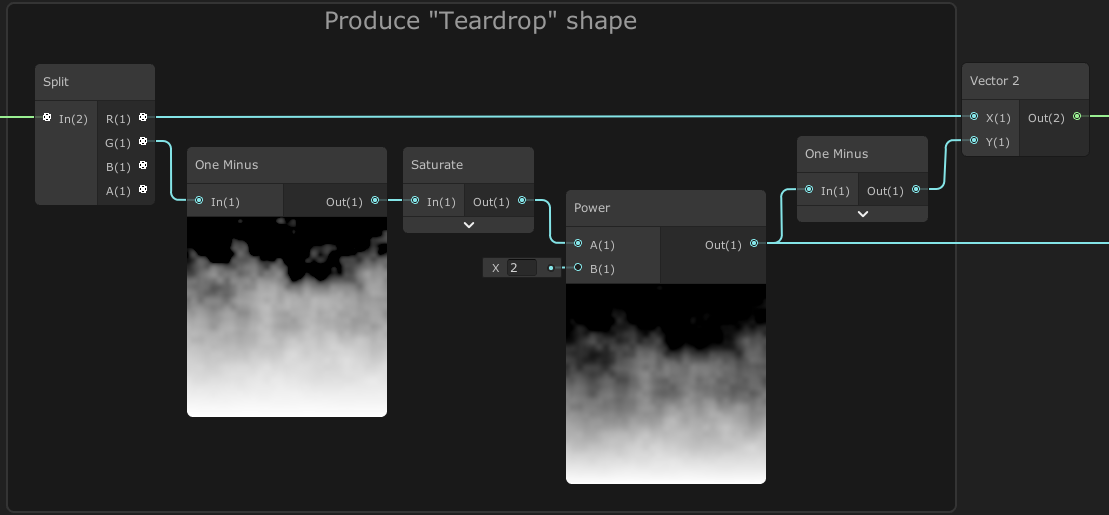
While we could take our UVs and directly put them into an Ellipse node, I’d like to apply a bit more offset first, to warp it into a more tear-drop, or candle-flame like shape. There might be a few ways to achieve this, but I’m taking the Y axis (G output from a Split), using One Minus to flip it upside-down and putting the result into a Power node with a B value of 2. (I guess this could also just be a Multiply, not sure if the compiler is clever enough to optimise this automatically or not). The next One Minus flips the vertical component back, but since the ellipse is centered and symmetrical it shouldn’t really matter.
With our edited UVs, we’ll put them into two Ellipse nodes. The first with a Width of 0.7 and Height of 0.5, and the other with 1 and 1.
We’ll also take the output from the Power in the previous step, Add 0.3, Multiply by 1.5 and put the result into a Posterize with 3 Steps. These values were mostly trial and error to ensure the fire had a nice amount of coloured bands, to help with a more stylised look.
This is added with the smaller Ellipse output, then we can tint the fire by multiplying with a Color property (which is also set to HDR mode and has an Intensity of 1.5) and plug the result into the Color input on the Unlit Master node. Be sure to also set the surface type to Transparent via the small cog on the node.
The larger Ellipse is used as the Alpha input on the Master node if using Alpha blending. If you prefer Additive blending, Multiply this with the current colour result and use that as the Color input instead, as black areas will show as transparent.
Randomising Distortion
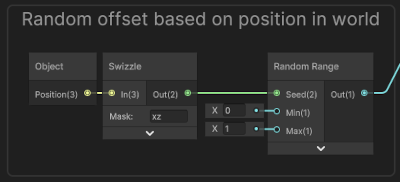
If we have multiple of these fire quads there is a problem that might become noticeable - they all look identical. We can scale/stretch the quads to make different sized flames, but the actual distortion is still the same. To prevent this, we can provide an additional offset to the UV coordinates used to sample the noise.
- If the GameObjects stay in the same position (and aren’t statically batched and aren’t particles), we can use the pivots as a Seed to the Random Range node to generate a random offset. The min/max can be anything if using procedural noise but if using a repeating noise texture only a 0-1 range will be important, since the texture would repeat anyway.
-
If the shader/material is used for a Particle System, you can use the Custom Vertex Streams under the Renderer module to provide a Stable Random value per particle (Random -> Stable.x). This will be passed into one of the TEXCOORD channels which can be accessed with the UV node. Will need to Split or Swizzle to obtain the component it’s in as it may be packed with other data.
-
If the GameObject needs to be able to move, another option is to create a Float Property in the Shader Graph Blackboard and set this to a random value from C#. e.g. using
GetComponent<Renderer>().material.SetFloat("_FloatReference", Random.value);in theStart()function, where_FloatReferenceis what the Reference field of the property is set to (see Node Settings tab while property is selected. Will likely be the same as the property name, but starting with_).
With either option, you’d Add the random value onto what is currently used in the Offset port of the Tiling And Offset node (or alternatively add to its output, before putting into UV port).
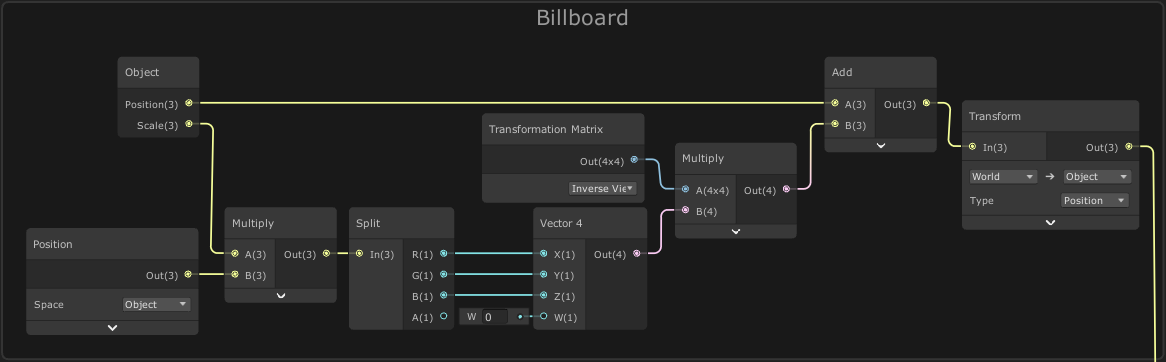
Billboard
For a 2D game this shader will work, but when applied to a flat quad in a 3D game the fire is obviously two dimensional if the player can walk around the side of it. One way to fix this is to have the quad always face the camera, which is known as billboarding. We could do this in a C# using Transform.LookAt in the Update/LateUpdate method, but we can also handle it inside the shader instead.
The following graph is based off this forum answer by bgolus, and can be put into the Vertex Position input on the Master node to produce the billboard effect.
Alternatively the shader could be used together with the Particle System component, as a way to apply a distortion effect on the existing particles - which already handle a billboarding effect. You’d also likely want to swap the Color property out for the Vertex Color node if you do that.
I’ve also applied the shader to a Line/Trail Renderer before which again already does a billboarding effect for you, that was for a fireball spell effect. I believe I also had to use a Rotate node somewhere in the graph for this, to rotate the UVs 90 degrees as that is what the line/trail expects. (Wow this is an old tweet!) :
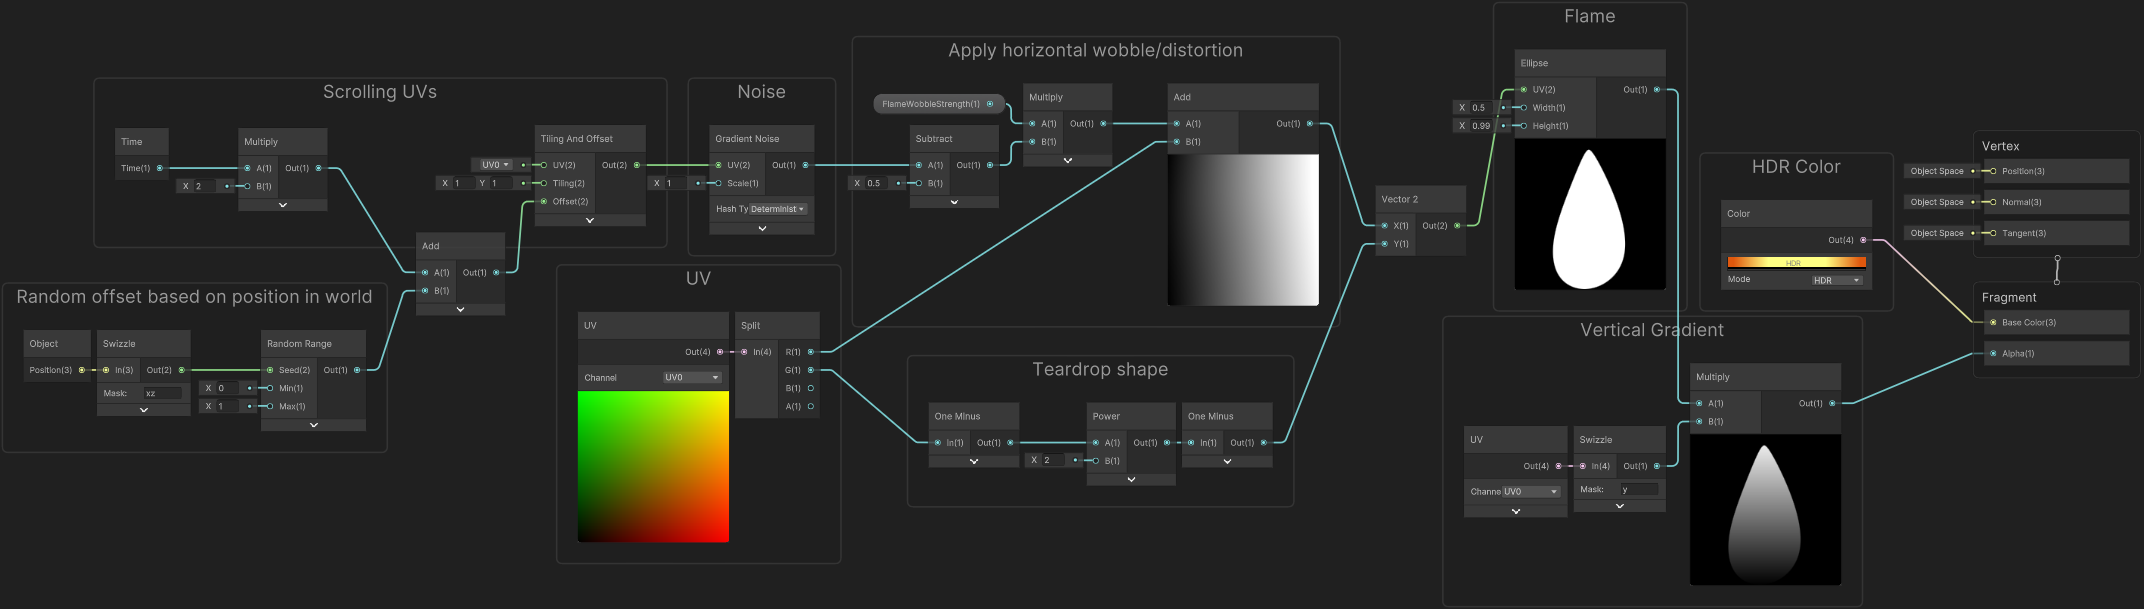
Candle Flame
This ellipse version explained above can also be used for a candle flame - though in this case I think the distortion makes more sense to be only on the horizontal axis to add some wobbling to the flame. In case it’s useful, I’ve shared the graph below that I used when making this Grimoire Scene :
(Click image to view full screen)
Thanks for reading! 😊
If you find this post helpful, please consider sharing it with others / on socials
Donations are also greatly appreciated! 🙏✨
(Keeps this site free from ads and allows me to focus more on tutorials)