2D Water Shader Breakdown
Intro
I’ve mostly stuck to 3D rendering but recently have been experimenting a bit with 2D (well, kinda 2.5D here), mostly to gain more experience working with sprites and tilemaps. I wanted to try out some 2D reflections and ended up with this water shader.
Sampling the noise textures with pixelated UVs really helped to make it fit with the pixel art style.
Overall, quite happy with how it looks. I know a few others are already interested, so thought I’d do a breakdown.
Notes
- I used URP (though nothing pipeline specific - I avoided renderer features), and the Sprite Unlit graph (but regular Unlit also works, or even Lit graph types if you want it affected by lights)
- Shader is applied to a tilemap which is important for the shoreline/edge ripples to function. But without the last couple sections the shader could work on other things (sprites, quad mesh, etc).
- Sprites in my scene are from a free asset pack by Cainos, with some minor edits. Except the duck, that one I drew 🦆
Breakdown
Reflections
For the reflections, I’ve used duplicate flipped sprites. In my case the sprites are angled towards the camera, and the scene is actually aligned to the XZ plane, but the same concept should work in full 2D / XY plane as well. (Especially if you want to use 2D Physics, that’s only XY)
Scene View (during play mode), with reflection sprites highlighted
At first, I did think about using RenderObject features with an override material/shader to create flipped sprites automatically. But it would be difficult to create accurate reflections for sprites that already have custom shaders (e.g. the swaying grass/foliage) as the vertex shader would be overidden. Probably also doesn’t allow you to override the texture - In my case, the pillars use an alternate sprite for reflections so the top isn’t reflected.
Instead, it’s better to just duplicate and rotate/flip the sprites manually, or use a C# Script to instantiate them at runtime. The script I wrote for this is shown in the foldout below. It should already work in both 2.5D and 2D scenes.
Sprite Reflection Script
|
|
So we can distort these later, capture the reflections to a Render Texture by using a second Camera (parented to the Main Camera). Create a Render Texture Asset (right-click in Project/Assets, will be somewhere under Create menu) and assign it to the Target/Output Texture field on the second camera - no scripting needed.
Reflection sprite GameObjects should be put on a specific Layer (e.g. named “Reflection”) and we adjust the Culling Mask on both cameras so that layer only renders to the second camera.
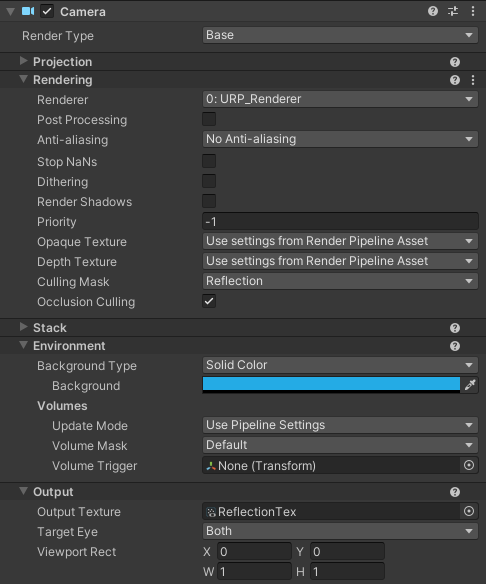
For URP specficially, you may be able to instead write a Custom Renderer Feature if you prefer (to potenitally avoid some overhead from the additional camera), though this tutorial won’t go over that.
In that case you’d use the Renderer asset (Transparent) Filtering Layer Mask to prevent reflection sprites rendering instead of camera Culling Mask. If using a 2D Renderer, you may need to update to 2022.3.61f1, 6000.0.42f1, or newer, to see the layer mask field.
Sky
I also wanted this reflection texture to include the sky. I think this is something you rarely get to see in top-down games and while the water could just show a solid colour I thought being able to see reflected clouds would be far more interesting. (Though this is specific to outdoor scenes of course)
This could likely be a static texture, or we could use a shader to add some scrolling - or perhaps even mix multiple noise textures. I’ve left the graph I used for the sky out, but it’s mostly just sampling a noise texture, put through a Smoothstep to remap and Lerp to apply blue (sky) and white (cloud) colours.
Ideally we’d want to keep this sky shader fairly cheap, as the current setup means every pixel on the second camera is rendered, regardless if the reflections will actually be shown by the water.
This might not be a big deal if texture is downsampled / small resolution. But if performance is an issue, could also try looking into optimisations to avoid rendering parts of the reflection texture - maybe via stencil buffer.
This sky shader/texture is placed on a quad, assigned to the Reflection Layer (so only rendered by that second camera). The quad should be big enough to cover that camera view and parented to it (which helps give a nice parallax effect when the camera moves!)
May also want to toggle the visibility in the Hierarchy, so you don’t see this in Scene View.

Assuming URP, rendering the sky using a Fullscreen Graph & Fullscreen Pass Renderer Feature on a second Renderer asset (used by that second camera) might also work, to avoid needing to manually scale the quad.
If using a 2D Renderer, may need a custom feature instead, as it seems the “Before Rendering Transparents” event isn’t actually before rendering sprites for some reason (in 2022.3 at least)
Noise
Okay! With that setup out the way, actually starting the water shader now…
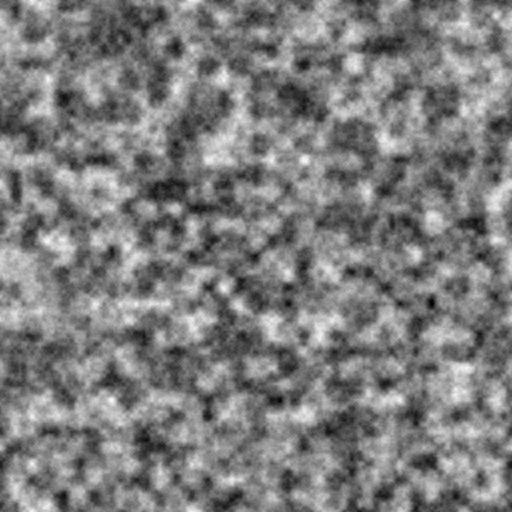
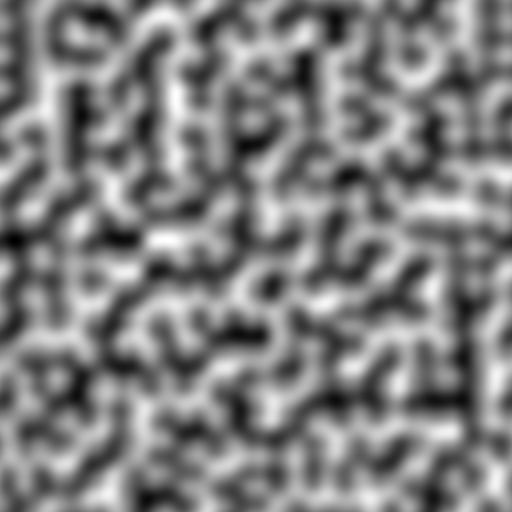
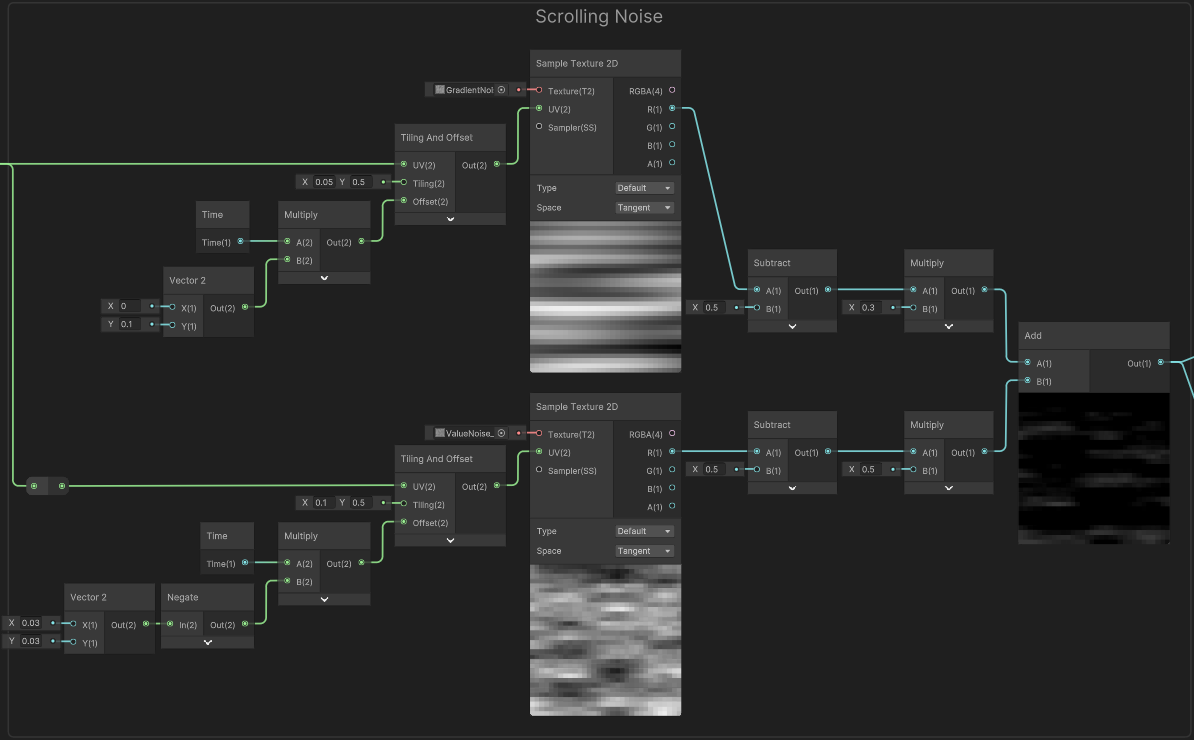
To apply distortions and handle specular reflections, we’ll need some seamless noise textures (or could use Gradient Noise / Simple Noise nodes - but these procedural methods can be more expensive). Here are the textures I used (CC0 License) :
Use a Sample Texture 2D node with a noise texture. In the UV port, we’ll need a Tiling And Offset node, where you can adjust the Tiling values and add scrolling by providing an Offset using the Time output from the Time node. Multiply the time by a Vector2 (node or property) to be able to adjust the speed in each direction. The values are up to you - but keep them quite small (ideally below 0.1) as we don’t want the water flowing by too fast.
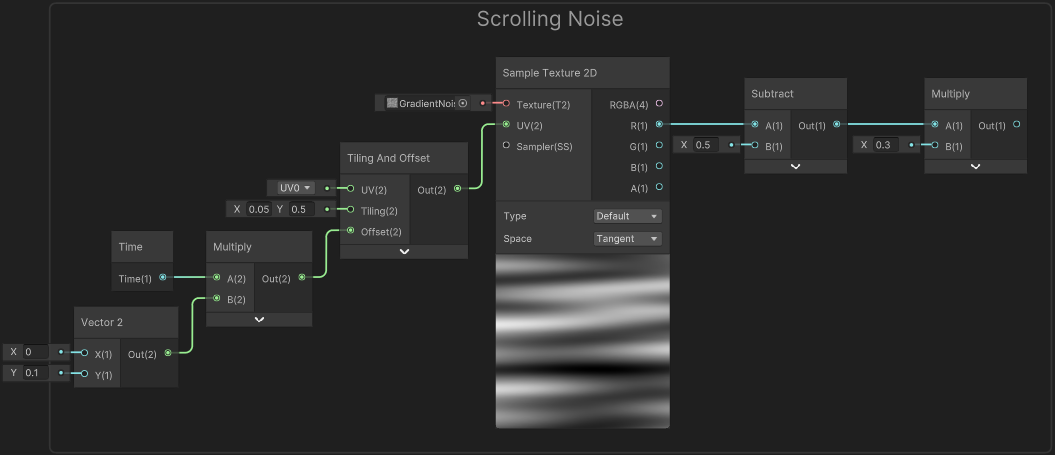
Since the texture ranges from 0 to 1 (roughly), we Subtract a value of 0.5 to shift the range. When we distort using this later, it offsets in both directions, keeping the overall image centered (rather than shifting towards the top corner). Can also Multiply to adjust the strength for better control of how the result will look.
Do the same setup for the other noise texture (but make sure to use a different scrolling direction) and Add both results together.
As I’d like to apply the shader to a tilemap and have the noise seamlessly connect over each tile, we need to use the Position rather than the mesh UV0 coordinates. Those are Vector3, so also Swizzle to convert them to Vector2. Can use "xy" if aligned to the usual 2D plane. In my case, I used "xz" since that is how my scene is set up.
You may want to handle the pixelation in the shader by using a Posterize node (equivalent to floor(UV * Steps) / Steps). Though if you already plan to render at lower resolution and use upscaling (i.e. on a 2D Pixel Perfect Camera or manually via another camera & Render Texture) then you can skip the pixelation.
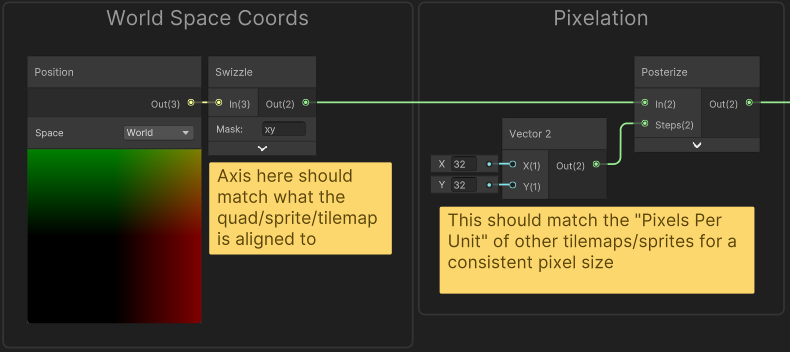
The result of this should be put into the UV ports on the Tiling And Offset nodes.
Distorting Reflections
Add a Texture2D property in the Blackboard where we can assign the Reflection Render Texture set up earlier. (Can set it as the Default under Node Settings and/or apply to material just like any other texture asset. If you use a custom feature to generate the reflection texture instead, would likely uncheck Exposed and use cmd.SetGlobalTexture)
To handle the distortion we need to alter the UV coordinates used to sample the texture. The current noise output would likely be far too strong of an offset though, so we’ll first need to Multiply by a value like 0.05 to lower the strength. Can hardcode that or use a Float property for this to have control from the material.
We can limit the distortion to only occur on the X axis by putting it into a Vector2 (keeping Y set to 0). This avoids the reflections “un-attaching” from the sprites which can look slightly odd. Then Add this to the Screen Position and put into the UV port on a Sample Texture 2D node sampling the reflection texture property.

Water Colour
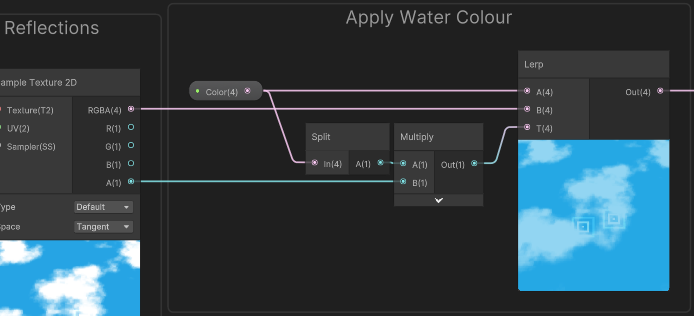
Having the reflections perfectly mirror the colours of the scene can be a bit jarring, so let’s add a cyan/blue tint to better show the surface is water.
Connect the sample result to the B port on a Lerp node, and create a Color property for the A port. To control how much the texture should be tinted (T port) we can use the alpha of this property. You’ll need a Split (or Swizzle with “a”) to extract that.
Can optionally also Multiply by the alpha channel of the reflection texture, which would result in showing the water colour if you don’t render the sky (and assuming the second camera’s background colour is transparent)
Specular Highlights
While I intend to keep the shader unlit, I think it’s still important to add some highlights to give the impression that the water surface is moving and catching the sunlight. But there’s no need for actual specular lighting calculations, (that would probably require normal maps which I haven’t used here), instead we can achieve something similar by reusing our scrolling noise.
Put the noise into the In port on a Step node, then try adjusting the Edge value input until there is only a few white parts appearing in the preview. Since there are two sets of noise scrolling past each other (and combined additively), they occasionally line up and produce values higher than the Edge.
You may need to adjust the noise scrolling directions until you get a good result. Also try outputting the result to the Master Stack and save the graph to preview in scene too.
We can add a subtler version of this to mimic shading too, by using the noise output again into the In on a Smoothstep to remap (I used an Edge1 of 0 and Edge2 of 0.5), then Multiply by a small value (i.e. 0.15).
Feel free to use properties for these values if you want control over them from the material.
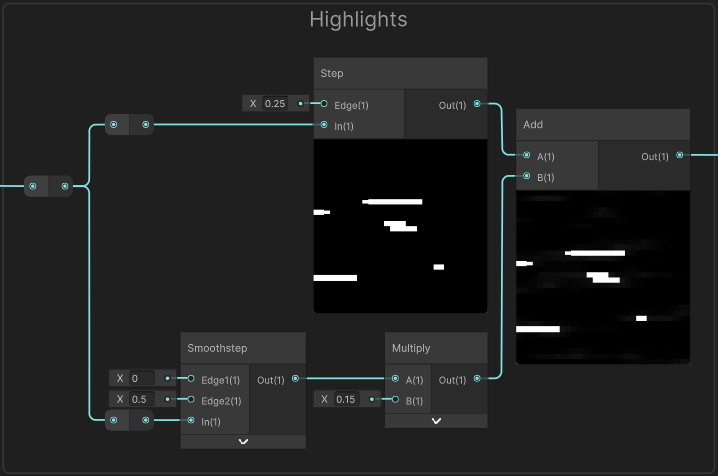
As shown in the above we Add these two outputs together. To actually apply this to the rest of our graph, we can Add again to the output of the “Apply Water Colour” group (from the previous section). If you connect that to the Base Color in the Master Stack and apply the shader (e.g. to a quad) it should look similar to the first tweet.
Shoreline Ripples
I initially had the water shader (using the above sections) on a quad mesh, but later swapped to applying to a Tilemap (separate from the rest of the scene that is - since they need different materials). This is so I could add a ripping effect to the edges of the water.
To handle this, it uses the following texture :

Gradient tiles (4 rows, 12 columns)
In the scene I mostly used the corner and straight tiles (on the right side). But made all 48 tiles of the blob tileset - just in case!~
Should import this as :
- Type : Sprite (2D and UI)
- Sprite Mode : Multiple
- Pixels Per Unit : 32
- Filter Mode : Point
- If you don’t want pixelated look can use Bilinear, but you’ll likely need to manually edit the texture to add a few pixels of padding, to avoid cell edges bleeding into neighbouring cells.
- In Sprite Editor, Slice by Cell Size of 32x32
After importing, drag the texture into a Sprite Palette, can then select tiles and paint on the Tilemap (with brush tool). May also be able to automatically paint the correct tiles with a Rule Tiles asset, though it looks a pain to set up.
The shader samples this by using a Texture2D property with the _MainTex reference, and by applying a scrolling Sine wave we create some nice repeating ripples moving out from the edges.

There’s some Multiply nodes here to control the speed and frequency of the wave (feel free to use properties for these if you want control from the inspector). We Multiply again with the texture, to fade the waves as they get further from the edge. Then the Saturate clamps between 0 and 1 (mostly removing negative values from the Sine as I didn’t like it darkening the water)
To actually apply these ripples, the result of this group is put into another Add node to combine with the “+ Highlights” group (from previous section)
Distorting Ripples
Finally, I also wanted to apply distortion to make these ripples look more interesting.
It’s possible this could be done by editing the gradients, but I handled this in the shader by re-using the output of the “Distortion Strength” group from earlier. However, since this is a tilemap we can’t really just add it to the UV. If you try, you’ll notice it leads to sampling parts of neighbouring tiles.
To avoid that, I lower the strength of the distortion based on the distance to the edge of the tile using this setup :
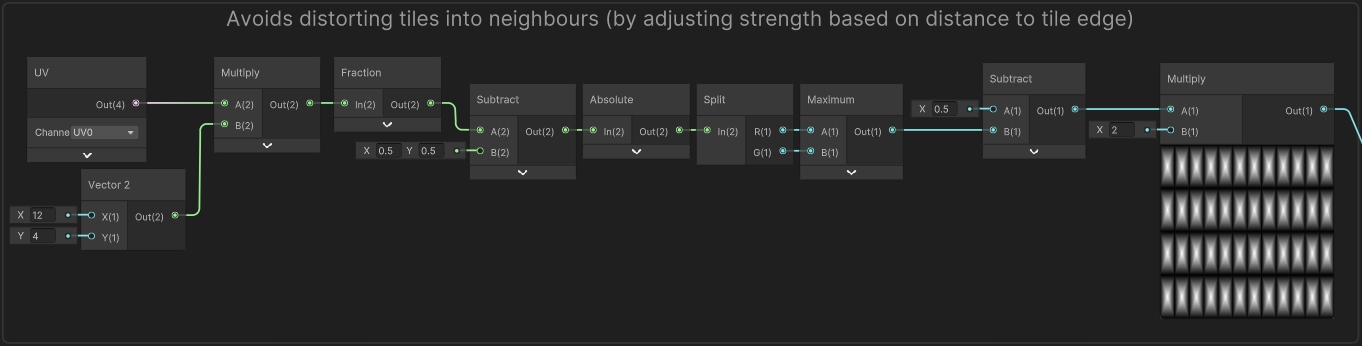
In short, the Vector2 node at the start uses a value of (12, 4) as that’s the number of columns/rows in the texture. The Fraction is responsible for it repeating, and the rest is basically a Square SDF (Signed Distance Field).
We Multiply this by the output of the “Distortion Strength” group from earlier. Then Add to the UV node and put into the UV port on the Sample Texture 2D node (in “Sample Tilemap” group from previous section)

Thanks for reading! 😊
If you find this post helpful, please consider sharing it with others / on socials
Donations are also greatly appreciated! 🙏✨
(Keeps this site free from ads and allows me to focus more on tutorials)