Custom Renderer Features
One way to customise the Universal Render Pipeline (URP) is by writing custom Scriptable Render Passes. A typical example of this could involve rendering some objects to a separate off-screen texture, which we could then sample later - either in shaders used by any objects in the scene, or as a fullscreen pass to composite it with the camera/screen.
These passes can be enqueued by a Custom Renderer Feature, which are assigned to the list at the bottom of the “Renderer” assets used by URP (i.e. the Universal Renderer asset, known as Forward Renderer prior to 2021, or the 2D Renderer which supports renderer features from 2022.1 onwards)
This post will show the general layout/structure of a custom feature & pass, going through each function separately as I think it’ll be more useful that way. The post was originally aimed at Unity 2022 versions of URP which introduced RTHandles - this was quite a big change and the lack of examples is mainly why I wrote this. Some links might lead to older code examples.
Unity 6 onwards uses Render Graph (a newer scripting API - not a visual editor!)
Methods like OnCameraSetup, Execute & OnCameraCleanup are now obsolete, replaced by RecordRenderGraph.
I’ve updated parts of this post to provide examples/snippets for Unity 6+, but unlike the older render pass code explained in this post, RenderGraph also has a good amount of info & examples in the Unity Docs explaining the new setup. As well as official examples in the Package Manager window, under the Samples tab of the Universal Render Pipeline package, or viewed on the Unity github / Graphics repo.

Sections :
- Example Uses
- Layout of a Custom Feature/Pass
- ScriptableRendererFeature Methods
- ScriptableRenderPass Methods
- Renderer Feature Example (Unity 2022)
- Setting values on features at Runtime
- Connecting a feature to a URP Volume
- RenderPipelineManager
Example Uses
First up, I thought I’d provide some examples so you can get an idea of why you might use a Renderer Feature. I’ve put most of these sections in a foldout so it’s easier to skip if you’d prefer.
Examples
Fullscreen / Post Process Effect
A very common use for renderer features is applying shaders/materials as a fullscreen effect, since URP’s Post Processing Volumes do not support custom effects (as of 2022 at least).
Applying fullscreen effects is sometimes referred to as a “blit”. There are various ways to handle it, such as CommandBuffer.Blit, using CommandBuffer.DrawMesh/CommandBuffer.DrawProcedural (either with custom vertex shader, or overriding view/projection matrices), or using the newer Blitter API (Unity 2022+), e.g. Blitter.BlitCameraTexture.
I have a Blit Renderer Feature shared on github - it has various branches showing some of these methods.
Unity 2022.2 also introduced a new Fullscreen Graph type and Fullscreen Pass Renderer Feature built-in to URP, so if you just need to apply a shader to the camera you can use those instead of a custom feature! To blit to a different destination, we’d still need a custom feature.
The later Blit section will go into more detail.
RenderObjects
URP provides the RenderObjects feature which, as the name might suggest, can render objects (e.g. MeshRenderers, SkinnedMeshRenderers, SpriteRenderers, etc), filtered by Opaque/Transparent, Layer Mask and Shader Pass (LightMode) tags, while also providing overrides for the Material, Depth Test/Write, Stencil operations and Camera properties.
Some of those overrides are particularly useful as Shader Graph doesn’t support Stencil operations and didn’t expose Depth Test/Write params until v12 (2021.2).
The Override Material is also useful for applying a material to many objects in the scene at once, such as Outline shaders using the “Inverted Hull” method such as this example from UniversalRenderingExamples, or X-Ray / Highlighting through walls effects also using ZTest “Greater” like this example in the Unity docs.
Note that when you use the feature, it is re-rendering those objects. For some effects you may only want to render once, so you would need to also remove the Layer(s) used in the Layer Mask from the default Opaque/Transparent Filtering Layer Mask(s) at the top of the Universal Renderer. (The 2D Renderer should also expose a layer mask field as of 2022.3.61f1, 6000.0.42f1, or newer)
Screen Blur
We can use a custom feature to apply blur operations to the screen. This can involve either blitting back to the screen, or to a custom buffer - which could then be sampled in UI shaders for example to make them appear to blur what is behind them.
There are multiple ways to blur in a shader, such as Box Blur, Gaussian, Kawase. If you use those as search terms you should be able to find example implementations in Unity shaders. These can be applied to the screen by using a Blit (may require shader to be modified depending on the blit method used).
Some examples (May be for older URP versions. Also check licenses before use) :
- https://gist.github.com/Refsa/e006f1a8d3a974ae88cb7ecd93bf306b
- https://github.com/sebastianhein/urp_kawase_blur
- https://alexanderameye.github.io/notes/scriptable-render-passes/
- https://danielilett.com/2023-06-01-tut6-6-gaussian-blur/
Pre-passes & Edge Detection
As is, the RenderObjects feature only renders to the camera buffers, but with a similar custom feature it is possible to render objects to another buffer (known as a Render Target). This is usually some form of Render Texture, but in features we tend to use RTHandle for 2022+, (or RenderTargetHandle/RenderTargetIdentifier in previous versions). Once you have this buffer it can be passed into other shaders using a Global Texture Property. Generating this buffer is usually referred to as a “pre-pass” as you need this additional pass before your main effect is rendered.
A common example is for Edge Detection style outlines, such as this tutorial by Alexander Ameye. That uses a feature to first render a prepass to obtain the depth and normals of objects in the scene, sent into a global texture property. Another feature (or pass) then applies a fullscreen material, where this texture is sampled multiple times to detect where the edges of objects are.
In URP v10+ (Unity 2020.2+) we can also now get URP to generate depth and normals textures for us, e.g. by using renderPass.ConfigureInput(ScriptableRenderPassInput.Normal); before enqueuing the pass (in AddRenderPasses function). More info on ConfigureInput is provided later.
Screenspace Distortion
Distortion for shaders used in the scene typically involves displacing the screen positions used to sample the Scene Color node. This uses the Opaque Texture enabled on the URP Asset, which is a copy of the camera color buffer after rendering opaques. Since this texture only contains opaques, transparent objects behind it cannot be seen. A potential solution is copying the screen after rendering transparents and applying the distortion later instead, a later example goes over that.
In that case, the regular transparent queue can be distorted at least - but multiple layers of distortion also won’t stack. If that is the desired result, we could instead have a feature render a pre-pass to combine distortion directions/strengths additively into a custom buffer (e.g. via a DrawRenderers call). We can then do a fullscreen blit on the camera targets, while sampling the buffer as a global texture to distort UV coords.
Lens Flares
While URP now supports the Lens Flares (SRP) component, older versions of the URP docs also provided a custom Lens Flare Renderer Feature example which could be a good reference if you need to do someting similar with lights.
Specifically, their example makes use of renderingData.lightData.visibleLights to loop through those lights, then drawing a quad mesh with a flare texture through cmd.DrawMesh.
Internal URP Passes
Internally, URP also uses a bunch of Scriptable Render Passes, listed under the URP package’s Runtime/Passes folder. These can use internal functions which we can’t use, but might still be useful to look at to get an idea of how they work.
For example, here’s a few :
- DepthOnlyPass, DepthNormalOnlyPass, or CopyDepthPass
- sets up the Camera Depth (and Normals) Textures (e.g. used by the Scene Depth node and SSAO feature)
- CopyColorPass
- sets up the Camera Opaque Texture (used by the Scene Color node)
- MainLightShadowCasterPass, AdditionalLightsShadowCasterPass
- renders objects into shadowmaps
URP also provides Renderer Features and Passes for :
- RenderObjectsPass - used by the Render Objects feature
- (see section above for example usages)
- ScreenSpaceAmbientOcclusionPass - used by the SSAO feature
- ScreenSpaceShadowsPass - used by Screen Space Shadows feature.
- This feature actually enqueues two passes - ScreenSpaceShadowsPostPass as well, used to turn off the screen space shadows keyword for the transparent pass.
- (2022.2+) FullscreenRenderPass - used by Fullscreen Pass feature.
- Allows you to draw/blit material/shader effects (using the new Fullscreen Shader Graph) to the screen, as mentioned earlier.
- DecalRendererFeature - Also see Decals feature docs page.
- Uses various passes depending on the technique selected. Can find them under Runtime/Decal folder.
Packages/ from the URL or you’ll see a 404.
Layout of a Custom Feature/Pass
To create a Custom Renderer Feature (& Pass) we can right-click in the Project window (somewhere in Assets) and use Create → Rendering → URP Renderer Feature. This creates a C# script for us with a renderer feature template (inherits ScriptableRendererFeature and includes a nested class inheriting ScriptableRenderPass, with the important methods overriden)
The feature is basically a ScriptableObject (a class that holds data, but saved as an asset rather than in a scene like a MonoBehaviour). It’s purpose is to serialise fields that need to be displayed in the inspector and creates & enqueues the render pass.
Focusing on the feature class, it should look something like :
using UnityEngine;
using UnityEngine.Rendering;
using UnityEngine.Rendering.Universal;

public class CustomRendererFeature : ScriptableRendererFeature {

    CustomRenderPass m_ScriptablePass;

    public override void Create() {
        m_ScriptablePass = new CustomRenderPass();

        // Configures where the render pass should be injected
        m_ScriptablePass.renderPassEvent = RenderPassEvent.AfterRenderingOpaques;
    }

    // Here you can inject one or multiple render passes in the renderer.
    // This method is called when setting up the renderer once per-camera (every frame!)
    public override void AddRenderPasses(ScriptableRenderer renderer, ref RenderingData renderingData) {
        renderer.EnqueuePass(m_ScriptablePass);
    }
}
The render pass is what will actually handle the custom rendering, mostly through the ScriptableRenderContext and CommandBuffer APIs. This class is usually nested inside the above feature, but could also be a separate C# file/script - especially if the pass is likely to be referenced by multiple features.
In the template, the pass class looks like this :
public class CustomRenderPass : ScriptableRenderPass {
    // Called before executing the render pass.
    // Used to configure render targets and their clear state. Also to create temporary render target textures.
    // When empty this render pass will render to the active camera render target.
    // You should never call CommandBuffer.SetRenderTarget. Instead call <c>ConfigureTarget</c> and <c>ConfigureClear</c>.
    public override void OnCameraSetup(CommandBuffer cmd, ref RenderingData renderingData) {

    }

    // Here you can implement the rendering logic.
    // Use <c>ScriptableRenderContext</c> to issue drawing commands or execute command buffers
    public override void Execute(ScriptableRenderContext context, ref RenderingData renderingData) {

    }

    // Cleanup any allocated resources that were created during the execution of this render pass.
    public override void OnCameraCleanup(CommandBuffer cmd) {

    }
}
Depending on your URP version the template may vary slightly. Unity 6 onwards will consider these methods obsolete and you’ll need to rewrite if you plan on updating to that version later.
Versions prior to Unity 2020.2 had Configure, which is similar to OnCameraSetup but only provides a RenderTextureDescriptor parameter rather than passing the RenderingData struct. There was also FrameCleanup, which was renamed to OnCameraCleanup.
Older methods (OnCameraSetup, Execute & OnCameraCleanup) are now obsolete. Though you may still find the features that URP provides and some assets using them, as projects made in older versions that update to Unity 6 have compatibility mode enabled, which disables RenderGraph and uses the old ScriptableRenderPass setup instead. This allows older custom renderer features to still function, but they should be rewritten for RenderGraph (as it is more performant and compatibility mode will be removed in future Unity versions). Once rewritten, you can turn off compatibility mode under Project Settings → Graphics.
Ignoring the obsolete methods, a ScriptableRenderPass for RenderGraph only requires one override now :
class CustomRenderPass : ScriptableRenderPass {

    public override void RecordRenderGraph(RenderGraph renderGraph, ContextContainer frameData) {
        UniversalCameraData cameraData = frameData.Get<UniversalCameraData>();
        UniversalResourceData resourceData = frameData.Get<UniversalResourceData>();

    }
}
The RecordRenderGraph method is responsible for configuring the render passes and declaring inputs/outputs.
You do not call any rendering commands in here. For that, you may need additional methods/classes. Using some form of PassData and ExecutePass are the common naming conventions. For example, a custom blit pass might use :
// Data required by ExecuteCustomPass
class BlitPassData {
    internal TextureHandle source;
}

// Function that calls rendering commands
static void ExecuteBlitPass(BlitPassData data, RasterGraphContext context) {
    Blitter.BlitTexture(context.cmd, data.source, new Vector4(1, 1, 0, 0), 0, false);
}
And the RecordRenderGraph would be updated to configure that pass and use this additional method/class. The later Blit section shows a full example.
Typically the first thing you’ll want to do is rename the feature/pass. These can be anything you want, but you would typically keep the Feature and RenderPass suffixes. Be aware that the C# script name should match the name of the feature class for serialisation purposes (same thing applies to ScriptableObject / MonoBehaviours, so you should already be somewhat familiar with that)
ScriptableRendererFeature Methods
Create
This method is used to initialise the ScriptableRenderPass and any required resources. Unity calls this method in OnEnable/OnValidate - so every time the project loads, enter/exit play mode, scripts recompile, or serialisation changes.
Since the method may be called multiple times, If you create/clone any Materials you should make sure to check if it is null first. Then clean up in Dispose - see that section for an example. Also be careful with creating materials in the constructor of the pass for the same reason.
It’s common for the feature to have serialised fields that get exposed in the inspector. We can drag assets from the Project window into here - but like other assets, it can’t contain references from scene objects. (If this is something you need, you may still be able to pass those in at runtime though. A section near the end of the post provides an example of this)
Some fields will need to be sent to the pass. Can do this through parameters in the constructor, create other methods or make the same fields in the pass public. To make things simpler, we can wrap the fields in an additional serialised class (e.g. named “Settings”). Of course, what goes in here will vary depending on what the pass does, but here’s an example setup :
// in feature
[System.Serializable]
public class Settings {
    [Header("Draw Renderers Settings")]
    public LayerMask layerMask = 1;
    public Material overrideMaterial;
    public int overrideMaterialPass;
    public string colorTargetDestinationID = "";

    [Header("Blit Settings")]
    public Material blitMaterial;
}

// exposed values
public Settings settings;
public RenderPassEvent _event = RenderPassEvent.AfterRenderingOpaques;

private CustomRenderPass m_ScriptablePass;

public override void Create() {
    m_ScriptablePass = new CustomRenderPass(settings, name);
    m_ScriptablePass.renderPassEvent = _event;
    ...
}

// in pass
private Settings settings;
private ProfilingSampler _profilingSampler;

// (constructor, method name should match class name)
public CustomRenderPass(Settings settings, string name){
    // pass our settings class to the pass, so we can access them inside OnCameraSetup/Execute/etc
    this.settings = settings;

    // set up ProfilingSampler used in Execute method
    _profilingSampler = new ProfilingSampler(name);
}
You may also create a ProfilingSampler which will be used later by the Execute method. The name passed through is a field of the ScriptableRendererFeature class, which gets exposed to the inspector allowing the user to rename it. If the pass isn’t going to be attached to a feature, it could also use a hardcoded string or use nameof() the class.
For Unity 6+ you can (optionally) specify a ProfilingSampler as a third parameter to the renderGraph.AddRasterRenderPass<>() function. If left out, it creates one behind the scenes using the passName (first param), though it’s slightly less efficient as it needs to convert that string to a hash code and index a dictionary. That only occurs in editor so might not be that important to worry about.
RenderPassEvent
Also in this Create method (or the constructor of the render pass) we typically set the renderPassEvent field of the pass. This configures when the render pass will run.
It uses the RenderPassEvent enum, which contains these entries/values :
BeforeRendering = 0
BeforeRenderingShadows = 50
AfterRenderingShadows = 100
BeforeRenderingPrePasses = 150
AfterRenderingPrePasses = 200
BeforeRenderingGbuffer = 210
AfterRenderingGbuffer = 220
BeforeRenderingDeferredLights = 230
AfterRenderingDeferredLights = 240
BeforeRenderingOpaques = 250
AfterRenderingOpaques = 300
BeforeRenderingSkybox = 350
AfterRenderingSkybox = 400
BeforeRenderingTransparents = 450
AfterRenderingTransparents = 500
BeforeRenderingPostProcessing = 550
AfterRenderingPostProcessing = 600
AfterRendering = 1000
Be aware that camera matrices and stereo rendering is not set up until the BeforeRenderingPrePasses event (value of 150).
More enum entries may be added in newer versions. Can find it’s declaration in ScriptableRenderPass.cs.
Typically you’ll set the field using the enum itself :
m_ScriptablePass.renderPassEvent = RenderPassEvent.AfterRenderingOpaques;
// (aka value of 300)
For passes with the same renderPassEvent value, the order should be the same as it appears on the Renderer Features list (or order of EnqueuePass if enqueuing multiple passes in a single feature).
If you need to specify a pass to run at a particular point inbetween other passes, you can also provide an offset to the values. For example the following would run after any passes with just RenderPassEvent.BeforeRenderingPostProcessing (value of 550) :
m_ScriptablePass.renderPassEvent = RenderPassEvent.BeforeRenderingPostProcessing + 1;
// (aka value of 551)
Just don’t make that offset too high, BeforeRenderingPostProcessing has a value of 550 in the enum. So doing BeforeRenderingPostProcessing + 50 would then be equivalent to AfterRenderingPostProcessing.
Dispose
While not a part of the template, we can add a Dispose method to the feature. The method can be useful for releasing any resources that have been allocated. For example, material instances (see below) or RTHandles (see RTHandle section)
In editor, the method is called when removing features, recompling scripts, entering/exiting play mode. (Not too sure when it gets called in builds, probably when changing scenes?)
public Shader shader; // expose a Shader field

private Material material;

public override void Create() {
    // Create may be called multiple times... so :
    if (material == null || material.shader != shader){
        // only create material if null or different shader has been assigned

        if (material != null) CoreUtils.Destroy(material);
        // destroy material using previous shader

        material = CoreUtils.CreateEngineMaterial(shader);
        // or alternative method that uses the shader name (string):
        //material = CoreUtils.CreateEngineMaterial("Hidden/Internal-DepthNormalsTexture");
        // assumes the required shader is in the build (and variant, if keywords are set)
        // e.g. could add the shader to the "Always Included Shaders" in Project Settings -> Graphics
    }
    m_ScriptablePass = new CustomRenderPass(material, name);
    ...
}

protected override void Dispose(bool disposing) {
    CoreUtils.Destroy(material);
    // (will use DestroyImmediate() or Destroy() depending if we're in editor or not)
}
It’s very possible that Unity will automatically clean up some unused resources (e.g. during a Scene change), but it’s still a good practice to handle it ourselves.
AddRenderPasses
This method is responsible for injecting/enqueuing ScriptableRenderPasses with URP’s Renderer. By default it’ll already have renderer.EnqueuePass(m_ScriptablePass) and that may be all we need here. But it is possible to enqueue multiple passes if required.
The comment in the template mentions this method is called once for each camera, but be aware this is also every frame/update, so avoid creating/instantiating anything in here (can use the Create method for that).
Also note that by default it would enqueue the pass for all cameras - including ones used by the Unity Editor. In order to avoid this, we can test the camera type and return before enququeing (or can check later during Execute to prevent that function running, if you prefer).
public bool showInSceneView;

public override void AddRenderPasses(ScriptableRenderer renderer, ref RenderingData renderingData) {
    if (renderingData.cameraData.isPreviewCamera) return;
    // Ignore feature for editor/inspector previews & asset thumbnails
    if (renderingData.cameraData.isSceneViewCamera) return;
    // Ignore feature for scene view
    // If the feature uses camera targets, you may want to expose a bool/tickbox instead, e.g.
    if (!showInSceneView && renderingData.cameraData.isSceneViewCamera) return;

    // (could alternatively use "cameraData.cameraType == CameraType enum" for these)

    if (renderingData.cameraData.camera != Camera.main) return;
    // Ignore all cameras except the camera tagged as MainCamera
    // Though may be better to use Multiple Renderer Assets (see below)

    renderer.EnqueuePass(m_ScriptablePass);
}
As shown, we can also test against Camera.main if you only want the feature to run on the Main Camera. If you only want it to run on a different specific camera you could potentially set a Camera field at runtime (can’t during editor as assets can’t serialise scene references). Though a better way to handle these would be to create multiple “Renderer” assets (e.g. Universal Renderers), assign them to the list on the URP Asset(s) (may have multiple per quality setting), then use the Renderer dropdown on each Camera component to select which index it should use. That way, you can choose which renderer features are used on a per-camera basis (without it being hardcoded).
In 2021.2+ you should avoid accessing camera targets here (e.g. cameraColorTargetHandle / cameraDepthTargetHandle, or older cameraColorTarget / cameraDepthTarget on the ScriptableRenderer param) as these may not have been allocated yet! We can either obtain those targets directly in the passes Execute method, or add the SetupRenderPasses method (see below)
ConfigureInput
We can also call ConfigureInput in this method, which allows us to request URP to generate certain textures (via the ScriptableRenderPassInput enum) :
ScriptableRenderPassInput.Depth- Make URP generate
_CameraDepthTexture, even if it’s not enabled on the URP Asset.
- Make URP generate
ScriptableRenderPassInput.Normal- Make URP generate
_CameraNormalsTexture
- Make URP generate
ScriptableRenderPassInput.Color- Make URP generate
_CameraOpaqueTexture, even if it’s not enabled on the URP Asset.
- Make URP generate
ScriptableRenderPassInput.Motion(2022.1+)- Make URP generate
_MotionVectorTextureand_MotionVectorDepthTexture
- Make URP generate
This appears to only work for the Universal Renderer. The 2D Renderer doesn’t generate these textures (in 2022 versions at least)
Also note these textures are generated at usual events, so won’t necessarily be ready for the event the pass is enqueued at, for example :
- Opaque texture would only be used in the BeforeRenderingTransparents event or later
- Depth texture will be generated using a DepthPrepass if using the BeforeRenderingOpaques event and CopyDepth when using AfterRenderingOpaques (assuming it isn’t already using a prepass for other reasons). If a prepass is used, this requires shaders to have a pass with the “DepthOnly” lightmode.
- Normals texture is also generated via prepass (assuming forward rendering). DepthPrepass is converted to a DepthNormalPrepass which renders both in a single call. This requires shaders to have a pass with the “DepthNormalsOnly” lightmode.
You can use the Frame Debugger window to see the order everything gets rendered in, and somewhat useful when it comes to debugging renderer features (at the very least to check it’s running).
If you need multiple of these inputs, don’t call ConfigureInput multiple times (that will just override the value). As the enum has the [Flags] attribute, you can use the | operator to combine them instead. For example :
public override void AddRenderPasses(ScriptableRenderer renderer, ref RenderingData renderingData) {

    // Tell URP to generate the Camera Depth Texture
    m_ScriptablePass.ConfigureInput(ScriptableRenderPassInput.Depth);

    // Tell URP to generate the Camera Normals and Depth Textures
    // m_ScriptablePass.ConfigureInput(ScriptableRenderPassInput.Normal | ScriptableRenderPassInput.Depth);

    renderer.EnqueuePass(m_ScriptablePass);
}
SetupRenderPasses
This method was added in Unity 2021.2 (URP v12). It doesn’t exist in the template, but it can be added inside the feature class. If your feature requires accessing the camera targets, you should do it inside this method rather than AddRenderPasses.
For example :
// in feature
public override void SetupRenderPasses(ScriptableRenderer renderer, in RenderingData renderingData) {
    RTHandle color = renderer.cameraColorTargetHandle;
    RTHandle depth = renderer.cameraDepthTargetHandle;
    m_ScriptablePass.Setup(color, depth);
    // For versions prior to 2022, use RenderTargetIdentifier type instead,
    // with renderer.cameraColorTarget / renderer.cameraDepthTarget
}

// in pass
private RTHandle rtDestinationColor;
private RTHandle rtDestinationDepth;

public void Setup(RTHandle destColor, RTHandle destDepth){
    rtDestinationColor = destColor;
    rtDestinationDepth = destDepth
}
Personally I usually access targets directly in Execute which also works (though I guess that is more hardcoded). Accessing them here and passing them into the pass may make the pass more flexible as you could potentially use the pass in multiple features (in that case would probably also be separated into its own file rather than a subclass)
To be clear, the latter method (Setup) isn’t overriding a method of the ScriptableRenderPass, so it could be named anything. In this case it’s used to pass the RTHandle through, which would then be used by the pass. (For example, could be used to configure the target in OnCameraSetup or used in a blit call in Execute. Later sections will explain these)
ScriptableRenderPass Methods
Sections under here are somewhat outdated for Unity 6+ (if not using compatibility mode)
OnCameraSetup
This method is responsible for configuring the render targets that will be used. By default if you do nothing, URP will already configure the pass to use the camera colour and depth targets for you.
But in the cases that we want to specify our own targets, we can use one of the ConfigureTarget function overloads from the ScriptableRenderPass class.
RTHandle
RTHandles are the way to handle render targets in Unity 2022+. Typically we allocate one inside OnCameraSetup using RenderingUtils.ReAllocateIfNeeded :
// To create a Color Target :
var colorDesc = renderingData.cameraData.cameraTargetDescriptor;
colorDesc.depthBufferBits = 0; // must set to 0 to specify a colour target
// to use a different format, set .colorFormat or .graphicsFormat
RenderingUtils.ReAllocateIfNeeded(ref colorTarget, colorDesc,
    name: settings.colorDestinationID);

// To create a Depth Target :
var depthDesc = renderingData.cameraData.cameraTargetDescriptor;
depthDesc.depthBufferBits = 32; // should be default anyway
RenderingUtils.ReAllocateIfNeeded(ref depthTarget, depthDesc,
    name: settings.depthDestinationID);
There is also RTHandles.Alloc (various overloads, see docs). This should only run once, so can do a null check :
if (colorTarget == null) {
    colorTarget = RTHandles.Alloc(Vector2.one, colorDesc,
        name: settings.colorDestinationID);
}
There’s a lot of parameters for some of these methods, but they have default values so we don’t need to specify all of them. If you want to override/set a specific parameter, can use <param name>:<value>, such as filterMode:FilterMode.Bilinear, wrapMode:TextureWrapMode.Clamp, etc.
There are also Alloc overrides to create an RTHandle from a RenderTargetIdentifier, RenderTexture, or Texture object, so you can technically still use those types with the new system.
RTHandles also need to be released when they are no longer needed (by calling .Release(); on it). You may want to do this in a function called by the Dispose function of the feature. e.g.
public class CustomRendererFeature : ScriptableRendererFeature {
    class CustomRenderPass : ScriptableRenderPass {
        ...
        public void ReleaseTargets() {
            colorTarget?.Release();
            depthTarget?.Release();
        }
    }
    ...
    protected override void Dispose(bool disposing) {
        m_ScriptablePass.ReleaseTargets();
    }
}
If you aren’t familiar, the ? here is the null-propagation operator - which means if the object is null, the function won’t be called. This helps avoid potential NullPointerExceptions if the feature is disposed without the targets being set (e.g. feature is added to list but disabled).
In case it’s useful, the docs for RTHandle System Fundamentals and Using the RTHandle system may provide additional info.
ConfigureTarget
These take either one or two parameters, the first being the colour target (like the colours you see on the screen in Scene/Game view) and the second being an optional depth target (like the depth buffer, used for ZWrite & ZTest. Can also contain bits for Stencil values). These parameters need to be of the type RTHandle (or RenderTargetIdentifier but those functions are deprecated as of Unity 2022).
private RTHandle colorTarget, depthTarget;

public override void OnCameraSetup(CommandBuffer cmd, ref RenderingData renderingData) {
    var colorDesc = renderingData.cameraData.cameraTargetDescriptor;
    colorDesc.depthBufferBits = 0; // must set to 0 to specify a colour target
    // to use a different format, set .colorFormat or .graphicsFormat

    if (settings.colorDestinationID != ""){
        RenderingUtils.ReAllocateIfNeeded(ref colorTarget, colorDesc, name: settings.colorDestinationID);
        // if you need to specify texture filter and wrap modes :
        // RenderingUtils.ReAllocateIfNeeded(ref colorTarget, colorDesc, FilterMode.Point, TextureWrapMode.Clamp, name: settings.colorDestinationID);
    }else{
        colorTarget = renderingData.cameraData.renderer.cameraColorTargetHandle;
    }

    var depthDesc = renderingData.cameraData.cameraTargetDescriptor;
    depthDesc.depthBufferBits = 32; // should be default anyway
    if (settings.depthDestinationID != ""){
        RenderingUtils.ReAllocateIfNeeded(ref depthTarget, depthDesc, name: settings.depthDestinationID);
    }else{
        depthTarget = renderingData.cameraData.renderer.cameraDepthTargetHandle;
    }

    //ConfigureTarget(colorTarget);
    // Later rendering commands will render into colorTarget
    // No depth target, so ZWrite, ZTest and Stencil operations will not do anything

    // OR

    ConfigureTarget(colorTarget, depthTarget);
    // Later rendering commands will render into colorTarget
    // and ZWrite/ZTest/Stencil based on depthTarget

    ConfigureClear(ClearFlag.Color, Color.black);
    // Set all pixels in the target to black
}
The first param of ConfigureTarget can also be an array of colour targets, which sets up what is known as Multi-Target Rendering (MRT) assuming the target platform supports it. That allows you to render objects into multiple buffers at the same time by having the fragment shader use SV_Target0, SV_Target1, SV_Target2, etc in the fragment shader output (rather than just SV_Target). An example of this is Deferred Rendering, which sets up multiple “gbuffer” targets and configures them using this.
ConfigureClear
In the above example you might also notice ConfigureClear being used, which allows us to clear the render target.
By default, RTHandle targets are uninitalised and may contain data from the previous frame/camera. This behaviour isn’t typically wanted, so we can use this function to set the entire texture to a particular colour (e.g. black) before rendering that camera. It can also clear depth and stencil values - this is specified by the first parameter of type ClearFlag (enum with [Flags]). Stencil was added in 2021.2. In older versions that than, Depth cleared both.
The function can be used even without ConfigureTarget, which would apply the clear to the camera targets. Typically you wouldn’t clear the camera’s colour (URP kinda does this for us anyway with the Background Color / Skybox) but for some effects clearing the depth or stencil values at a specific event could probably be useful.
OnCameraCleanup
This method is called once for each camera (every frame) after rendering. You’d use this method to clean up some resources created during the other passes (that aren’t needed across multiple frames)! Some examples below.
If you used CommandBuffer.GetTemporaryRT somewhere, you’d typically use CommandBuffer.ReleaseTemporaryRT in this method.
With the change to RTHandles, you might think to release those in here too but I’ve found this causes glitchy rendering - especially in scene view. It’s better to instead release those in a method called by the feature’s Dispose method (see RTHandle section for an example). I have seen some examples set private RTHandle fields to null in this method, but I don’t think that is required. (It may be to avoid accidently rendering to targets if the feature is called without using it’s Setup function?)
If your feature relies on shader keywords, you might also enable those during Execute and disable them in OnCameraCleanup. This can either involve using CommandBuffer.EnableShaderKeyword and CommandBuffer.DisableShaderKeyword or the CoreUtils.SetKeyword function which provides a boolean which calls either of those for you. For example, the decal passes such as DecalScreenSpaceRenderPass do this.
DeferredLights (used by URP’s Deferred Rendering path) appears to dispose some NativeArrays in here.
Execute
The Execute function is where most of our custom rendering code goes. This is mostly handled through the ScriptableRenderContext and CommandBuffer APIs (or other functions that end up calling those APIs, like ScriptableRenderPass.Blit and the Blitter class which passes a CommandBuffer as a parameter).
We do not need to call ScriptableRenderContext.Submit as URP handles this for us.
To properly title things in the Profiler & Frame Debugger windows, the usual way to set up the Execute function is like this :
// (in Pass)
private ProfilingSampler m_ProfilingSampler;
...
// (constructor, method name should match class name)
public CustomRenderPass(string name) {
    m_ProfilingSampler = new ProfilingSampler(name);
}
...
public override void Execute(ScriptableRenderContext context, ref RenderingData renderingData) {
    CommandBuffer cmd = CommandBufferPool.Get();
    using (new ProfilingScope(cmd, m_ProfilingSampler)) {
        context.ExecuteCommandBuffer(cmd);
        cmd.Clear();
        /*
        Note : should always ExecuteCommandBuffer at least once before using
        ScriptableRenderContext functions (e.g. DrawRenderers) even if you
        don't queue any commands! This makes sure the frame debugger displays
        everything under the correct title.
        */

        // Do stuff!
        // Would recommend keeping all your rendering code in this using statement.
        ...
    }
    // Execute Command Buffer one last time and release it
    // (otherwise we get weird recursive list in Frame Debugger)
    context.ExecuteCommandBuffer(cmd);
    cmd.Clear();
    CommandBufferPool.Release(cmd);
}
What rendering commands you do in here depends on what the feature is meant to do. The next couple sections provide some common examples.
Before moving on, it’s important to understand :
- These rendering commands do not happen straight away - we are instead queueing up calls that URP will execute later.
- This means for example, you cannot edit properties in a material and then call rendering commands and change the properties again - It’ll just use the last values you set. You may need to create multiple material instances instead (i.e. like the example in the earlier Dispose section). You can however, set global values through
CommandBuffer.SetGlobalXfunctions (not throughShaderclass!)
- This means for example, you cannot edit properties in a material and then call rendering commands and change the properties again - It’ll just use the last values you set. You may need to create multiple material instances instead (i.e. like the example in the earlier Dispose section). You can however, set global values through
- After using command buffer functions. We must use
context.ExecuteCommandBuffer(cmd)to let the feature actually know about them. If something isn’t working, the first thing is to check that you’re actually executing it!- Be sure to also
cmd.Clear(), so you don’t end up calling those commands twice if you execute again later - Note if you want command buffer functions (or functions that use
cmdas a param!) to run before a ScriptableRenderContext function (e.g.context.DrawRenderers), you need toExecuteCommandBufferfirst. - Also related & commented in the above code too, always call
ExecuteCommandBufferat least once before using context functions (even if you haven’t enqueued any commands) and again outside the using ProfilingScope so Unity displays the pass correctly in the Frame Debugger.
- Be sure to also
DrawRenderers
In Unity 2022, ScriptableRenderContext.DrawRenderers allows us to draw renderers to the current render target (specified in OnCameraSetup by ConfigureTarget as previously discussed). (For newer versions click tab above)
// in pass
private Settings settings;
private FilteringSettings filteringSettings;
private List<ShaderTagId> shaderTagsList = new();
private ProfilingSampler _profilingSampler;

// (constructor)
public CustomRenderPass(Settings settings, string name) {
    this.settings = settings;
    _profilingSampler = new ProfilingSampler(name);
    filteringSettings = new FilteringSettings(RenderQueueRange.opaque, settings.layerMask);
        // for rendering transparents, use RenderQueueRange.transparent instead
    // URP's default shader tags
    shaderTagsList.Add(new ShaderTagId("SRPDefaultUnlit"));
    shaderTagsList.Add(new ShaderTagId("UniversalForward"));
    shaderTagsList.Add(new ShaderTagId("UniversalForwardOnly"));
}
...
public override void Execute(ScriptableRenderContext context, ref RenderingData renderingData) {
    CommandBuffer cmd = CommandBufferPool.Get();
    using (new ProfilingScope(cmd, m_ProfilingSampler)) {
        context.ExecuteCommandBuffer(cmd);
        cmd.Clear();

        // Draw Renderers to current Render Target (set in OnCameraSetup)
        SortingCriteria sortingCriteria = renderingData.cameraData.defaultOpaqueSortFlags;
            // for rendering transparents, use SortingCriteria.CommonTransparent instead
        DrawingSettings drawingSettings = CreateDrawingSettings(shaderTagsList, ref renderingData, sortingCriteria);
        if (settings.overrideMaterial != null) {
            drawingSettings.overrideMaterialPassIndex = settings.overrideMaterialPass;
            drawingSettings.overrideMaterial = settings.overrideMaterial;
        }
        context.DrawRenderers(renderingData.cullResults, ref drawingSettings, ref filteringSettings);
    }
    context.ExecuteCommandBuffer(cmd);
    cmd.Clear();
    CommandBufferPool.Release(cmd);
}
ScriptableRenderContext.DrawRenderers is obsolete in 2023 versions. For drawing objects to the current render target we now instead create a RendererList using ScriptableRenderContext.CreateRendererList and then draw it using DrawRendererList on the CommandBuffer.
There are two overloads for CreateRendererList, each with one struct parameter of type :
RendererListDesc- slightly simpler / conciseref RendererListParams- contains other structs likeFilteringSettingsandDrawingSettings(similar to the older DrawRenderers function)
RendererListDesc Example :
// in pass
private Settings settings;
private ShaderTagId[] shaderTags;
private ProfilingSampler _profilingSampler;

// (constructor)
public CustomRenderPass(Settings settings, string name) {
    this.settings = settings;
    _profilingSampler = new ProfilingSampler(name);
    // URP's default shader tags
    shaderTags = new ShaderTagId[] {
        new("SRPDefaultUnlit"),
        new("UniversalForward"),
        new("UniversalForwardOnly")
    };
}
...
public override void Execute(ScriptableRenderContext context, ref RenderingData renderingData) {
    CommandBuffer cmd = CommandBufferPool.Get();
    using (new ProfilingScope(cmd, m_ProfilingSampler)) {
        context.ExecuteCommandBuffer(cmd);
        cmd.Clear();

        // Draw Renderers to current Render Target (set in OnCameraSetup)
        RendererListDesc rendererListDesc = new(shaderTags, renderingData.cullResults, renderingData.cameraData.camera) {
            renderQueueRange = RenderQueueRange.opaque,
            sortingCriteria = renderingData.cameraData.defaultOpaqueSortFlags,
                // for rendering transparents, use RenderQueueRange.transparent & SortingCriteria.CommonTransparent instead
            rendererConfiguration = renderingData.perObjectData,
            layerMask = settings.layerMask
        };
        if (settings.overrideMaterial != null) {
            rendererListDesc.overrideMaterialPassIndex = settings.overrideMaterialPass;
            rendererListDesc.overrideMaterial = settings.overrideMaterial;
        }
        RendererList rendererList = context.CreateRendererList(rendererListDesc);
        cmd.DrawRendererList(rendererList);
    }
    context.ExecuteCommandBuffer(cmd);
    cmd.Clear();
    CommandBufferPool.Release(cmd);
}
RendererListParams Example :
If using a RendererListDesc you can also convert that to RendererListParams using it’s RendererListDesc.ConvertToParameters(ref rendererListDesc), though it may be easier building the params struct from scratch.
// in pass
private Settings settings;
private FilteringSettings filteringSettings;
private List<ShaderTagId> shaderTagsList = new();
private ProfilingSampler _profilingSampler;

// (constructor)
public CustomRenderPass(Settings settings, string name) {
    this.settings = settings;
    _profilingSampler = new ProfilingSampler(name);
    filteringSettings = new FilteringSettings(RenderQueueRange.opaque, settings.layerMask);
        // for rendering transparents, use RenderQueueRange.transparent instead
    // URP's default shader tags
    shaderTagsList.Add(new("SRPDefaultUnlit"));
    shaderTagsList.Add(new("UniversalForward"));
    shaderTagsList.Add(new("UniversalForwardOnly"));
}
...
public override void Execute(ScriptableRenderContext context, ref RenderingData renderingData) {
    CommandBuffer cmd = CommandBufferPool.Get();
    using (new ProfilingScope(cmd, m_ProfilingSampler)) {
        context.ExecuteCommandBuffer(cmd);
        cmd.Clear();

        // Draw Renderers to current Render Target (set in OnCameraSetup)
        SortingCriteria sortingCriteria = renderingData.cameraData.defaultOpaqueSortFlags;
            // for rendering transparents, use SortingCriteria.CommonTransparent instead
        DrawingSettings drawingSettings = CreateDrawingSettings(shaderTagsList, ref renderingData, sortingCriteria);
        if (settings.overrideMaterial != null) {
            drawingSettings.overrideMaterialPassIndex = settings.overrideMaterialPass;
            drawingSettings.overrideMaterial = settings.overrideMaterial;
        }
        RendererListParams rendererListParams = new(renderingData.cullResults, drawingSettings, filteringSettings);
        RendererList rendererList = context.CreateRendererList(ref rendererListParams);
        cmd.DrawRendererList(rendererList);
    }
    context.ExecuteCommandBuffer(cmd);
    cmd.Clear();
    CommandBufferPool.Release(cmd);
}
Like 2023 versions, Unity 6+ still uses RendererLists, however you create them though RenderGraph.CreateRendererList instead of through the ScriptableRenderContext object. To tell RenderGraph about the list, you need to use builder.UseRendererList, and to actually draw it, cmd.DrawRendererList inside the function assigned to the render pass.
There are two overloads for CreateRendererList, each with one struct parameter of type :
RendererListDesc- slightly simpler / conciseRendererListParams- contains other structs likeFilteringSettingsandDrawingSettings. (Note that compared to the 2023 version, this doesn’t use arefparameter)
If using a RendererListDesc you can also convert that to RendererListParams using it’s RendererListDesc.ConvertToParameters(ref rendererListDesc), though it may be easier building the params struct from scratch.
Here’s an example using RendererListParams, rendering to the active render targets :
// in pass
private Settings settings;
private List<ShaderTagId> shaderTagsList = new();

// (constructor)
public RenderPass(Settings settings) {
    this.settings = settings;
    // URP's default shader tags
    shaderTagsList.Add(new("SRPDefaultUnlit"));
    shaderTagsList.Add(new("UniversalForward"));
    shaderTagsList.Add(new("UniversalForwardOnly"));
}

// Data needed by ExecuteDrawPass
private class DrawPassData {
    internal RendererListHandle rendererListHandle;
}

// Execute draw commands
static void ExecuteDrawPass(DrawPassData data, RasterGraphContext context) {
    context.cmd.DrawRendererList(data.rendererListHandle);
}

private void InitRendererLists(ContextContainer frameData, ref DrawPassData passData, RenderGraph renderGraph) {
    // Access the relevant frame data from the Universal Render Pipeline
    UniversalRenderingData universalRenderingData = frameData.Get<UniversalRenderingData>();
    UniversalCameraData cameraData = frameData.Get<UniversalCameraData>();
    UniversalLightData lightData = frameData.Get<UniversalLightData>();

    SortingCriteria sortFlags = cameraData.defaultOpaqueSortFlags;
    RenderQueueRange renderQueueRange = RenderQueueRange.opaque;
    /* // or for transparents :
    sortFlags = SortingCriteria.CommonTransparent;
    renderQueueRange = RenderQueueRange.transparent;
    */
    FilteringSettings filterSettings = new FilteringSettings(renderQueueRange, settings.layerMask);
    DrawingSettings drawSettings = RenderingUtils.CreateDrawingSettings(shaderTagsList, universalRenderingData, cameraData, lightData, sortFlags);
    if (settings.overrideMaterial != null) {
        drawSettings.overrideMaterial = settings.overrideMaterial;
        drawSettings.overrideMaterialPassIndex = settings.overrideMaterialPassIndex;
    }

    var param = new RendererListParams(universalRenderingData.cullResults, drawSettings, filterSettings);
    passData.rendererListHandle = renderGraph.CreateRendererList(param);
}

public override void RecordRenderGraph(RenderGraph renderGraph, ContextContainer frameData) {
    UniversalCameraData cameraData = frameData.Get<UniversalCameraData>();
    UniversalResourceData resourceData = frameData.Get<UniversalResourceData>();

    // Draw Renderers
    using (var builder = renderGraph.AddRasterRenderPass<DrawPassData>("Custom DrawRendererList Pass", out var passData)) {
        // Init PassData
        InitRendererLists(frameData, ref passData, renderGraph);
        if (!passData.rendererListHandle.IsValid()) return;

        // Declare Inputs
        builder.UseRendererList(passData.rendererListHandle);

        // Set Render Target
        builder.SetRenderAttachment(resourceData.activeColorTexture, 0);
        builder.SetRenderAttachmentDepth(resourceData.activeDepthTexture);

        // Assign ExecutePass
        builder.SetRenderFunc((DrawPassData data, RasterGraphContext context) => ExecuteDrawPass(data, context));
    }
}
In the above, the DrawingSettings struct allows us to configure how the renderers will be drawn. It’s typically created using the CreateDrawingSettings method of the ScriptableRenderPass class (which calls a method of the same name in RenderingUtils), which initalises using the provided params.
The example uses URPs default Shader Tags, which correspond to the “LightMode” tag in shaders. But in some cases you may want to use different tags. If your scene uses custom shaders with an additional pass with a custom LightMode tag, you could use only that tag in the shaderTagsList to render it.
- For example, an additional “Distortion” pass in water shaders / particle shaders to act as heat distortion, etc. A feature would render the distortion noise/strengths to a custom target (using a red/green format), which could then be applied to the screen later after rendering objects, by using a blit. Unlike distortion that relies on the Opaque Texture, these could blend additively by specifying
Blend One Onein the shader pass.
After this, can set additional properties (see DrawingSettings)
Most notable :
- Like in the above example,
overrideMaterialallows you to override the material used to draw the renderers, replacing any existing shader properties. - In 2022.2+ there is also
overrideShader, which is similar to the concept of Replacement Shaders in the Built-in RP. Existing shader property values are retained. Note however that this does not support SRPBatcher and BatchRendererGroups so will be more expensive to draw.
Unity selects which renderers are in the camera’s view using cullResults - which is handled by URP, though you may be able to create your own via ScriptableRenderContext.Cull
- (Or for Unity 6+ :
CullContextData.Cull, example in samples)
To filter this further, we can use the FilteringSettings struct to specify a RenderQueueRange and LayerMask, and optionally a RenderingLayerMask. For creating this, see the FilteringSettings constructor. (If you don’t want to filter anything, can use FilteringSettings.defaultValue)
Blit
A blit is used to copy pixels from a “source” texture to a “destination” target. To do this, it draws a fullscreen quad (or triangle). It optionally allows you to specify a material if you want to use a custom shader, otherwise it’ll use a built-in one (specifically Hidden/Universal/CoreBlit).
There are a number of ways to handle blits. For Unity 2022+ versions we should now use the Blitter API, which mostly ends up as a CommandBuffer.DrawProcedural behind the scenes (or DrawMesh if device is using old shader models). Blitter has a lot of methods (and overrides), but most commonly used :
Blitter.BlitCameraTexture- Draws a fullscreen triangle (to the specified destination param). Note that a specific vertex shader is required for the triangle to actually fill the screen. Include and use the
Vertfunction in Blit.hlsl or use a Fullscreen Shader Graph (2022.2+) - Source param is passed into
_BlitTexturereference - Examples in next section, also : Blit Renderer Feature / 2022.1+ branch
- Draws a fullscreen triangle (to the specified destination param). Note that a specific vertex shader is required for the triangle to actually fill the screen. Include and use the
Blitter.BlitTexture- Same as above, but to the current render targets. Useful if you need depth/stencil buffer - example provided in next section.
Alternative blit methods
For older versions, these methods could be used :
CoreUtils.DrawFullScreen(usesCommandBuffer.DrawProcedural)- Can draw a fullscreen triangle with correct vertex shader (e.g.
Vertin Blit.hlsl) - Has various overloads, see the CoreUtils class. Uses the older
RenderTargetIdentifiertype for source/destinations, so should be avoided in 2022+
- Can draw a fullscreen triangle with correct vertex shader (e.g.
CommandBuffer.Blit- Draws a fullscreen quad
- Is probably more documented / used in older tutorials. But this does not work with XR (Single Pass Instanced at least), so should be avoided.
- Source param is passed into
_MainTexreference. - Example : Blit Renderer Feature / master branch
- Note, this example uses the
ScriptableRenderPass.Blitfunction, but that then callsCommandBuffer.Blitwhen usingRenderTargetIdentifierparams.
- Note, this example uses the
CommandBuffer.DrawMeshwithRenderingUtils.fullscreenMesh(quad)- Can work with XR. Likely the recommended method for versions prior to 2022.
- Would need to pass source into shader yourself. e.g. using
cmd.SetGlobalTexture(_SomeReference, source); - Requires a specific vertex shader (output vertex positions as-is, rather than using
TransformObjectToHClip), unless you also override the View/Projection matrices to identity, then switch back after. Otherwise will render in the scene, not fullscreen. - Example : Blit Renderer Feature / cmd-DrawMesh branch
Example 1 (Post Process / Apply Shader to Camera)
If the source/destination needs to be the same, like in the case of applying a shader effect to the camera buffer, we need to be a bit careful. Reading and Writing to the same texture/target can cause “unintended behaviour”, likely due to the parallel nature of rendering and limits to how textures are bound by the GPU/Graphics API.
To avoid using the same source/destination, we need to instead use two blits with an additional target texture in-between.
In older versions this would typically be a “Temporary” RenderTexture, but with the change to RTHandles we don’t really use those. Instead we can use RenderingUtils.ReAllocateIfNeeded to create a RTHandle that won’t be set up multiple times if the feature is used multiple times (or if other features use the same _TemporaryColorTexture reference)
// In pass :
private RTHandle rtTemp;
...
// OnCameraSetup
RenderingUtils.ReAllocateIfNeeded(ref rtTemp, desc, name: "_TemporaryColorTexture");
...
// Execute (inside using statement)
RTHandle rtCamera = renderer.cameraColorTargetHandle;
Blitter.BlitCameraTexture(cmd, rtCamera, rtTemp, settings.blitMaterial, settings.blitMaterialPassIndex);
Blitter.BlitCameraTexture(cmd, rtTemp, rtCamera, Vector2.one);
// or alternative if depth/stencil buffer is required :
/*
RTHandle rtCamera = renderer.cameraColorTargetHandle;
Blitter.BlitCameraTexture(cmd, rtCamera, rtTemp, Vector2.one);
CoreUtils.SetRenderTarget(cmd, rtCamera, renderer.cameraDepthTargetHandle);
Blitter.BlitTexture(cmd, rtTemp, new Vector4(1, 1, 0, 0), settings.blitMaterial, settings.blitMaterialPassIndex);
*/
...
// Should also clean-up our allocated RTHandle when the feature is disposed of, so :
public void ReleaseTargets() {
    temp?.Release();
}
// In feature :
protected override void Dispose(bool disposing) {
    blitPass.ReleaseTargets();
}
Of course some effects may require multiple passes/blits anyway, such as a two-pass blur. This would be the same as the above, but we’d specify the material in both with different pass indices :
Blitter.BlitCameraTexture(cmd, rtCamera, rtTemp, settings.blurMaterial, 0);
Blitter.BlitCameraTexture(cmd, rtTemp, rtCamera, settings.blurMaterial, 1);
To avoid using the same source/destination, in older versions we would typically need two blits with an additional target texture in-between. While this is still possible, in Unity 6+ the RenderGraph API actually allows us to swap the camera buffer - removing the need for an additional blit!
A custom target is still needed. RenderGraph uses TextureHandle for this, which can be created with renderGraph.CreateTexture or UniversalRenderer.CreateRenderGraphTexture in the RecordRenderGraph method using a RenderTextureDescriptor. (Technically compared to RTHandles, these methods don’t allocate the resource yet as that’s handled internally by RenderGraph)
Though, as commented in the BlitWithMaterial sample the optimization of being able to swap the camera buffer has some caveats :
- “You have to be careful when the color buffer is persistent across frames and between different cameras, such as in camera stacking. In those cases you need to make sure your texture is an RTHandle and that you properly manage the lifecycle of it”
So in those cases, probably have to use RenderingUtils.ReAllocateHandleIfNeeded & renderGraph.ImportTexture(rtHandle) to convert it to TextureHandle - though I haven’t tested.
Or don’t swap the buffer and use an additional blit pass (to copy destination back to resourceData.cameraColor)
TextureHandle also has implicit casts to other types so can still be used in the usual functions (like Blitter.BlitTexture), though there are other methods like renderGraph.AddBlitPass which handles the blit setup for you :
AddBlitPass
public override void RecordRenderGraph(RenderGraph renderGraph, ContextContainer frameData) {
    UniversalCameraData cameraData = frameData.Get<UniversalCameraData>();
    UniversalResourceData resourceData = frameData.Get<UniversalResourceData>();

    if (settings.blitMaterial != null) {
        // Create Destination Texture
        var desc = renderGraph.GetTextureDesc(resourceData.cameraColor);
        desc.name = "_CameraColorFullScreenPass";
        desc.clearBuffer = false;
        TextureHandle destination = renderGraph.CreateTexture(desc);

        // Blit
        RenderGraphUtils.BlitMaterialParameters blitParams;
        blitParams = new(resourceData.cameraColor, destination, settings.blitMaterial, settings.blitMaterialPassIndex);
        renderGraph.AddBlitPass(blitParams);

        // Swap Camera Buffer
        resourceData.cameraColor = destination;
    }
}
Custom Blit Pass
When using AddBlitPass, only the provided source/destination colour buffers are used. If additional input textures, or depth/stencil buffer is required, you need to handle the blit pass yourself. For example :
For example :
private class BlitPassData {
    internal TextureHandle source;
    internal Material material;
    internal int passIndex;
}

static void ExecuteBlitPass(BlitPassData data, RasterGraphContext context) {
    if (data.material == null) {
        Blitter.BlitTexture(context.cmd, data.source, new Vector4(1, 1, 0, 0), 0, false);
    } else {
        Blitter.BlitTexture(context.cmd, data.source, new Vector4(1, 1, 0, 0), data.material, data.passIndex);
    }
}

public override void RecordRenderGraph(RenderGraph renderGraph, ContextContainer frameData) {
    UniversalCameraData cameraData = frameData.Get<UniversalCameraData>();
    UniversalResourceData resourceData = frameData.Get<UniversalResourceData>();

    TextureHandle cameraTex = resourceData.cameraColor;
    if (!cameraTex.IsValid()) return;
    using (var builder = renderGraph.AddRasterRenderPass<BlitPassData>("Custom Draw Fullscreen Pass", out var passData)) {
        // Init PassData
        passData.material = settings.blitMaterial;
        passData.passIndex = settings.blitMaterialPassIndex;
        passData.source = cameraTex;

        // Declare Inputs
        builder.UseTexture(passData.source);
        // builder.UseGlobalTexture(globalTextureID); // e.g. set by Shader.PropertyToID("_Example") in constructor

        // Create Destination Texture
        var desc = renderGraph.GetTextureDesc(cameraTex);
        desc.name = "_CameraColorFullScreenPass";
        desc.clearBuffer = false;
        TextureHandle destination = renderGraph.CreateTexture(desc);

        // Set Render Targets
        builder.SetRenderAttachment(destination, 0);
        if (settings.bindDepthStencilBuffer) {
            builder.SetRenderAttachmentDepth(resourceData.activeDepthTexture);
        }

        // Assign ExecutePass
        builder.SetRenderFunc((BlitPassData data, RasterGraphContext context) => ExecuteBlitPass(data, context));

        // Swap Camera Buffer
        resourceData.cameraColor = destination;
    }
}
Example 2 (Copy Color to Custom Buffer)
A blit could also be used to copy the camera colour buffer to a custom target.
This would be similar to what the Opaque Texture does (used by Scene Color node), but that always occurs AfterRenderingSkybox so won’t contain transparent objects. With a custom blit feature, we could copy the screen during different events, such as AfterRenderingTransparents. That way, the texture contains anything rendered in the normal transparent queue.
In this case you likely wouldn’t specify a material, and since the targets are different only a single call is needed :
Blitter.BlitCameraTexture(cmd, rtCamera, rtCustom, Vector2.one);

// Pass as global shader texture
CommandBuffer.SetGlobalTexture("_SomeReference", rtCustom);
// In Shader Graphs could obtain this using Texture2D property,
// set same Reference, untick Exposed.
// In code, define `TEXTURE2D(_SomeReference);` only in the HLSL portion
private int globalTextureID = Shader.PropertyToID("_CameraCopyTexture");
class PassData {}
public override void RecordRenderGraph(RenderGraph renderGraph, ContextContainer frameData) {
UniversalCameraData cameraData = frameData.Get<UniversalCameraData>();
UniversalResourceData resourceData = frameData.Get<UniversalResourceData>();
// Create Destination Texture
var desc = renderGraph.GetTextureDesc(resourceData.cameraColor);
desc.name = "_CameraCopyTexture";
desc.clearBuffer = false;
TextureHandle cameraCopyTexture = renderGraph.CreateTexture(desc);
// Blit
renderGraph.AddBlitPass(resourceData.cameraColor, cameraCopyTexture, Vector2.one, Vector2.zero, passName: "Copy Color");
// Alternatively, using AddCopyPass
// Can be more performant, but requires source/destination to be the same size in pixels and same number of MSAA samples and array slices
if (RenderGraphUtils.CanAddCopyPassMSAA()){
renderGraph.AddCopyPass(resourceData.cameraColor, cameraCopyTexture, passName: "Copy Color");
} else {
// cannot copy due to MSAA, I guess just fallback to blit
renderGraph.AddBlitPass(resourceData.cameraColor, cameraCopyTexture, Vector2.one, Vector2.zero, passName: "Copy Color");
}
// Use texture in another pass, or set as global texture. e.g.
using (var builder = renderGraph.AddRasterRenderPass<PassData>("Set Global Texture", out var passData)){
// Set a texture to the global texture
builder.SetGlobalTextureAfterPass(cameraCopyTexture, globalTextureID);
builder.AllowPassCulling(false);
// this is to prevent RenderGraph from removing this RasterRenderPass
// If another pass uses builder.UseGlobalTexture(globalTextureID) this might not be required
builder.SetRenderFunc((PassData data, RasterGraphContext context) => { });
}
}As shown we can pass our custom target (containing the camera copy) as a global texture. To obtain and sample this in shaders used by objects in the scene :
- For Shader Graphs, use a Texture2D property in Blackboard. Set the same Reference and untick Exposed / set as Global scope.
- In code, define
TEXTURE2D(_SomeReference);only in the HLSL portion
Note that to prevent graphical artifacts (or to even work in Unity6+ as I believe RenderGraph unbinds global textures at the end of the frame), it is important that any objects/shaders that sample the texture are rendered in a later event! Can force this by putting the object on a layer removed from the Default Opaque/Transparent Layer Mask at the top of the UniversalRenderer asset, and instead render that layer with a DrawRenderers/DrawRendererList call, or use the RenderObjects feature.
Full Renderer Feature Example (Unity 2022)
Here’s a full code example based on snippets mentioned in this post. It involves rendering objects to a custom texture, then a fullscreen pass on the camera which also uses that texture. (The usage foldout below also provides example shaders that the materials could use)
Feature Example Code
using System.Collections.Generic;
using UnityEngine;
using UnityEngine.Rendering;
using UnityEngine.Rendering.Universal;

public class CustomRendererFeature : ScriptableRendererFeature {

    public class CustomRenderPass : ScriptableRenderPass {

        private Settings settings;
        private FilteringSettings filteringSettings;
        private ProfilingSampler _profilingSampler;
        private List<ShaderTagId> shaderTagsList = new List<ShaderTagId>();
        private RTHandle rtCustomColor, rtTempColor;

        public CustomRenderPass(Settings settings, string name) {
            this.settings = settings;
            filteringSettings = new FilteringSettings(RenderQueueRange.opaque, settings.layerMask);

            // Use default tags
            shaderTagsList.Add(new ShaderTagId("SRPDefaultUnlit"));
            shaderTagsList.Add(new ShaderTagId("UniversalForward"));
            shaderTagsList.Add(new ShaderTagId("UniversalForwardOnly"));

            _profilingSampler = new ProfilingSampler(name);
        }

        public override void OnCameraSetup(CommandBuffer cmd, ref RenderingData renderingData) {
            var colorDesc = renderingData.cameraData.cameraTargetDescriptor;
            colorDesc.depthBufferBits = 0;

            // Set up temporary color buffer (for blit)
            RenderingUtils.ReAllocateIfNeeded(ref rtTempColor, colorDesc, name: "_TemporaryColorTexture");

            // Set up custom color target buffer (to render objects into)
            if (settings.colorTargetDestinationID != ""){
                RenderingUtils.ReAllocateIfNeeded(ref rtCustomColor, colorDesc, name: settings.colorTargetDestinationID);
            }else{
                // colorDestinationID is blank, use camera target instead
                rtCustomColor = renderingData.cameraData.renderer.cameraColorTargetHandle;
            }

            // Using camera's depth target (that way we can ZTest with scene objects still)
            RTHandle rtCameraDepth = renderingData.cameraData.renderer.cameraDepthTargetHandle;

            ConfigureTarget(rtCustomColor, rtCameraDepth);
            ConfigureClear(ClearFlag.Color, new Color(0,0,0,0));
        }

        public override void Execute(ScriptableRenderContext context, ref RenderingData renderingData) {
            CommandBuffer cmd = CommandBufferPool.Get();
            // Set up profiling scope for Profiler & Frame Debugger
            using (new ProfilingScope(cmd, _profilingSampler)) {
                // Command buffer shouldn't contain anything, but apparently need to
                // execute so DrawRenderers call is put under profiling scope title correctly
                context.ExecuteCommandBuffer(cmd);
                cmd.Clear();

                // Draw Renderers to Render Target (set up in OnCameraSetup)
                SortingCriteria sortingCriteria = renderingData.cameraData.defaultOpaqueSortFlags;
                DrawingSettings drawingSettings = CreateDrawingSettings(shaderTagsList, ref renderingData, sortingCriteria);
                if (settings.overrideMaterial != null) {
                    drawingSettings.overrideMaterialPassIndex = settings.overrideMaterialPass;
                    drawingSettings.overrideMaterial = settings.overrideMaterial;
                }
                context.DrawRenderers(renderingData.cullResults, ref drawingSettings, ref filteringSettings);

                // Pass our custom target to shaders as a Global Texture reference
                // In a Shader Graph, you'd obtain this as a Texture2D property with "Exposed" unticked
                if (settings.colorTargetDestinationID != "")
                    cmd.SetGlobalTexture(settings.colorTargetDestinationID, rtCustomColor);

                // Apply material (e.g. Fullscreen Graph) to camera
                if (settings.blitMaterial != null) {
                    RTHandle camTarget = renderingData.cameraData.renderer.cameraColorTargetHandle;
                    if (camTarget != null && rtTempColor != null) {
                        Blitter.BlitCameraTexture(cmd, camTarget, rtTempColor, settings.blitMaterial, 0);
                        Blitter.BlitCameraTexture(cmd, rtTempColor, camTarget);
                    }
                }
            }
            // Execute Command Buffer one last time and release it
            // (otherwise we get weird recursive list in Frame Debugger)
            context.ExecuteCommandBuffer(cmd);
            cmd.Clear();
            CommandBufferPool.Release(cmd);
        }

        public override void OnCameraCleanup(CommandBuffer cmd) {}

        // Cleanup Called by feature below
        public void Dispose() {
            if (settings.colorTargetDestinationID != "")
                rtCustomColor?.Release();
            rtTempColor?.Release();
        }
    }

    // Exposed Settings

    [System.Serializable]
    public class Settings {
        public bool showInSceneView = true;
        public RenderPassEvent _event = RenderPassEvent.AfterRenderingOpaques;

        [Header("Draw Renderers Settings")]
        public LayerMask layerMask = 1;
        public Material overrideMaterial;
        public int overrideMaterialPass;
        public string colorTargetDestinationID = "";

        [Header("Blit Settings")]
        public Material blitMaterial;
    }

    public Settings settings = new Settings();

    // Feature Methods

    private CustomRenderPass m_ScriptablePass;

    public override void Create() {
        m_ScriptablePass = new CustomRenderPass(settings, name);
        m_ScriptablePass.renderPassEvent = settings._event;
    }

    public override void AddRenderPasses(ScriptableRenderer renderer, ref RenderingData renderingData) {
        CameraType cameraType = renderingData.cameraData.cameraType;
        if (cameraType == CameraType.Preview) return; // Ignore feature for editor/inspector previews & asset thumbnails
        if (!settings.showInSceneView && cameraType == CameraType.SceneView) return;
        renderer.EnqueuePass(m_ScriptablePass);
    }

    protected override void Dispose(bool disposing) {
        m_ScriptablePass.Dispose();
    }
}
Usage
The feature can be used to render objects with a given material, into a custom buffer (specified by Color Target Destination ID setting). This texture reference can be sampled as a global/unexposed Texture2D in a blit/fullscreen material.
For example, feature could be used with materials using the following graphs (click images to view full screen) :
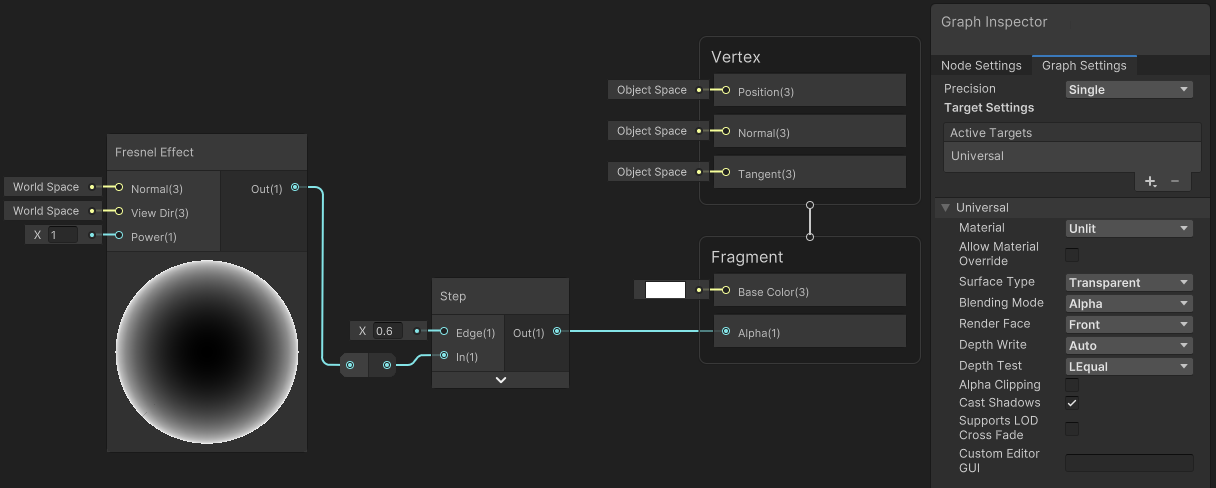
Override Material (Unlit Graph)
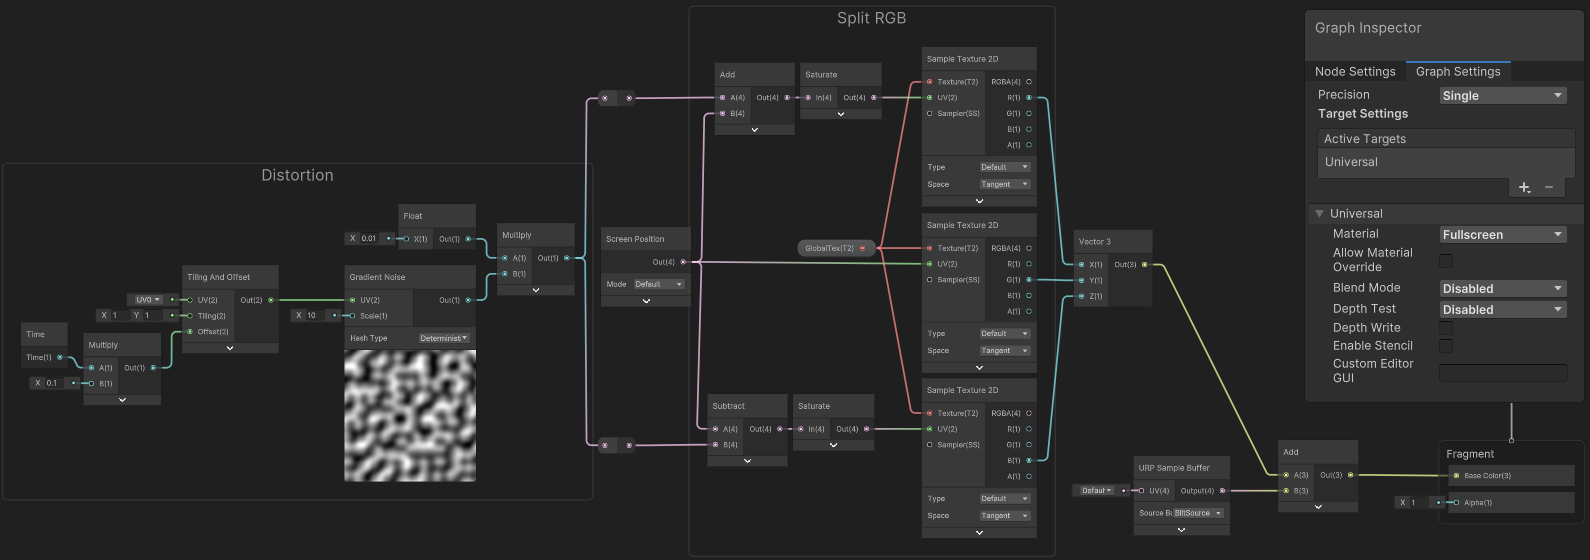
Blit Material (Fullscreen Graph)
Resulting in :
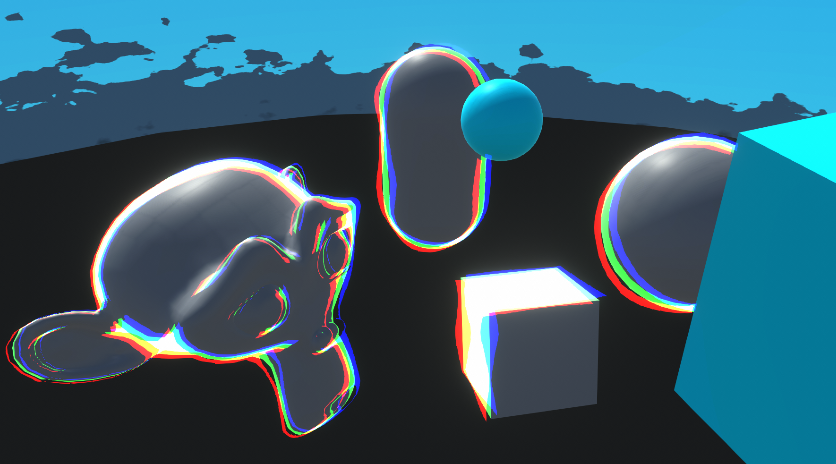
Cyan objects are on separate Layer, not used by feature’s LayerMask setting. Note the cube doesn’t look great since we used a Fresnel Effect. Alternative outline methods may work better.
Another similar example is this Horizon Zero Dawn inspired highlight/glitch effect I made a while ago.
Setting values on features at Runtime
For some effects, you may want to set public or serialised fields/properties on a feature, from a C# Script at runtime.
If this is only for a specific instance of a feature on a single Renderer asset, you should be able to do this quite easily by exposing a public field in your MonoBehaviour. e.g.
using UnityEngine;
using UnityEngine.Rendering;
using UnityEngine.Rendering.Universal;

public class SomeScript : MonoBehaviour {

    public CustomRendererFeature feature;
    // This feature uses the same "Settings class" example as shown in other sections
    // If you set public fields on the feature directly, that won't update the pass (unless you call Dispose and Create)

    // Call this method to set Override Material used by feature
    void SetMaterial(Material material, int passIndex){
        feature.settings.overrideMaterial = material;
        feature.settings.overrideMaterialPass = passIndex;
    }

}
If you need to do this for multiple instances of a feature (i.e. if the feature exists on multiple URP Assets per quality setting), you can use an array of those features instead (so HighlightRendererFeature[] in this example) and loop over it. Another method could be to create a single ScriptableObject to hold the Settings data, which the feature/pass and our SomeScript would each have a reference to.
You could also try to get the Renderer Asset and loop through the features. But those aren’t public, so might require Reflection, not ideal.
Connecting a feature to a URP Volume
It is also possible to create a custom VolumeComponent to expose fields/properties which can communicate with a custom pass/feature. I won’t be including an example here as Febucci already has good tutorial of this (though note the code for the pass uses RenderTargetIdentifier and should be converted to RTHandles in 2022+)
Unity 6 also has a new script template for this, under Create → Rendering → URP Post-processing Effect (Renderer Feature with Volume)
RenderPipelineManager
While not necessarily the scope of this post, we can also inject code before or after rendering each frame/camera using the events in the RenderPipelineManager class.
I wanted to mention this as it is possible to enqueue Scriptable Render Passes to the renderer here if you don’t want to have to create/assign the Renderer Feature. This is also useful for older versions of URP where the 2D Renderer did not support features.
Here’s an example of this. Note that it still uses the Settings and CustomRenderPass classes nested inside a CustomRendererFeature, but they could also be separate - the feature isn’t used! The feature used here is the same as the Renderer Feature Example (2022) from earlier.
using UnityEngine;
using UnityEngine.Rendering;
using UnityEngine.Rendering.Universal;

public class SomeScript : MonoBehaviour {

    public CustomRendererFeature.Settings settings;
    private CustomRendererFeature.CustomRenderPass m_ScriptablePass;
    // or just CustomRenderPass if not nested
    // if nested, make sure CustomRenderPass is marked as public

    private void OnEnable(){
        // Setup same way as in CustomRendererFeature.Create
        m_ScriptablePass = new CustomRendererFeature.CustomRenderPass(settings, "Example");
        m_ScriptablePass.renderPassEvent = settings.renderPassEvent;

        // Register method
        RenderPipelineManager.beginCameraRendering += BeginCameraRendering;
    }

    private void OnDisable(){
        // same as CustomRendererFeature.Dispose
        m_ScriptablePass.ReleaseTargets();
        m_ScriptablePass = null;

        // Unregister method
        RenderPipelineManager.beginCameraRendering -= BeginCameraRendering;
    }

    // if fields are changed in editor, update pass by disposing & recreate
    private void OnValidate(){
        if (m_ScriptablePass != null) {
            OnDisable();
            OnEnable();
        }
    }

    private void BeginCameraRendering(ScriptableRenderContext context, Camera camera) {
        // Similar to CustomRendererFeature.AddRenderPasses
        CameraType cameraType = camera.cameraType;
        if (cameraType == CameraType.Preview) return; // Ignore feature for editor/inspector previews & asset thumbnails
        if (!settings.showInSceneView && cameraType == CameraType.SceneView) return;

        ScriptableRenderer renderer = camera.GetUniversalAdditionalCameraData().scriptableRenderer;
        renderer.EnqueuePass(m_ScriptablePass);
    }
}
Note that while the pass is enqueued at the beginning of the camera render, the blit will still occur later as set by the RenderPassEvent.
The script here would still need to be put onto an GameObject in the scene - but that could be considered easier than adding a Renderer Feature? 🤷
Thanks for reading! 😊
If you find this post helpful, please consider sharing it with others / on socials
Donations are also greatly appreciated! 🙏✨
(Keeps this site free from ads and allows me to focus more on tutorials)